• Home
  • Shop
  • Stitch Showcase
  • Embroidery tips
  • Freebies
  • About
  • Contact
Menu

Embellished Elephant

  • Home
  • Shop
  • Stitch Showcase
  • Embroidery tips
  • Freebies
  • About
  • Contact
An image of blue fabric with silver stitches and beaded embellishments. Overlaid is a blue square with white text saying - stitch showcase, six-pointed star stitch, www.embellishedelephant.co.uk

Stitch Showcase: Six-pointed star stitch

November 1, 2024

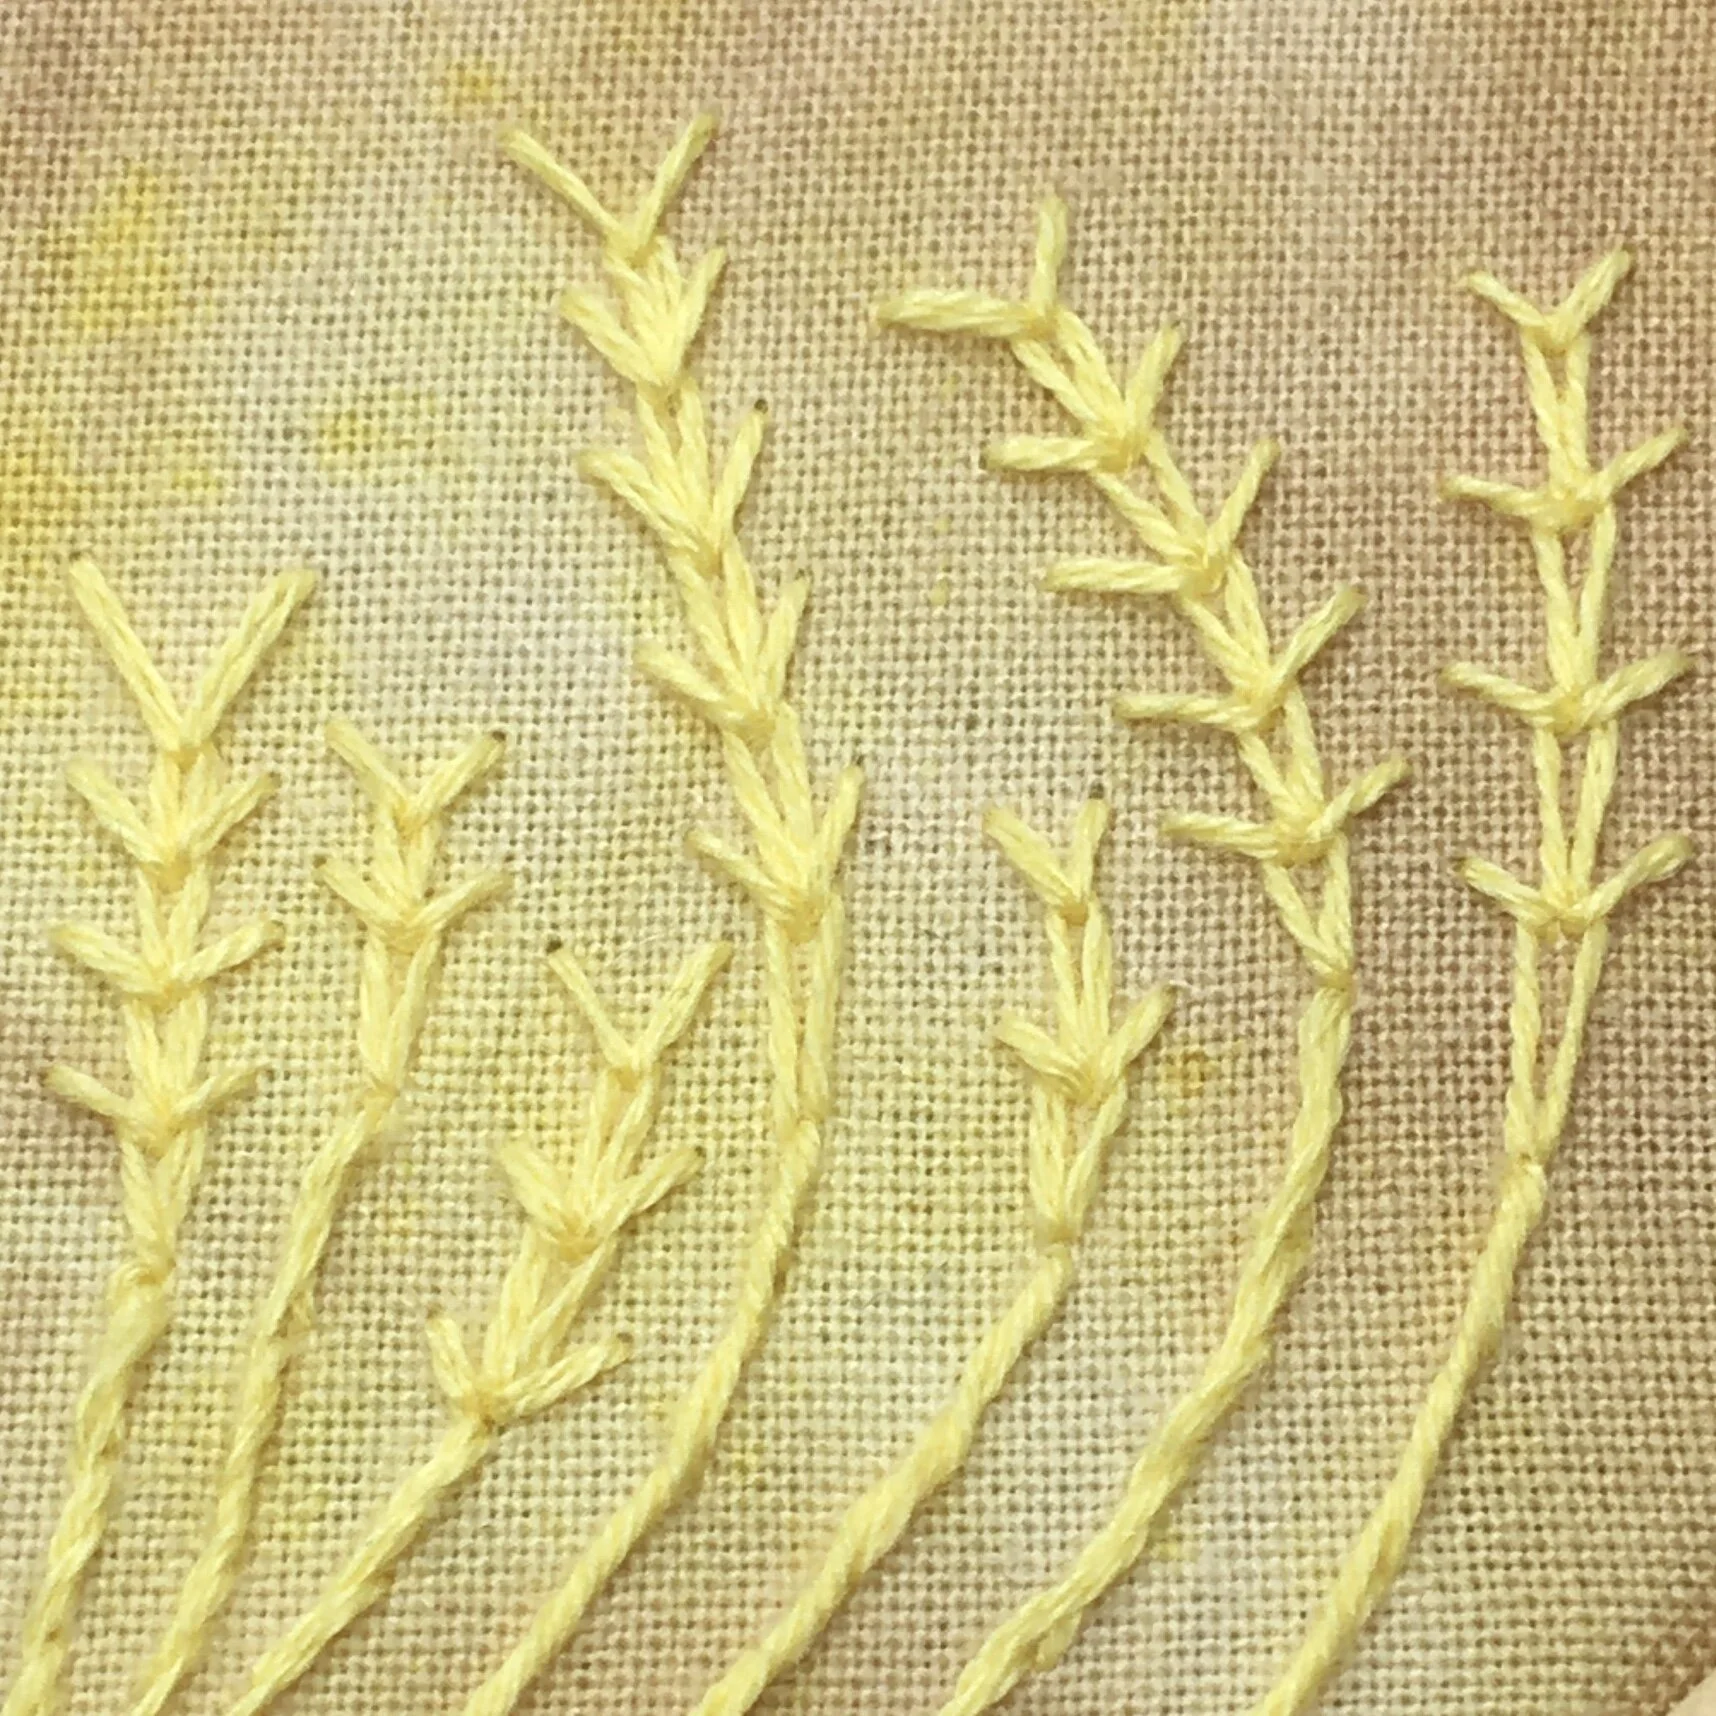
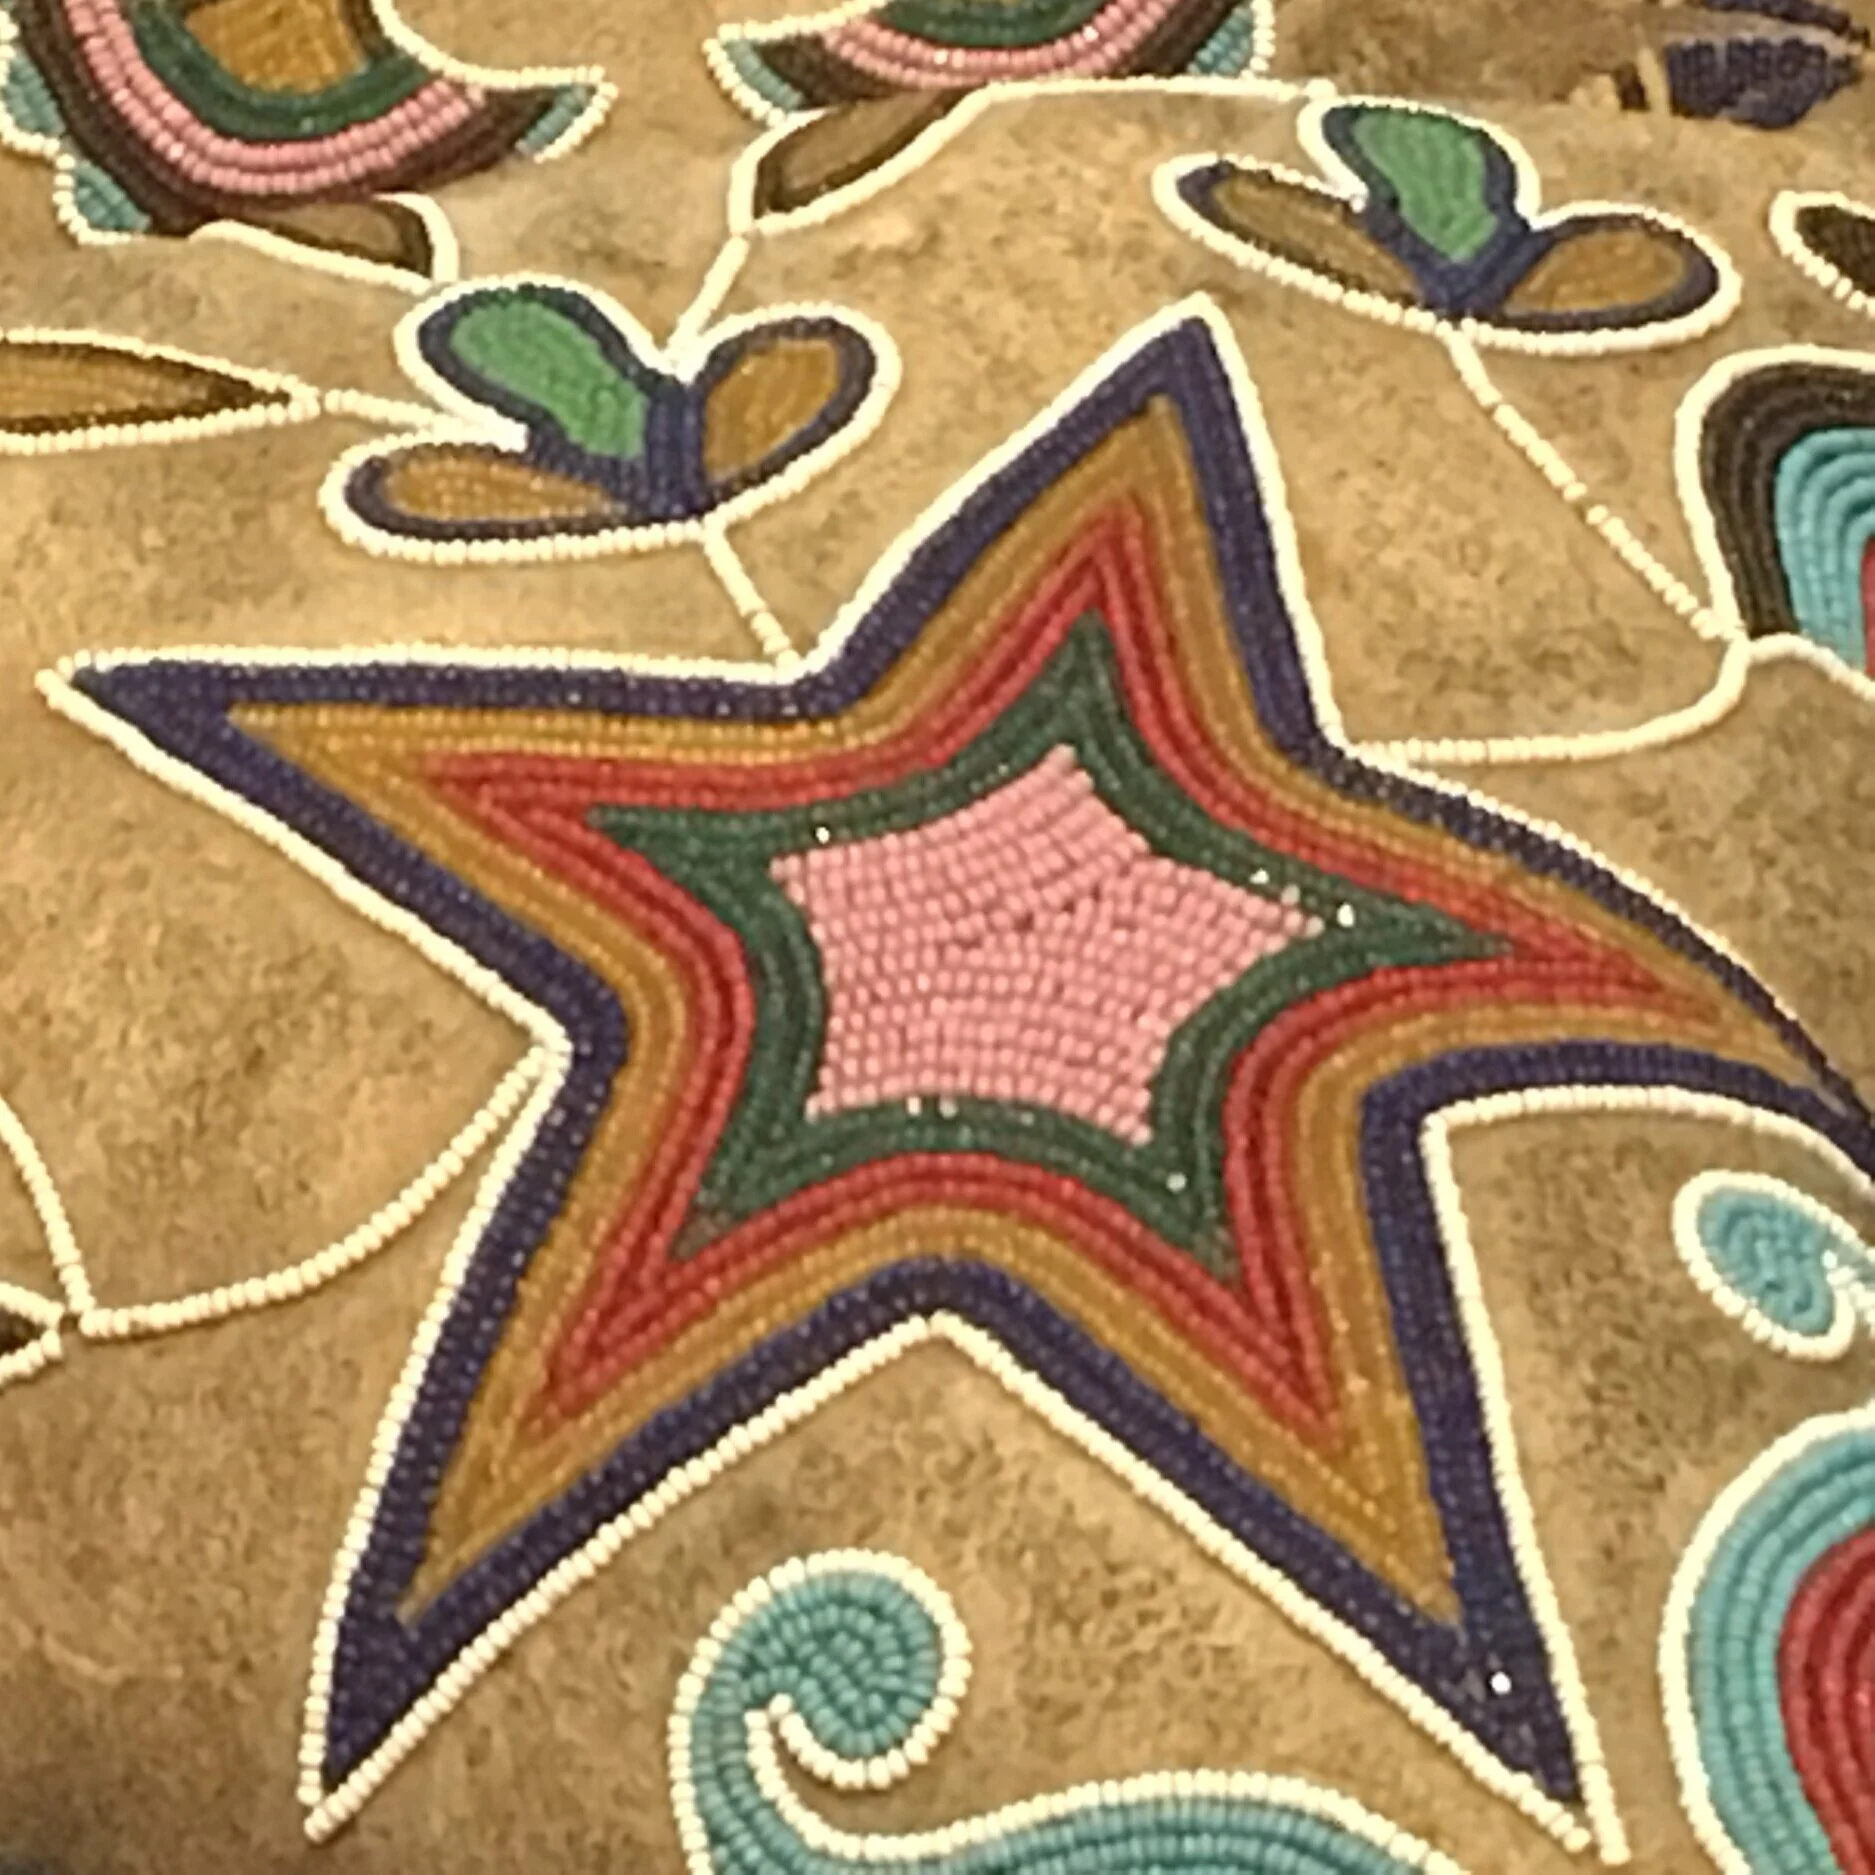
The six-pointed star stitch (also known as Dutch cross stitch) is a basic cross stitch with an extra horizontal stitch.

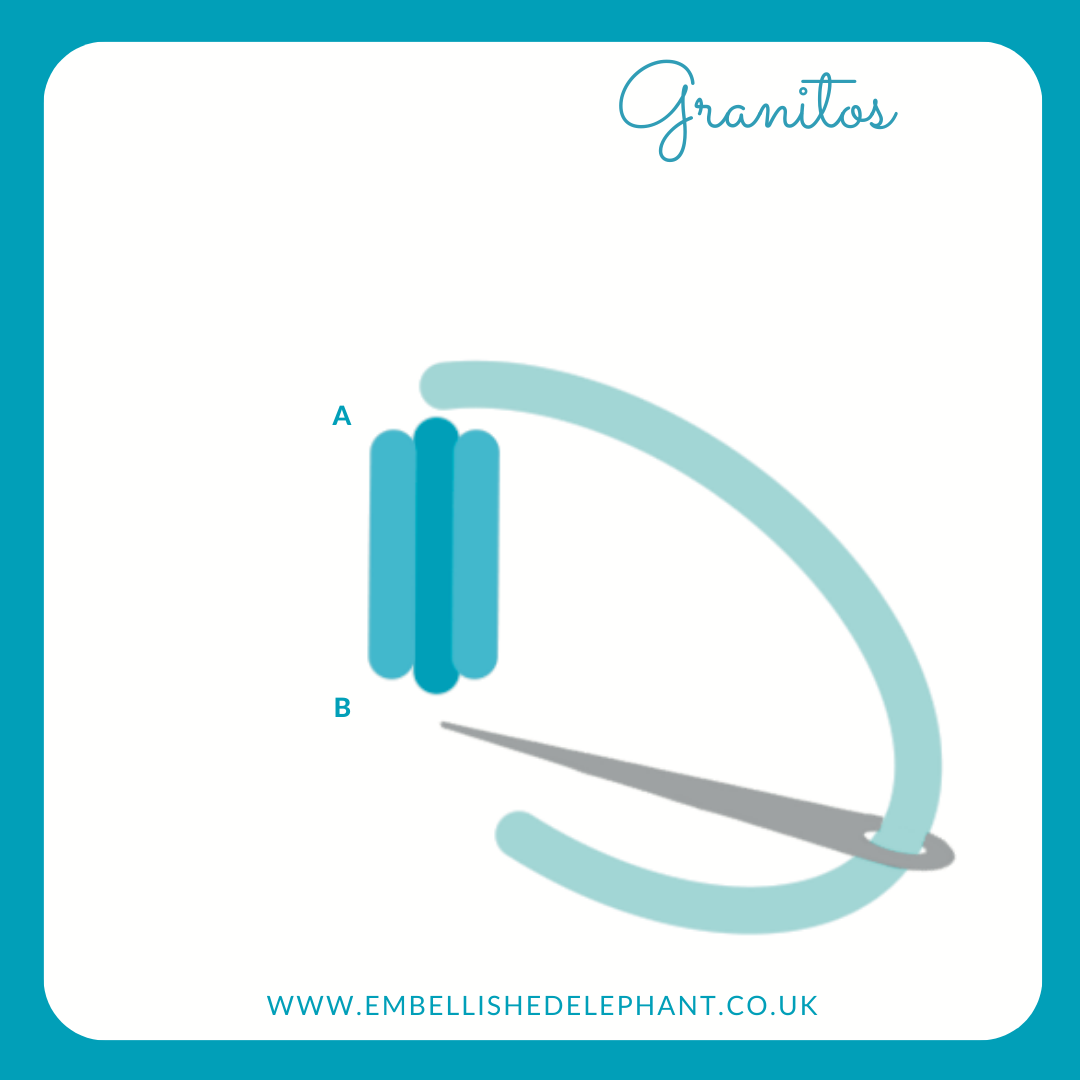
  • Make a straight stitch in any direction.

  • Imagine you are cutting a pie into 6 parts.

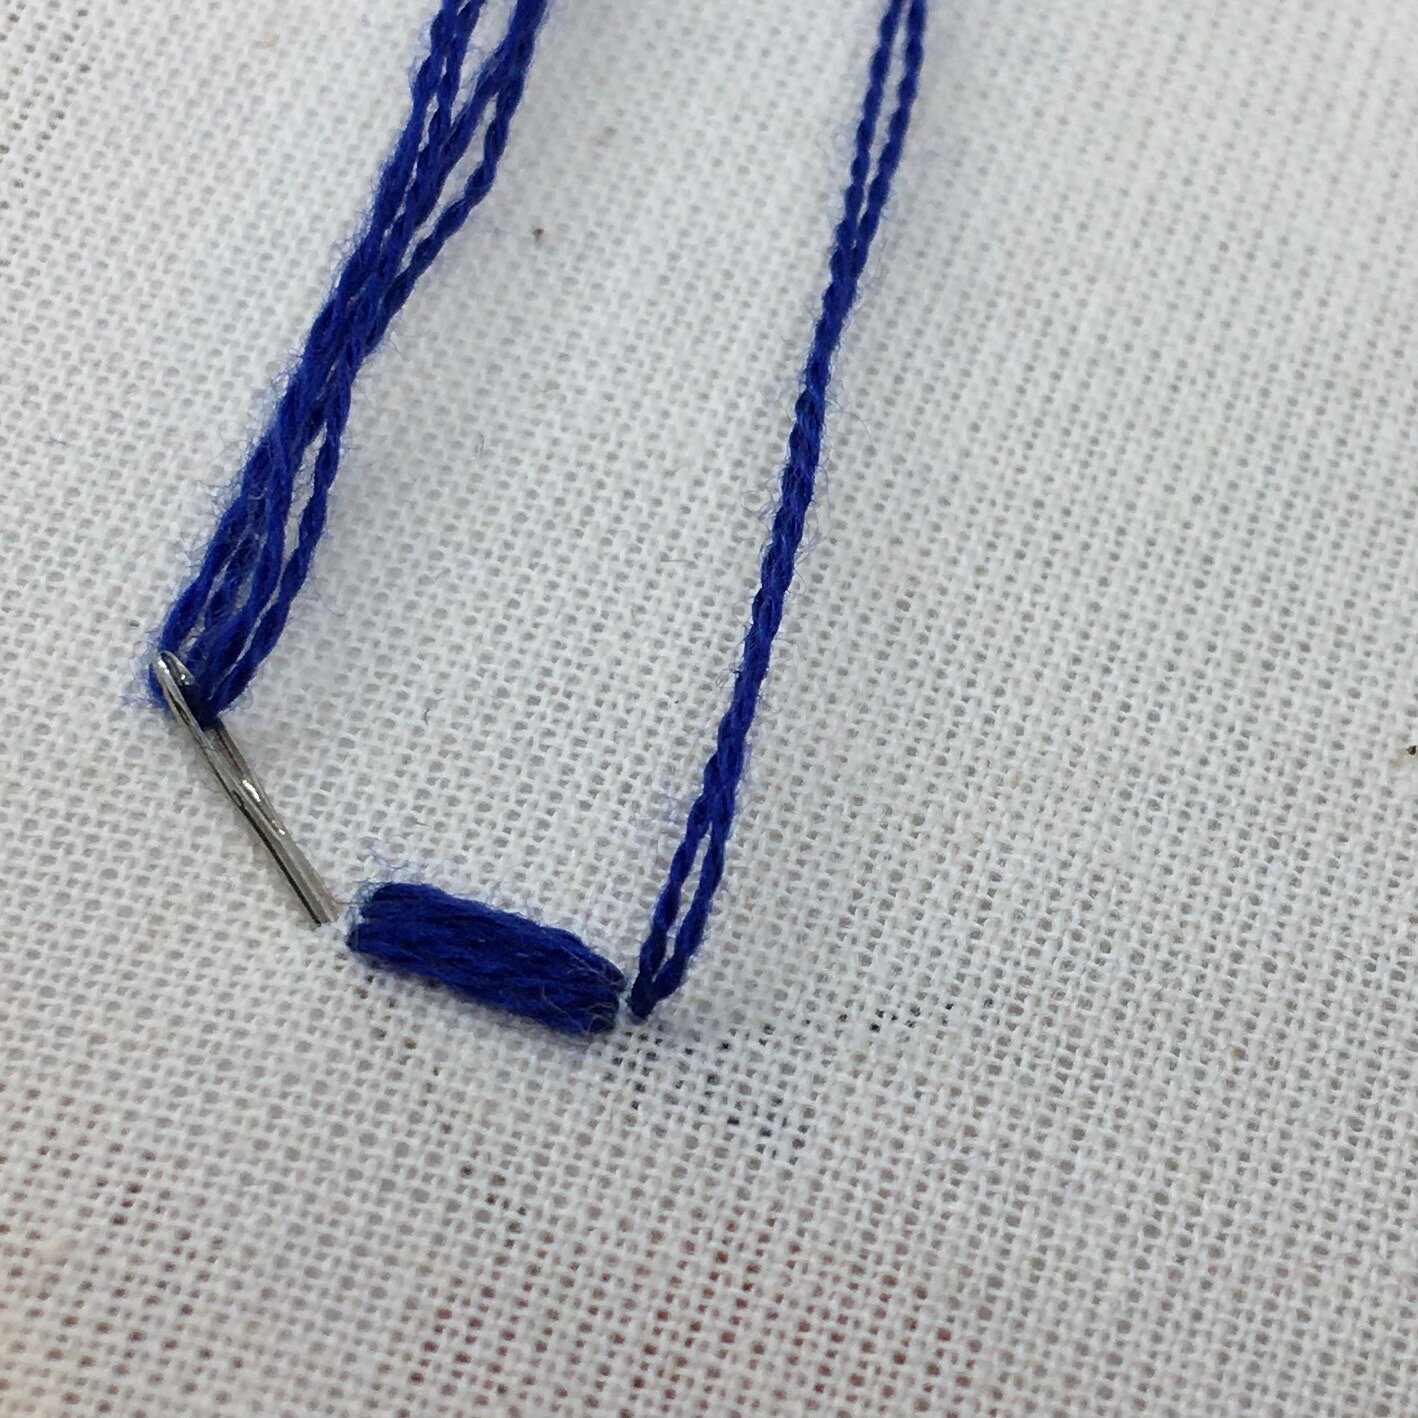
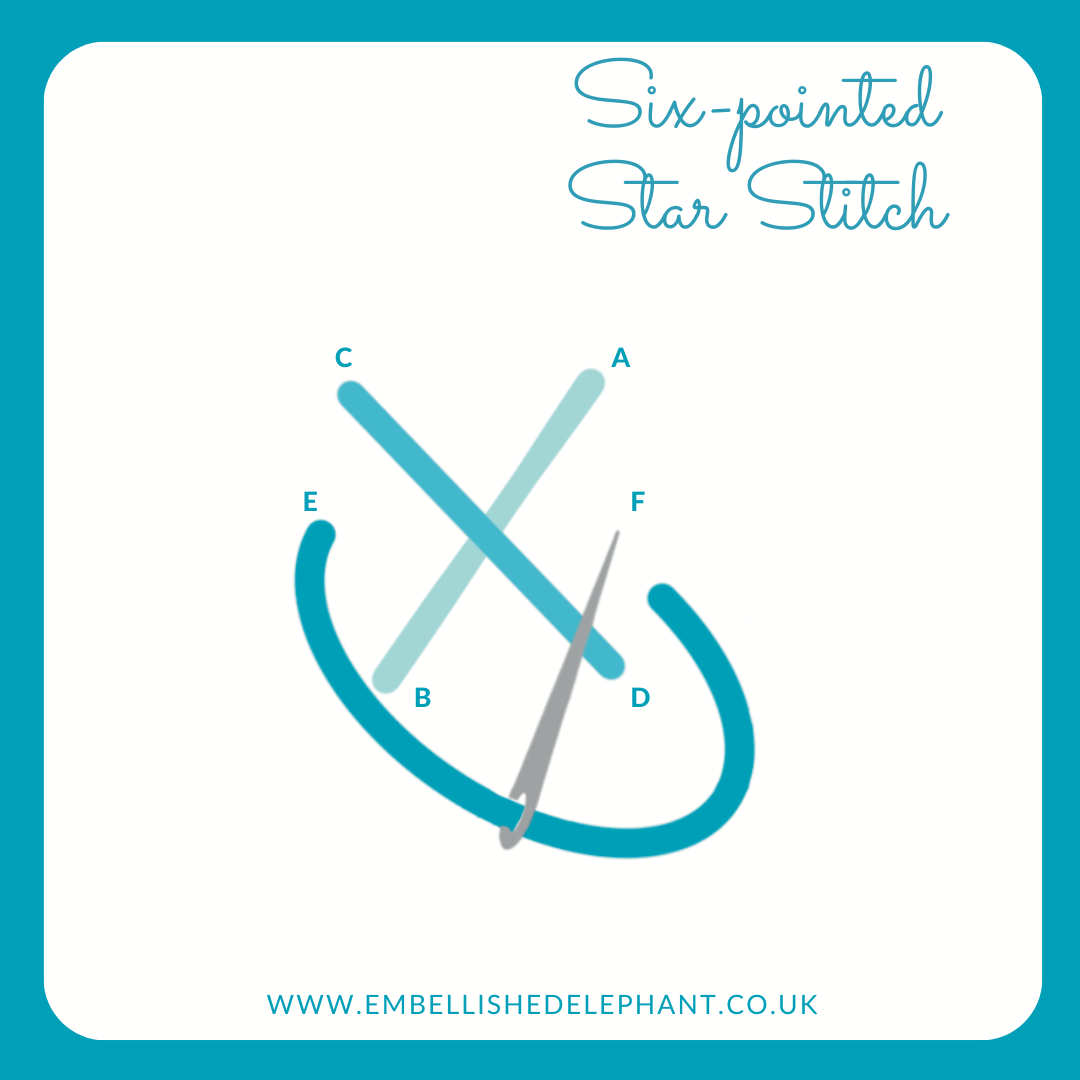
  • About one sixth of the way around from the top of the first stitch, bring the needle up through the fabric.

  • Take the needle back down diagonally opposite this point. This will create a slim X shape.

  • To finish the stitch, create another stitch diagonally over the previous one.

  • The length of the stitches used for each layer of the star can be the same or longer or shorter stitches can be used.

an illustration of how to create an embroidery stitch
In stitch showcase 2 Tags Stitch Showcase, Line Stitch
Comment

Stitch Showcase: Whipped Wheel Stitch

September 27, 2023

This is a little more complex than the woven wheel stitch as in each round the thread is wrapped around the base stitches. Try experimenting with a half wheel shape to create a fan like effect. Most commonly this is stitched with the woven lines pushed together to create a fully filled shape, but it can also be stitched in an open approach to create a spiders web.

  • Start by laying down the base stitches, there can be an odd or even number of base stitches

  • Bring the thread up at the centre of the wheel

  • Pass the thread under the nearest base stitch and then over and under the base stitch to create a whole wrap around

  • Repeat with each base stitch and keep on going round and round until the base stitches are completely covered

  • At the end, or if the thread runs out and needs to be changed, take the thread down through the fabric after completing one wrap. It should be slightly under one of the base threads and, if needed start a new thread from the same place.

In stitch showcase 2 Tags Stitch Showcase, Isolated Stitch
Comment
A photo of burden stitch in light brown thread stitched on an orange felt background. Overlayed is a blue square graphic with the text stitch showcase burden stitch

Stitch Showcase: Burden Stitch

March 9, 2022

With my houseplant collection of craft kits, I’m always on the look out for stitches that would look good as pot or basket decorations. When I came across this stitch, I knew I wanted to try it out.

  • Lay down parallel rows of horizontal stitches (A to B)

  • Start at the bottom corner, add a stitch at right angles ending just below the next horizontal stitch (C to D)

  • Keep adding vertical stitches, evenly spaced, with enough gap between each to fit a stitch on the next row

  • For the next and subsequent rows, place the vertical stitches between those of the previous row.

An illustration of an embroidery stitch labelled as Burden Stitch. There are three lines of parallel horizontal stitches. At right angles shorter vertical stitching are overlayed over the long horizontal stitches.

Want to have a go at this stitch? Keep an eye out for the palm house plant kit that it heading into my shop very soon. Alternatively, you could use this stitch instead of any of those I recommend in the guidance for any of my houseplant kits. You can find the full range of houseplant kits here.

Enjoyed this blog post? I share embroidery tips and a free embroidery pattern in my monthly newsletter. Sign up here to receive the newsletter on the 1st of each the month.

In stitch showcase 2, 100days Tags Stitch Showcase, Couching Stitch
Comment
A close up of green embroidery thread on calico fabric. The thread is stitched in fan stitch to create palm leaves. Overlaid is a blue square with the text Hand Embroidery - Fan/Ray stitch

Stitch Showcase: Fan Stitch

February 23, 2022

Fan stitch is also commonly called ray stitch, I prefer the name fan as I thing it really describes what it looks like. To me this stitch conjures up images in my mind of large palm leaves and this stitch can be used to represent leaves.

  • Create the base of the fan by stitching one long straight stitch. It is generally about half the length of the fan centre line

  • Now create the central fan line. It should be in a straight line with the base stitch

  • Either draw on guide lines or imagine the shape of a diamond

  • Bring the needle through the fabric a few mm down from the top of the centre line and a few mm away from the centre line. Complete this stitch at the point at which the base and centre lines meet.

  • Repeat on the other side of the centre line, making a mirror image stitch.

  • Repeat for a further two pairs of lines so there are 7 lines in total coming from the base stitch (the centre line and 3 pairs of stitches)

An illustration of how to create the embroidery stitch fan stitch. The illustration is in shades of blue and grey on a white background.

Want to have a go at this stitch? Sign up to my newsletter to hear when the palm houseplant kit that uses a variation of this stitch will be launched.

In stitch showcase 2, 100days Tags Stitch Showcase, Isolated Stitch
Comment
an image of four waves of scroll stitch using blue thread on a calico background. Overlaid is a blue square with text that says - hand embroidery, scroll stitch, www.embellishedelephant.co.uk

Whatever it is, the way you tell your story online can make all the difference.

Stitch Showcase: Scroll stitch

January 26, 2022

Scroll stitch comprises a knot and a tail and gives a beautiful curved look. Like a lot of stitches it takes a bit of practice to get into the rhythm but once you’ve got the steps you’ll be scrolling onwards.

My top tip if you want to make sure your scrolls are all in the same direction then make sure that you bring the needle through the fabric the same direction each time.

  • Bring the needle up through the fabric at the start of the stitch (A)

  • At the point where you want the scroll part of the stitch to be placed (B) bring the needle down and up through the fabric as close together as possible

  • Leave the needle threaded through the fabric and wrap the floss around the needle from the eye end of the need to the point of the needle

  • Pull the needle through slowly to prevent any thread tangles

  • Repeat for the rest of the scrolls

an illustration of how to create a scroll stitch. The illustration is in blue on a white background and there is a grey needle showing where this should be placed on the fabric

Want to try this stitch? It’s not one that is currently included as a recommended stitch for any of my kits but you can switch this for any of the stitches that decorate the pots in the houseplant collection of kits that you can browse here.

Enjoyed this blog post? I share embroidery tips and a free embroidery pattern in my monthly newsletter. Sign up here to receive the newsletter on the 1st of each the month.

In stitch showcase 2 Tags Stitch Showcase, Line Stitch
Comment
a picture of yellow fabric with yellow layered lazy daisy stitches in rows. Overlaid is a blue square with text saying - stitch showcase, layered lazy daisy stitch, www.embelllishedelephant.co.uk

Stitch Showcase: Layered Lazy Daisy Stitch

January 12, 2022

Layered lazy daisy stitch is a variation of lazy daisy stitch and can be used if you want to fill in the centre of a lazy daisy stitch .

  • I recommend working this stitch by creating the inner lazy daisy and then then outer one

  • Bring the needle up through the fabric at the point where you want your stitch to start (A)

  • Take it back down as close as possible to the original hole

  • Gently pull the thread through until you have a small loop - don't pull fully tight at this point

  • Push the needle up through the fabric at the point where you want the stitch to end, 5mm is a good length (B)

  • Create a tiny straight stitch over the loop so it can’t come loose (C)

  • Repeat the steps above creating the start and end points of the stitch just a millimetre away from the first.

an illustration of the steps to follow to create layered lazy daisy stitch. The illustration is blue on a white background with a blue border

Want to try this stitch? It’s not one that is currently included as a recommended stitch for any of my kits but you can switch this for any of the stitches in the floral stitch sample kit that you can find here.

Enjoyed this blog post? I share embroidery tips and a free embroidery pattern in my monthly newsletter. Sign up here to receive the newsletter on the 1st of each the month.

In stitch showcase 2 Tags Isolated Stitch, Stitch Showcase
Comment
An image of close up of green stitching on calico fabric. Overlaid is a blue square and on it in white text is - stitch showcase, double layer whipped backstitch, www.embellishedelephant.co.uk

Stitch Showcase: Double Layer Whipped Backstitch

December 29, 2021

I came across this variation on whipped backstitch recently and it was a bit of a lightbulb moment. Whipped backstitch is a favourite of mine and with this version you can stitch thicker lines without needing to increase the number of strands of thread being used.

The main difference to whipped backstitch is that rather than laying down just one row of backstitches, you lay down two or three rows as the base to whip around.

  • Backstitch is the foundation and then floss is wrapped around each of these stitches to create a cord effect

  • Start by backstitching the complete length of the line you want to embroider (see here for how to create a backstitch line)

  • Create another row or two alongside the first row

  • To wrap the backstitch, bring the needle up at the end of the backstitch length (B)

  • Pass the needle under the first backstitch from right to left (E)

  • Repeat on the next backstitch again passing from right to left

  • Continue until the floss is wrapped around all the backstitches

  • To finish push the needle back down through the fabric.

An illustration of how to create the double layer whipped backstitch embroidery stitch. The illustration is in blue on a white background.

Whipped back stitch is one of my favourite stitches and I recommend it for many of my houseplant kits. You can switch in double layer whipped backstitch to give the plant stems some extra width.

Enjoyed this blog post? I share embroidery tips and a free embroidery pattern in my monthly newsletter. Sign up here to receive the newsletter on the 1st of each the month.

In stitch showcase 2 Tags Line Stitch, Stitch Showcase
Comment
A picture of a close up of an embroidered leaf stitched in blue floss on calico. Overlaid is a blue square with the text - stitch showcase, open fishbone stitch, tutorials for embroidery stitches and ideas for ways to use them,

Stitch Showcase: Open Fishbone Stitch

December 22, 2021

There are a few different variations on the fishbone stitch, including open fishbone stitch and raised fishbone stitch.

  • At the top of the shape bring the needle up close to the centre top

  • Take the needle down through the fabric at a diagonal angle, completing the stitch just slightly to the other side of the centre of the shape

  • Bring the needle up through the fabric in line with the first stitch but on the other side of the centre line

  • Take the needle down through the fabric at a diagonal angle completing the stitch in line with the first one

  • Repeat all the way down the shape, alternating sides A to B then C to D.

  • Leave a small gap between each pair of stitches and aim to have the same sized gap all the way down the shape.

an illustration of how to create open fishbone stitch. The illustration is in blue on a white background

Enjoyed this blog post? I share embroidery tips and a free embroidery pattern in my monthly newsletter. Sign up here to receive the newsletter on the 1st of each the month.

In stitch showcase 2 Tags Stitch Showcase, Filling Stitch
Comment
an image of some embroidery leaves in close up. Overlaid is a blue square with text saying - stitch showcase, raised fishbone stitch, www.embellishedelephant.co.uk

Stitch Showcase: Raised Fishbone Stitch

December 15, 2021

I tend to use satin stitch or leaf stitch when filling in leaves but that stitch does tend to leave tiny gaps at the centre line of the leaf. Raised fishbone stitch is a great alternative as it creates a central line but as each stitch extends to the side of the leaf there are no gaps where the fabric shows through.

  • At the top of the shape bring the needle up close to the centre top

  • Take the needle down through the fabric at a diagonal angle at the edge of the shape

  • Bring the needle up through the fabric close to the start of the first stitch but on the other side of the centre line

  • Take the needle down through the fabric at a diagonal angle at the other side of the shape to the first stitch

  • Repeat all the way down the shape, alternating sides A to B then C to D.

An illustration of how to stitch raised fishbone stitch. The illustration is in blue on a white background

Enjoyed this blog post? I share embroidery tips and a free embroidery pattern in my monthly newsletter. Sign up here to receive the newsletter on the 1st of each the month.

In stitch showcase 2 Tags Filling Stitch
Comment
A close up image of an embroidery with bright pink flowers and green leaves. Overlaid is a blue square saying - hand embroidery, fishbone stitch, www.embellishedelephant.co.uk

Stitch Showcase: Fishbone Stitch

December 8, 2021

There are a few different variations on the fishbone stitch, including open fishbone stitch and raised fishbone stitch.

  • At the top of the shape bring the needle up close to the centre top

  • Start by creating a vertical line down the centre of the shape about 1cm long

  • Take the needle down through the fabric at a diagonal angle, completing the stitch just slightly to one side of the centre of the shape

  • Bring the needle up through the fabric in line with the first stitch but on the other side of the centre line

  • Take the needle down through the fabric at a diagonal angle completing the stitch in line with the first one

  • Repeat all the way down the shape, alternating sides A to B then C to D.

An illustration of how to create the fishbone embroidery stitch. The illustration is in blue on a white background.

Enjoyed this blog post? I share embroidery tips and a free embroidery pattern in my monthly newsletter. Sign up here to receive the newsletter on the 1st of each the month.

In stitch showcase 2 Tags Stitch Showcase, Filling Stitch
Comment
An image of yellow stitching on yellow fabric. Overlaid is a blue square with text in white saying, stitch showcase, double seed stitch, www.embellishedelephant.co.uk

Stitch Showcase: Double Seed Stitch

November 3, 2021

I love this variation on the standard seed stitch. I think it makes the stitched pieces have a more geometric style and look about them.

  • Bring the needle up from the back of the fabric (A)

  • Take it back down a few millimetres along (B)

  • Repeat this to create a second stitch that runs parallel to the first (C-D) that is the same length and angle

  • Create the next pair of stitches at a different angle.

An illustration of how to create double seed embroidery stitch. The illustration is in shades of blue and grey on a white background.

This piece shows how double seed stitch can be contrasted against other stitches.

Want to try this stitch? It’s a stitch I suggest using in my heart stitch sampler kit and floral sampler kit.

Sign up to my email newsletter to get a monthly free embroidery pattern and a round up of Stitch Showcase blogs.

A close up of an embroidery piece featuring double seed stitch in teal thread on a mustard coloured fabric.

Enjoyed this blog post? I share embroidery tips and a free embroidery pattern in my monthly newsletter. Sign up here to receive the newsletter on the 1st of each the month.

In stitch showcase 2 Tags Isolated Stitch
Comment
A picture of wheatear embroidery stitch in black on calico fabric. Overlaid is a blue square with white text saying, stitch showcase, wheatear stitch, www.embellishedelephant.co.uk

Stitch Showcase: Wheatear Stitch

October 20, 2021

I was inspired to revisit this stitch one August morning when I went for a walk and my way back to the house was to pass through a field of wheat. I also think this stitch looks a bit like a millipede - especially when stitched in black or brown thread!

I look at this stitch as being a combination of an arrowhead stitch and a lazy daisy stitch.

  • Start by creating an arrowhead stitch

  • Bring the needle up through the fabric a few millimetres below the point of the arrow

  • Pass the needle under both arms of the arrow without piercing the fabric

  • Take the needle down through the fabric in the same hole it came up through

  • If creating a chain of wheatears, then start the next arrow at the base of the loop of the first stitch.

An illustration of how to create wheatear embroidery stitch. The illustration is in shades of blue and grey on a white background

The sample below was stitched with the aim of representing wheat blowing in the wind. The fabric is naturally dyed using turmeric and onion skins.

On hand dyed yellow fabric is stitched columns of wheatear stitch in yellow thread

Enjoyed this blog post? I share embroidery tips and a free embroidery pattern in my monthly newsletter. Sign up here to receive the newsletter on the 1st of each the month.

In stitch showcase 2 Tags Stitch Showcase, Line Stitch
Comment
A picture of yellow fabric with small yellow stitches in the shape of tulips scattered. Overlaid is a blue square with white text saying - stitch showcase, tulip stitch, www.embellishedelephant.co.uk

Stitch Showcase: Tulip Stitch

October 6, 2021

I’ve been experimenting with a few stitches that I’ve not tried before - there are so many different stitches.

Tulip stitch is so called as it is meant to look like a tulip flower (I think it looks more like a flower bud!).

When I was designing my free tulip pattern earlier in the year, I considered trying to come up with a design to use tulip stitch but in the end went in a different direction.

It’s based on a lazy daisy (or single chain) stitch, so if you are familiar with these, then this stitch just needs one extra element.

  • Create the lazy daisy stitch

  • At the bottom of the lazy daisy stitch add a small straight stitch, this will be the stem of the tulip so can be a little bit longer than the straight stitch normally used in a lazy daisy stitch

  • To create the leaf element, bring the needle up through the fabric to one side of the tulip

  • Pass the needle underneath the ‘stem’ but don’t pierce the fabric

  • Take the needle down through the fabric to the other side of the tulip as symmetrically as you can.

An illustration showing step by step guide to tulip stitch

Enjoyed this blog post? I share embroidery tips and a free embroidery pattern in my monthly newsletter. Sign up here to receive the newsletter on the 1st of each the month.

In stitch showcase 2 Tags Stitch Showcase, Isolated Stitch
Comment
A picture of pink bead couching rows. Overlaid is a blue square with white text saying - stitch showcase, bead couching, www.embellishedelephant.co.uk

Stitch Showcase: Bead Couching

September 22, 2021

Beads were my first crafting love affair. One summer holiday I went to a workshop on bead weaving and was hooked. My first craft business was selling bead woven bracelets to classmates at school.

As my interest in beads developed I learned more about the techniques Native Americans used beads to decorate their belongings. One of the techniques used is bead couching.

Couching in embroidery is when small stitches are used to hold a thread on the surface of fabric. The principle with bead couching is very similar.

  • Bring the needle up through the fabric (A), thread on a small number of beads (between 3-6 is ideal)

  • Take the needle down through the fabric at the end of the row of beads (B) as close to the last bead as possible

  • Bring the needle up through the fabric about 2 or 3 beads along and make a tiny stitch over the string of beads to couch the string to the fabric.

An illustration of how to couch beads. The background is white and the illustration is shades of blue

An alternative method is:

  • Bring the needle up through the fabric (A), thread on a small number of beads (between 3-6 is ideal)

  • Take the needle down through the fabric and bring it up through the fabric about 2-3 beads along

  • Pass the needle through these two beads and then thread 3 or 4 beads onto the needle and repeat

This technique of passing the needle through the string of beads helps to make sure the beads sit flat to the fabric and there are no gaps between each bead.

A close up image of some native american beadwork in the shape of stars and flowers on leather

If you would like to have a go at bead couching, then why not take a look at my floral sampler kit where you can try this technique alongside a range of other stitches.

Sign up to my email newsletter to get a monthly free embroidery pattern and a round up of Stitch Showcase blogs.

In stitch showcase 2 Tags Stitch Showcase, Line Stitch, Filling Stitch
Comment
a picture of lavender embroidery stitched using granitos. Overlaid is a blue square with white text saying - stitch showcase, granitos stitch, www.embellishedelephant.co.uk

Stitch showcase: Granitos stitch

September 1, 2021

I see this stitch as a textured variation on a satin stitch. It creates a raised bump on the fabric and looks like a grain (hence the name granitos).

  • Create a straight stitch slightly shorter than the finished length of stitch

  • Bring the needle up through the fabric as close to the first stitch as possible without going through the same hole. Complete the stitch as close to the first stitch as possible

  • Add another stitch the other side of your first stitch so there are three stitches lying right next to each other

  • The final step is to layer some stitches over this base. Working at the centre of the base stitches, bring the needle up a tiny bit away from the base stitch to create a little point. Bring the needle back down a tiny bit away from the base stitches at the other end

  • Stitch through these exact holes a couple more times to create more of a bump. Try using a different shade of thread for these layering stitches for some definition.

An illustration of how to create granitos stitch - it is white background with blue illustration and text
An image of blue stitching on calico showing how to create granitos stitch

Want to try this stitch? It’s a stitch I suggest using in my lavender kit.

Sign up to my email newsletter to get a monthly free embroidery pattern and a round up of Stitch Showcase blogs.

In stitch showcase 2 Tags Stitch Showcase, Isolated Stitch
Comment
A picture of lots of embroidered roses in pink and purple coloured threads. Overlaid is a blue square with white text saying - stitch showcase, woven wheel, www.embellishedelephant.co.uk

Stitch Showcase: Woven Wheel

March 31, 2021

Woven wheel is a stitch most commonly used to add some floral textural detail to a piece.

  • The base of the woven wheel is 5 straight stitches radiating out from a centre point to form spokes (A to E)

  • Once the base stitches are in place bring the needle up through the fabric at the centre point and start weaving over and under the base spokes in turn.

  • As there is an odd number of spokes each time you come back round you should be doing the opposite of what you did in the last round eg if last time was over that stitch, the next time round go under it

  • Keep on going round and round. pulling the thread loosely but not so loose that the flower has no structure. Try experimenting to see how the tightness of the weaving affects the finished flower

  • Keep on going until you cover up all the base spokes then pass the needle back through the fabric slightly underneath the last round

  • If the thread runs out part way through, pass the needle back through the fabric, secure the thread and then start a new thread in the same place and continue the weaving pattern.

An illustration of how the create the embroidery stitch woven wheel. The illustration is in shades of blue and grey on a white background.

I love stitching this cluster of woven wheels as a sampler. I used yarn and thread of different textures and thicknesses to experiment with how this affected the flowers. Any gaps between the flowers I added a simple straight stitch of green yarn which really makes the flowers pop.

The second photo is a Mollie Makes free kit which shows how a single woven wheel can be used.

Depending on how you stitch your base stitches, you can leave a gap in the centre or not and one option is to then fill the centre with French knots or beads for added detail.

A picture of lots of embroidered roses in pink and purple coloured threads.
A picture of an embroidered bee on blue fabric. Below the bee are leaves and flowers, including a pink rose made from woven wheel stitch

Enjoyed this blog post? I share embroidery tips and a free embroidery pattern in my monthly newsletter. Sign up here to receive the newsletter on the 1st of each the month.

In stitch showcase 2 Tags Stitch Showcase, Texture Stitch
Comment
An image of a spray of pistil stitch in blue thread on white fabric. Overlaid is a blue square with white text saying - stitch showcase, pistil stitch, www.embellishedelephant.co.uk

Stitch Showcase: Pistil Stitch

March 24, 2021

Until recently I didn’t realise that this was a proper stitch with a proper name. I thought this was the result of when my French knots went horrendously wrong. Another name for pistil stitch is elongated French knot which describes perfectly how you create this stitch. If you are familiar with French knots then the only difference is the point at which you take the needle back down through the fabric.

  • Bring the needle up through the fabric at the point you want the long tail of your stitch to finish (A)

  • Wrap the thread around the needle 3 or 4 times

  • Put the tip of the needle through the fabric where you want the knot part of the stitch to lie (B)

  • Gently pull the needle through the wraps, hold your thumb over them to keep them in place if needed

an illustration of how to create pistil embroidery stitch. the illustration is in shades of blue on a white background

When I created my daffodil pattern I wanted a bit of extra texture at the centre of the trumpet to represent the stamen and pistil stitch was the perfect stitch for this detail.

Enjoyed this blog post? I share embroidery tips and a free embroidery pattern in my monthly newsletter. Sign up here to receive the newsletter on the 1st of each the month.

In stitch showcase 2 Tags Isolated Stitch, Stitch Showcase
Comment
A picture of chevron stitch in blue thread on calico. Overlaid is a blue square with white text saying - stitch showcase, chevron stitch, www.embellishedelephant.co.uk

Stitch Showcase: Chevron Stitch

March 17, 2021

Chevron stitch isn’t one that I use that much but it makes a great decorative border stitch.

  • it may help to draw two parallel guidelines to create this stitch

  • Start by stitching zig zags (A to B, B to C) between the two guidelines if you have drawn them

  • It can help to stitch all the diagonal stitches in one direction first and then in the opposite direction as this helps to keep the angle of the stitches even

  • To finish the stitch add a bar at the top/bottom of each V (D to E). There should be a little gap between each bar.

an illustration of how to create chevron embroidery stitch. The illustration is in shades of blue on a white background

Enjoyed this blog post? I share embroidery tips and a free embroidery pattern in my monthly newsletter. Sign up here to receive the newsletter on the 1st of each the month.

In stitch showcase 2 Tags Line Stitch, Border stitch, Stitch Showcase
Comment
A picture of embroidered leaves. Overlaid is a blue square with white text saying - stitch showcase, leaf stitch, www.embellishedelephant.co.uk

Stitch Showcase: Leaf Stitch

March 10, 2021

This is a version of satin stitch used, not surprisingly, to fill in leaf shapes. It helps to draw guidelines for the shape of the leaf, the centre line and indicating the angle the stitches will follow working down the leaf.

  • To start make one stitch from the top point of the leaf to the centre of the leaf (A)

  • Work satin stitch into that same finishing point for a few stitches (B and C). The angles will gradually change until the stitches are at the angle to be used for the rest of the leaf

  • Continue working down the leaf. My preference is to alternate from one side to the other but this stitch could also be worked on one side first

  • Make sure that your stitches meet neatly in the middle (if they don't they can be covered up with some split stitches)

an illustration of leaf embroidery stitch. The illustration is in shades of blue on a white background

These are pictures from the first couple of embroidery projects that I stitched when I started to immerse myself in this wonderful craft.

On the greenhouse picture you can see that the outside edge of the leaves isn’t quite a smooth finish. On the Monstera leaf picture the angles of stitches are all over the place.

It was only after I stitched these that I learned about how much guidelines help with this stitch! Also a reminder to keep practicing and you will improve.

Want to try this stitch? It’s one I recommend using in my tulip kit.

Sign up to my email newsletter to get a monthly free embroidery pattern and a round up of Stitch Showcase blogs.

A picture of a greenhouse embroidery showing leaves stitched in green
A picture of a few monstera leaves stitched using angled satin stitch. The leaves are in different shades of green

Enjoyed this blog post? I share embroidery tips and a free embroidery pattern in my monthly newsletter. Sign up here to receive the newsletter on the 1st of each the month.

In stitch showcase 2 Tags Filling Stitch
Comment

Tags

  • About me
  • Artists/Designers
  • Basics
  • Christmas
  • colour
  • Couching Stitch
  • Fabric
  • Filling Stitch
  • Finishing
  • Hoops
  • Isolated Stitch
  • Line Stitch
  • London
  • My Makes
  • Needles
  • Stitch Showcase
  • Texture Stitch
  • Thread
  • Transfer
  • Travel

Latest Posts

Featured
May 1, 2025
How to manage your backlog of craft projects
May 1, 2025
May 1, 2025
Apr 1, 2025
What to do if you don't like what you've stitched
Apr 1, 2025
Apr 1, 2025
Feb 15, 2025
How to decide which embroidery stitch to use
Feb 15, 2025
Feb 15, 2025
Feb 1, 2025
Focus on stitches for flowers
Feb 1, 2025
Feb 1, 2025
Jan 1, 2025
Focus on stitches for leaves
Jan 1, 2025
Jan 1, 2025
Nov 1, 2024
Stitch Showcase: Six-pointed star stitch
Nov 1, 2024
Nov 1, 2024
Oct 1, 2024
Focus on transferring or tracing patterns
Oct 1, 2024
Oct 1, 2024
Sep 1, 2024
Focus on hoops
Sep 1, 2024
Sep 1, 2024
Aug 1, 2024
A focus on needles
Aug 1, 2024
Aug 1, 2024
Jul 1, 2024
Focus on threads
Jul 1, 2024
Jul 1, 2024

Home — Shop — Stockists — Wholesale — Portfolio — Contact — Reviews — Policies — FAQs