• Home
  • Shop
  • Stitch Showcase
  • Embroidery tips
  • Freebies
  • About
  • Contact
Menu

Embellished Elephant

  • Home
  • Shop
  • Stitch Showcase
  • Embroidery tips
  • Freebies
  • About
  • Contact

Stitch Showcase: Whipped Wheel Stitch

September 27, 2023

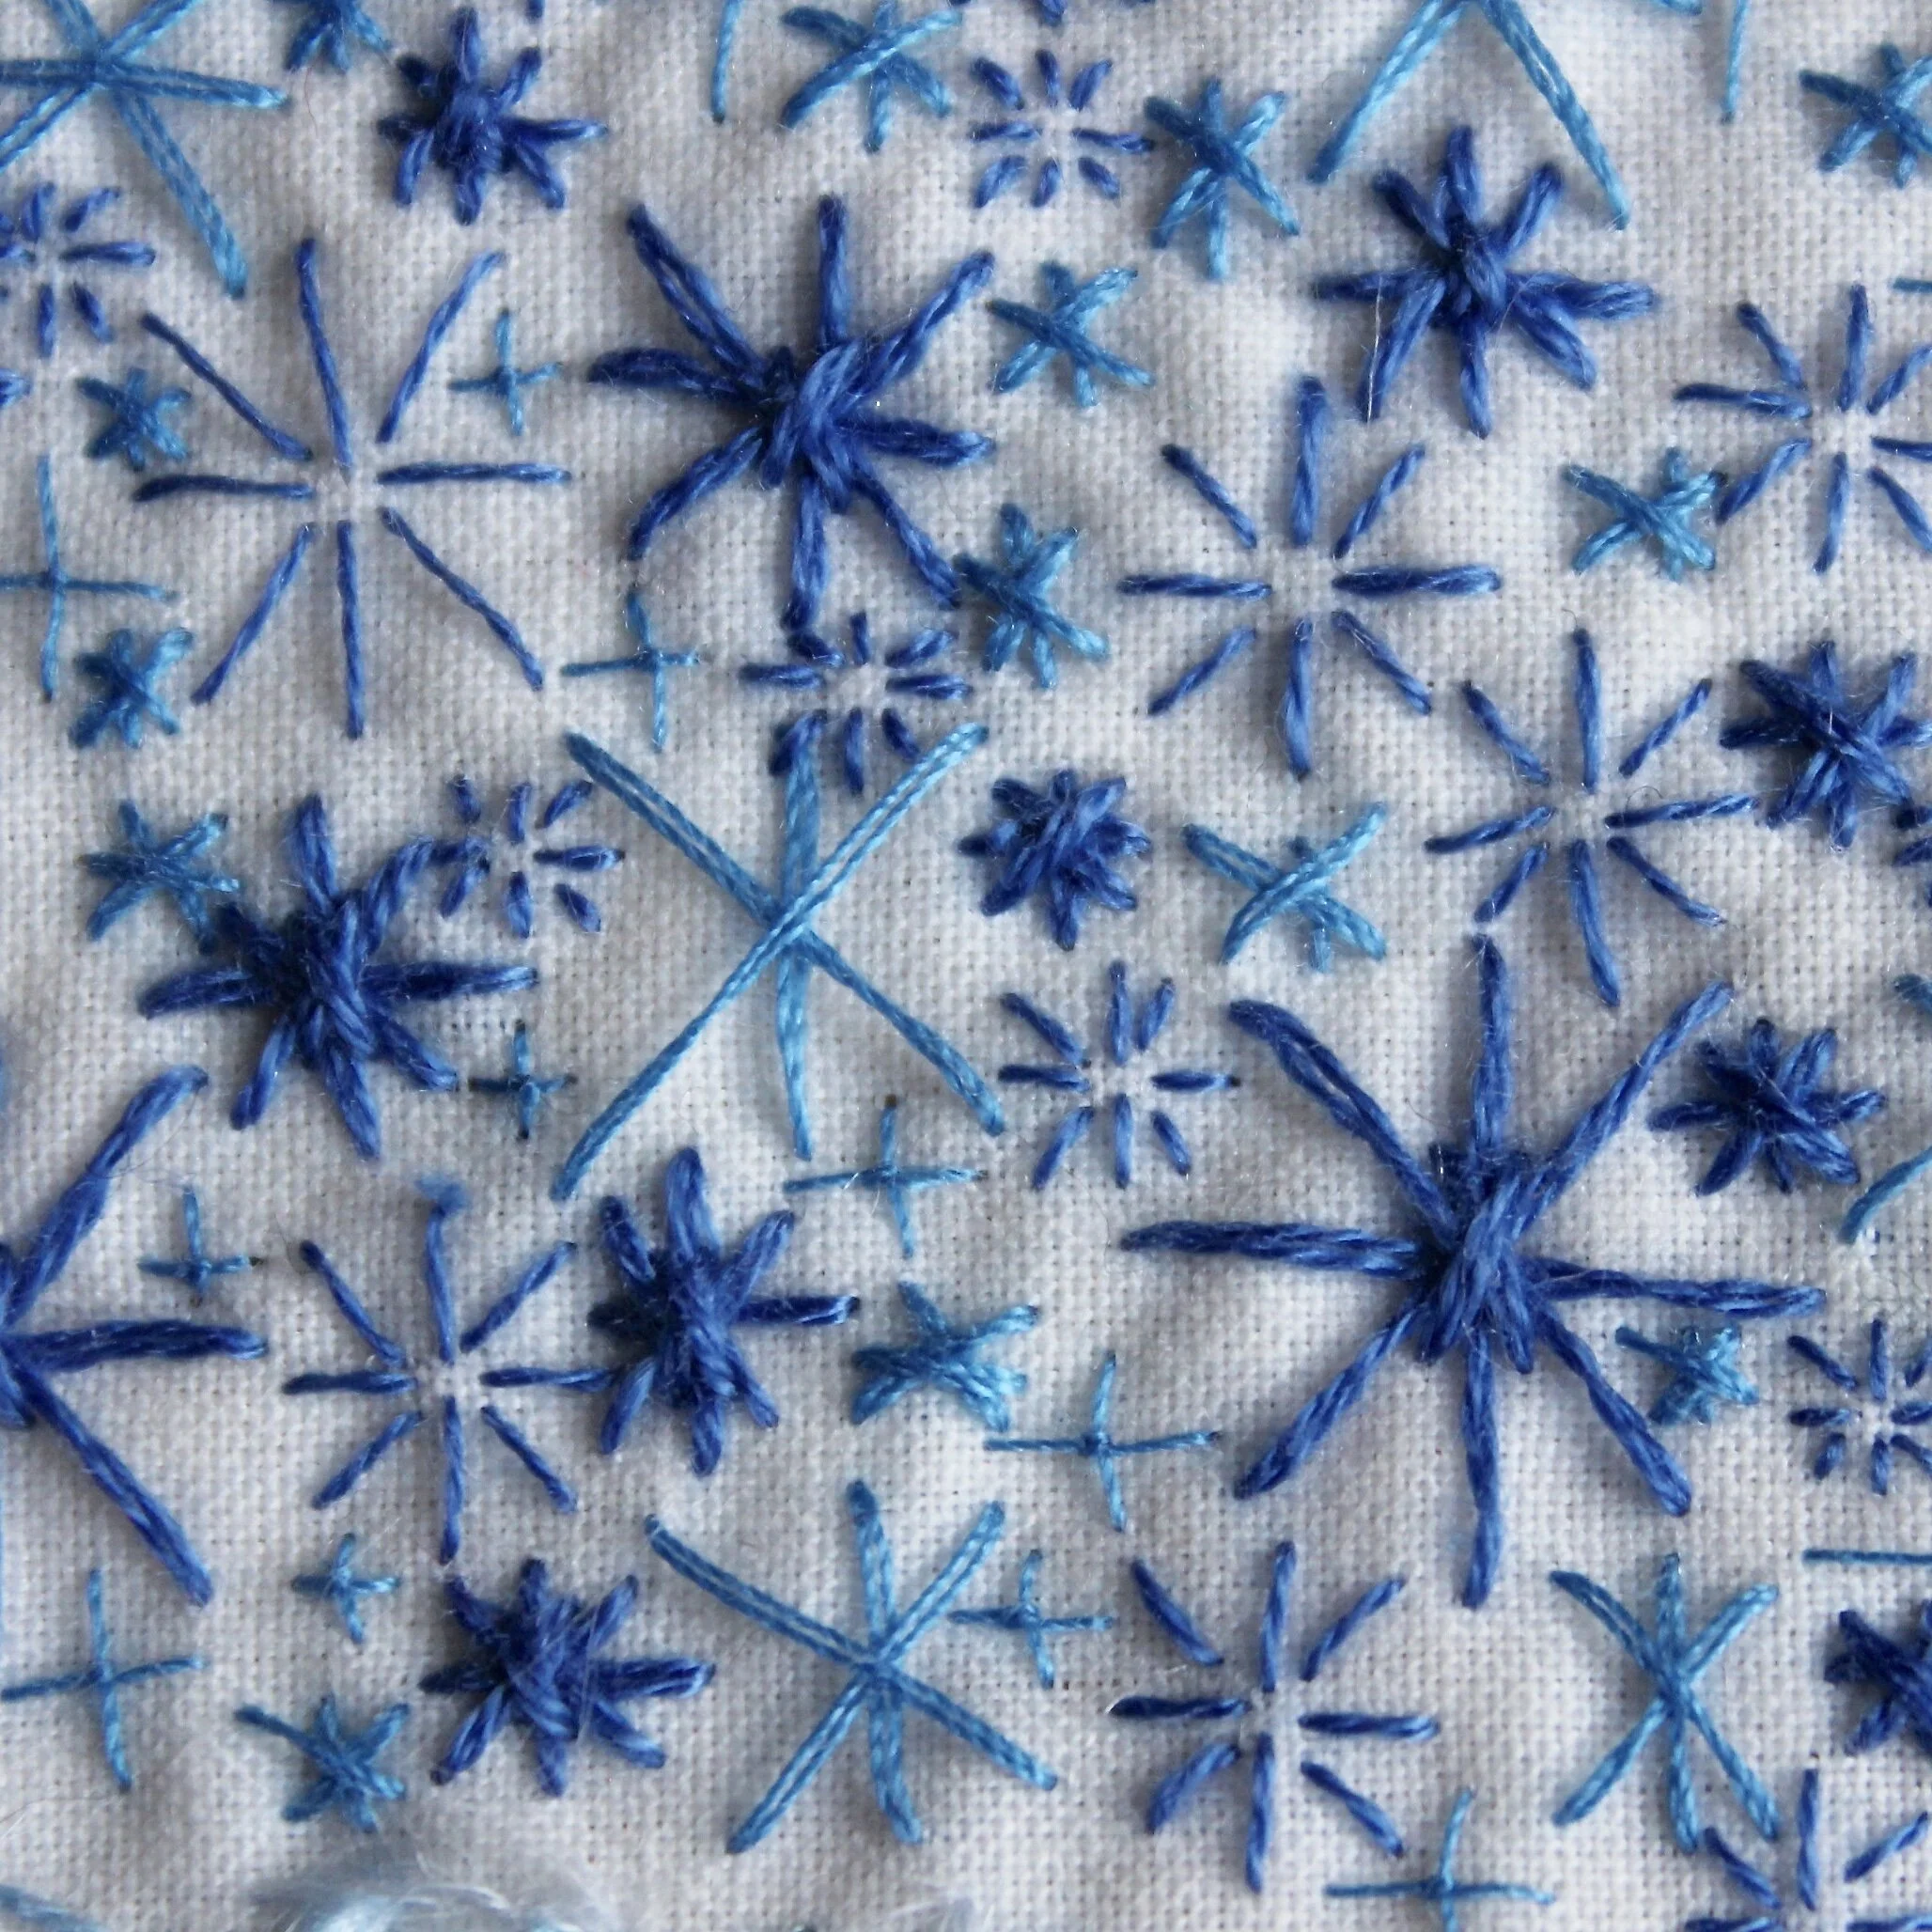
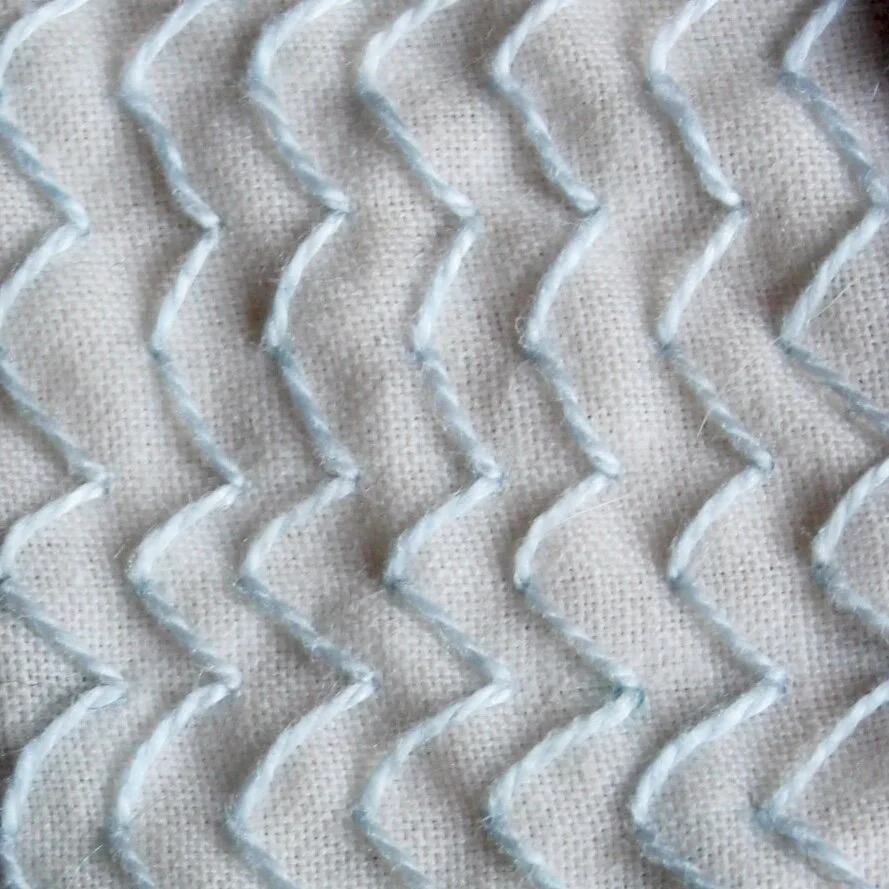
This is a little more complex than the woven wheel stitch as in each round the thread is wrapped around the base stitches. Try experimenting with a half wheel shape to create a fan like effect. Most commonly this is stitched with the woven lines pushed together to create a fully filled shape, but it can also be stitched in an open approach to create a spiders web.

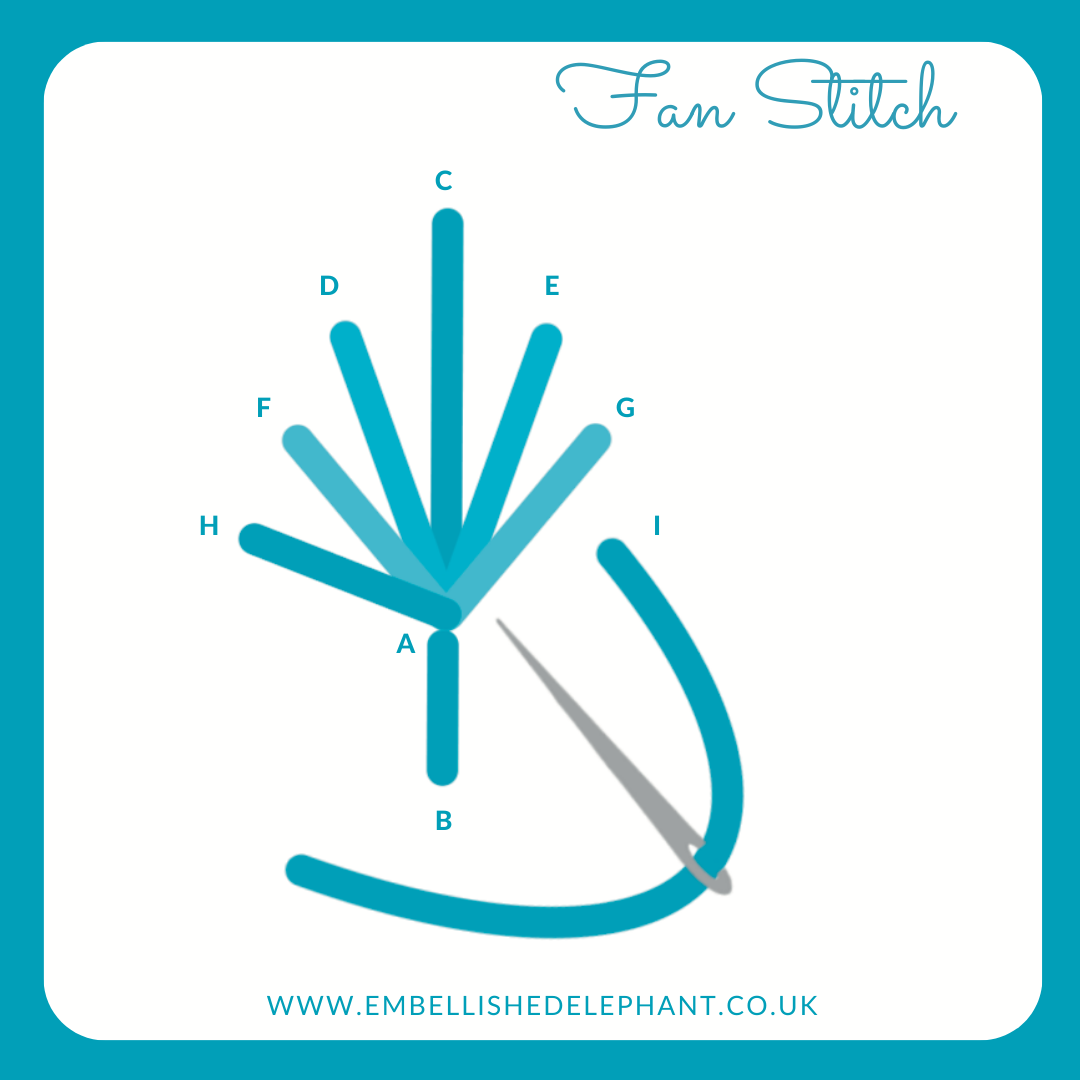
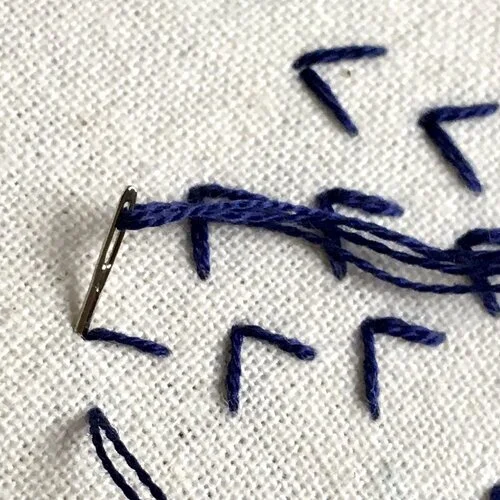
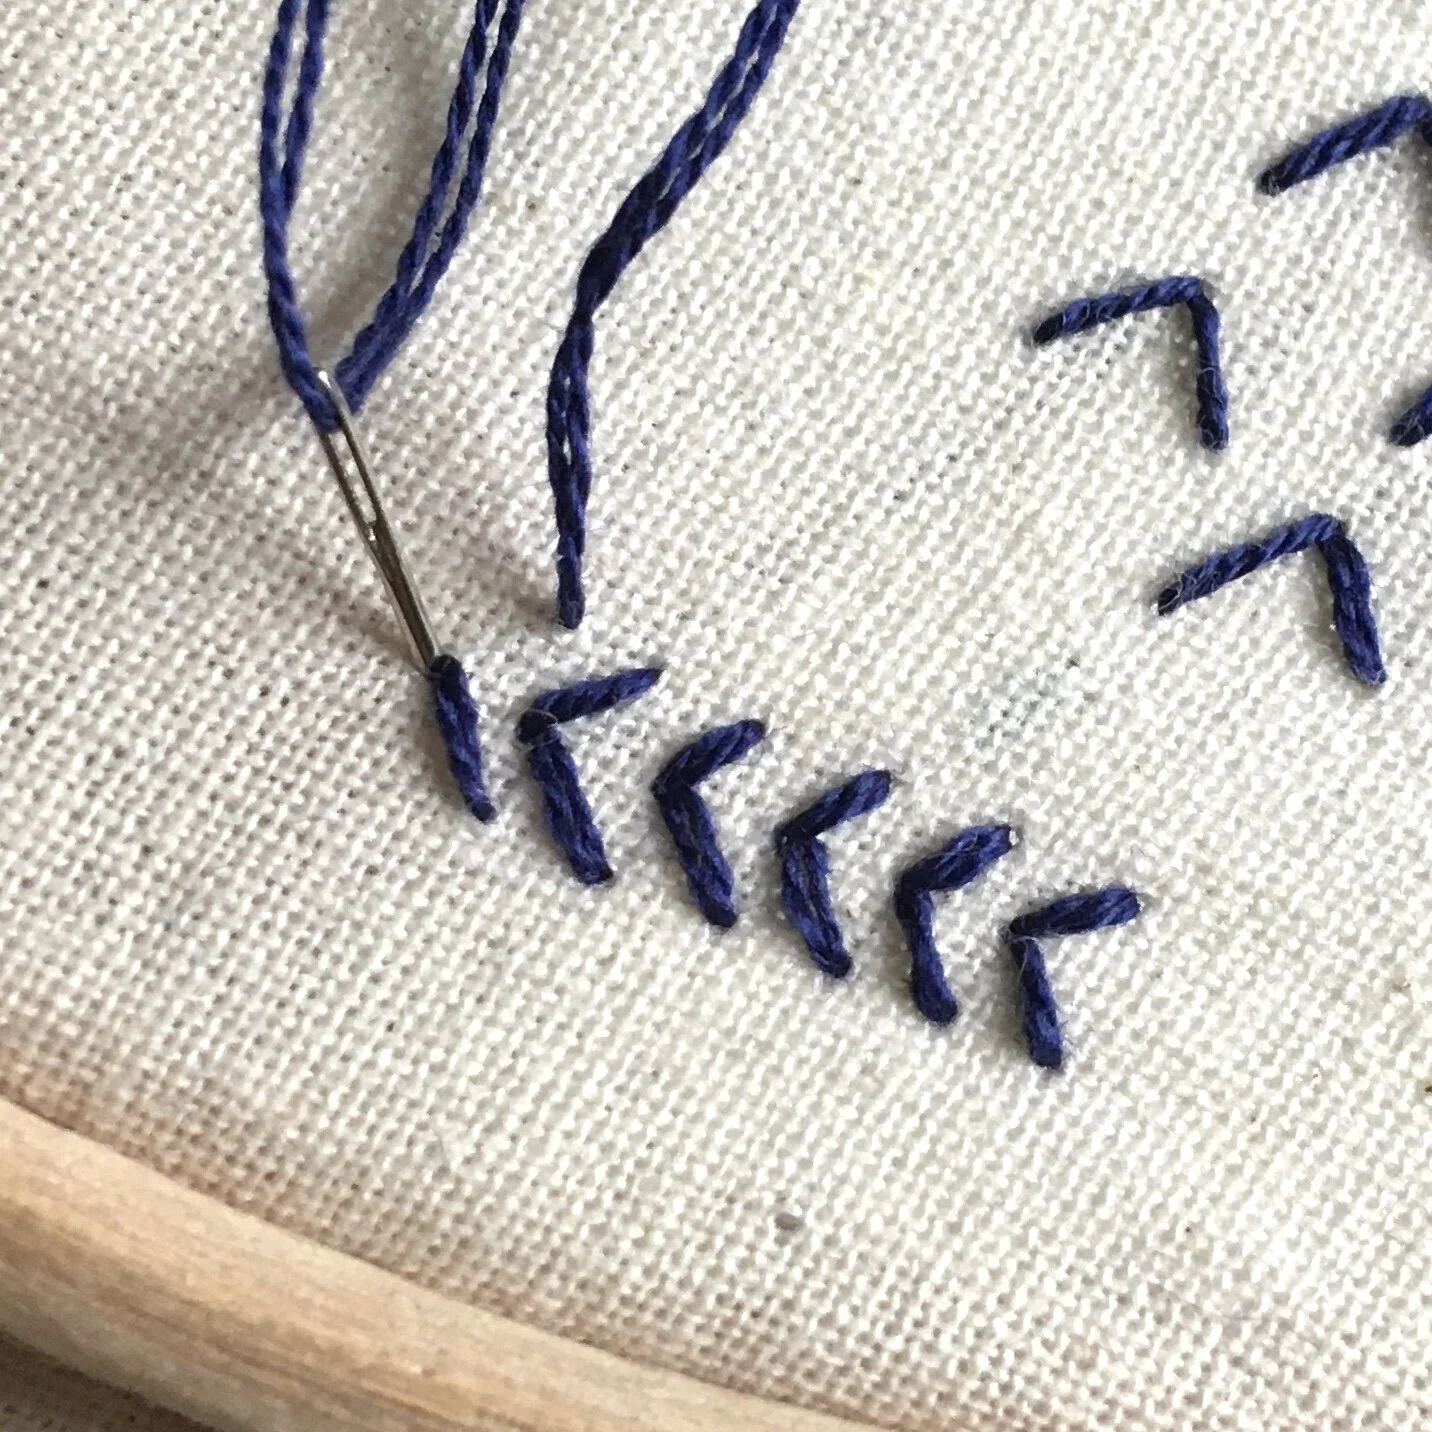
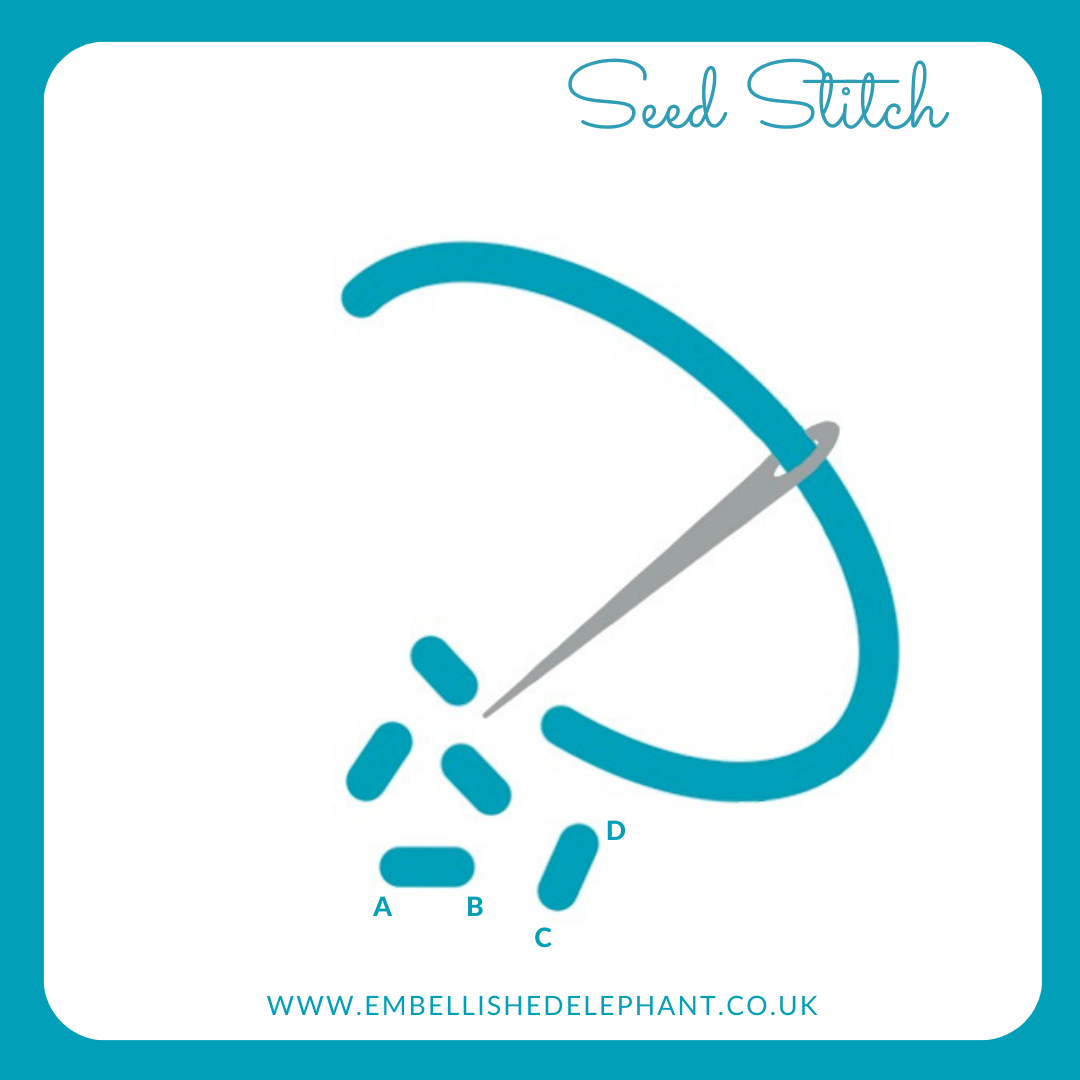
  • Start by laying down the base stitches, there can be an odd or even number of base stitches

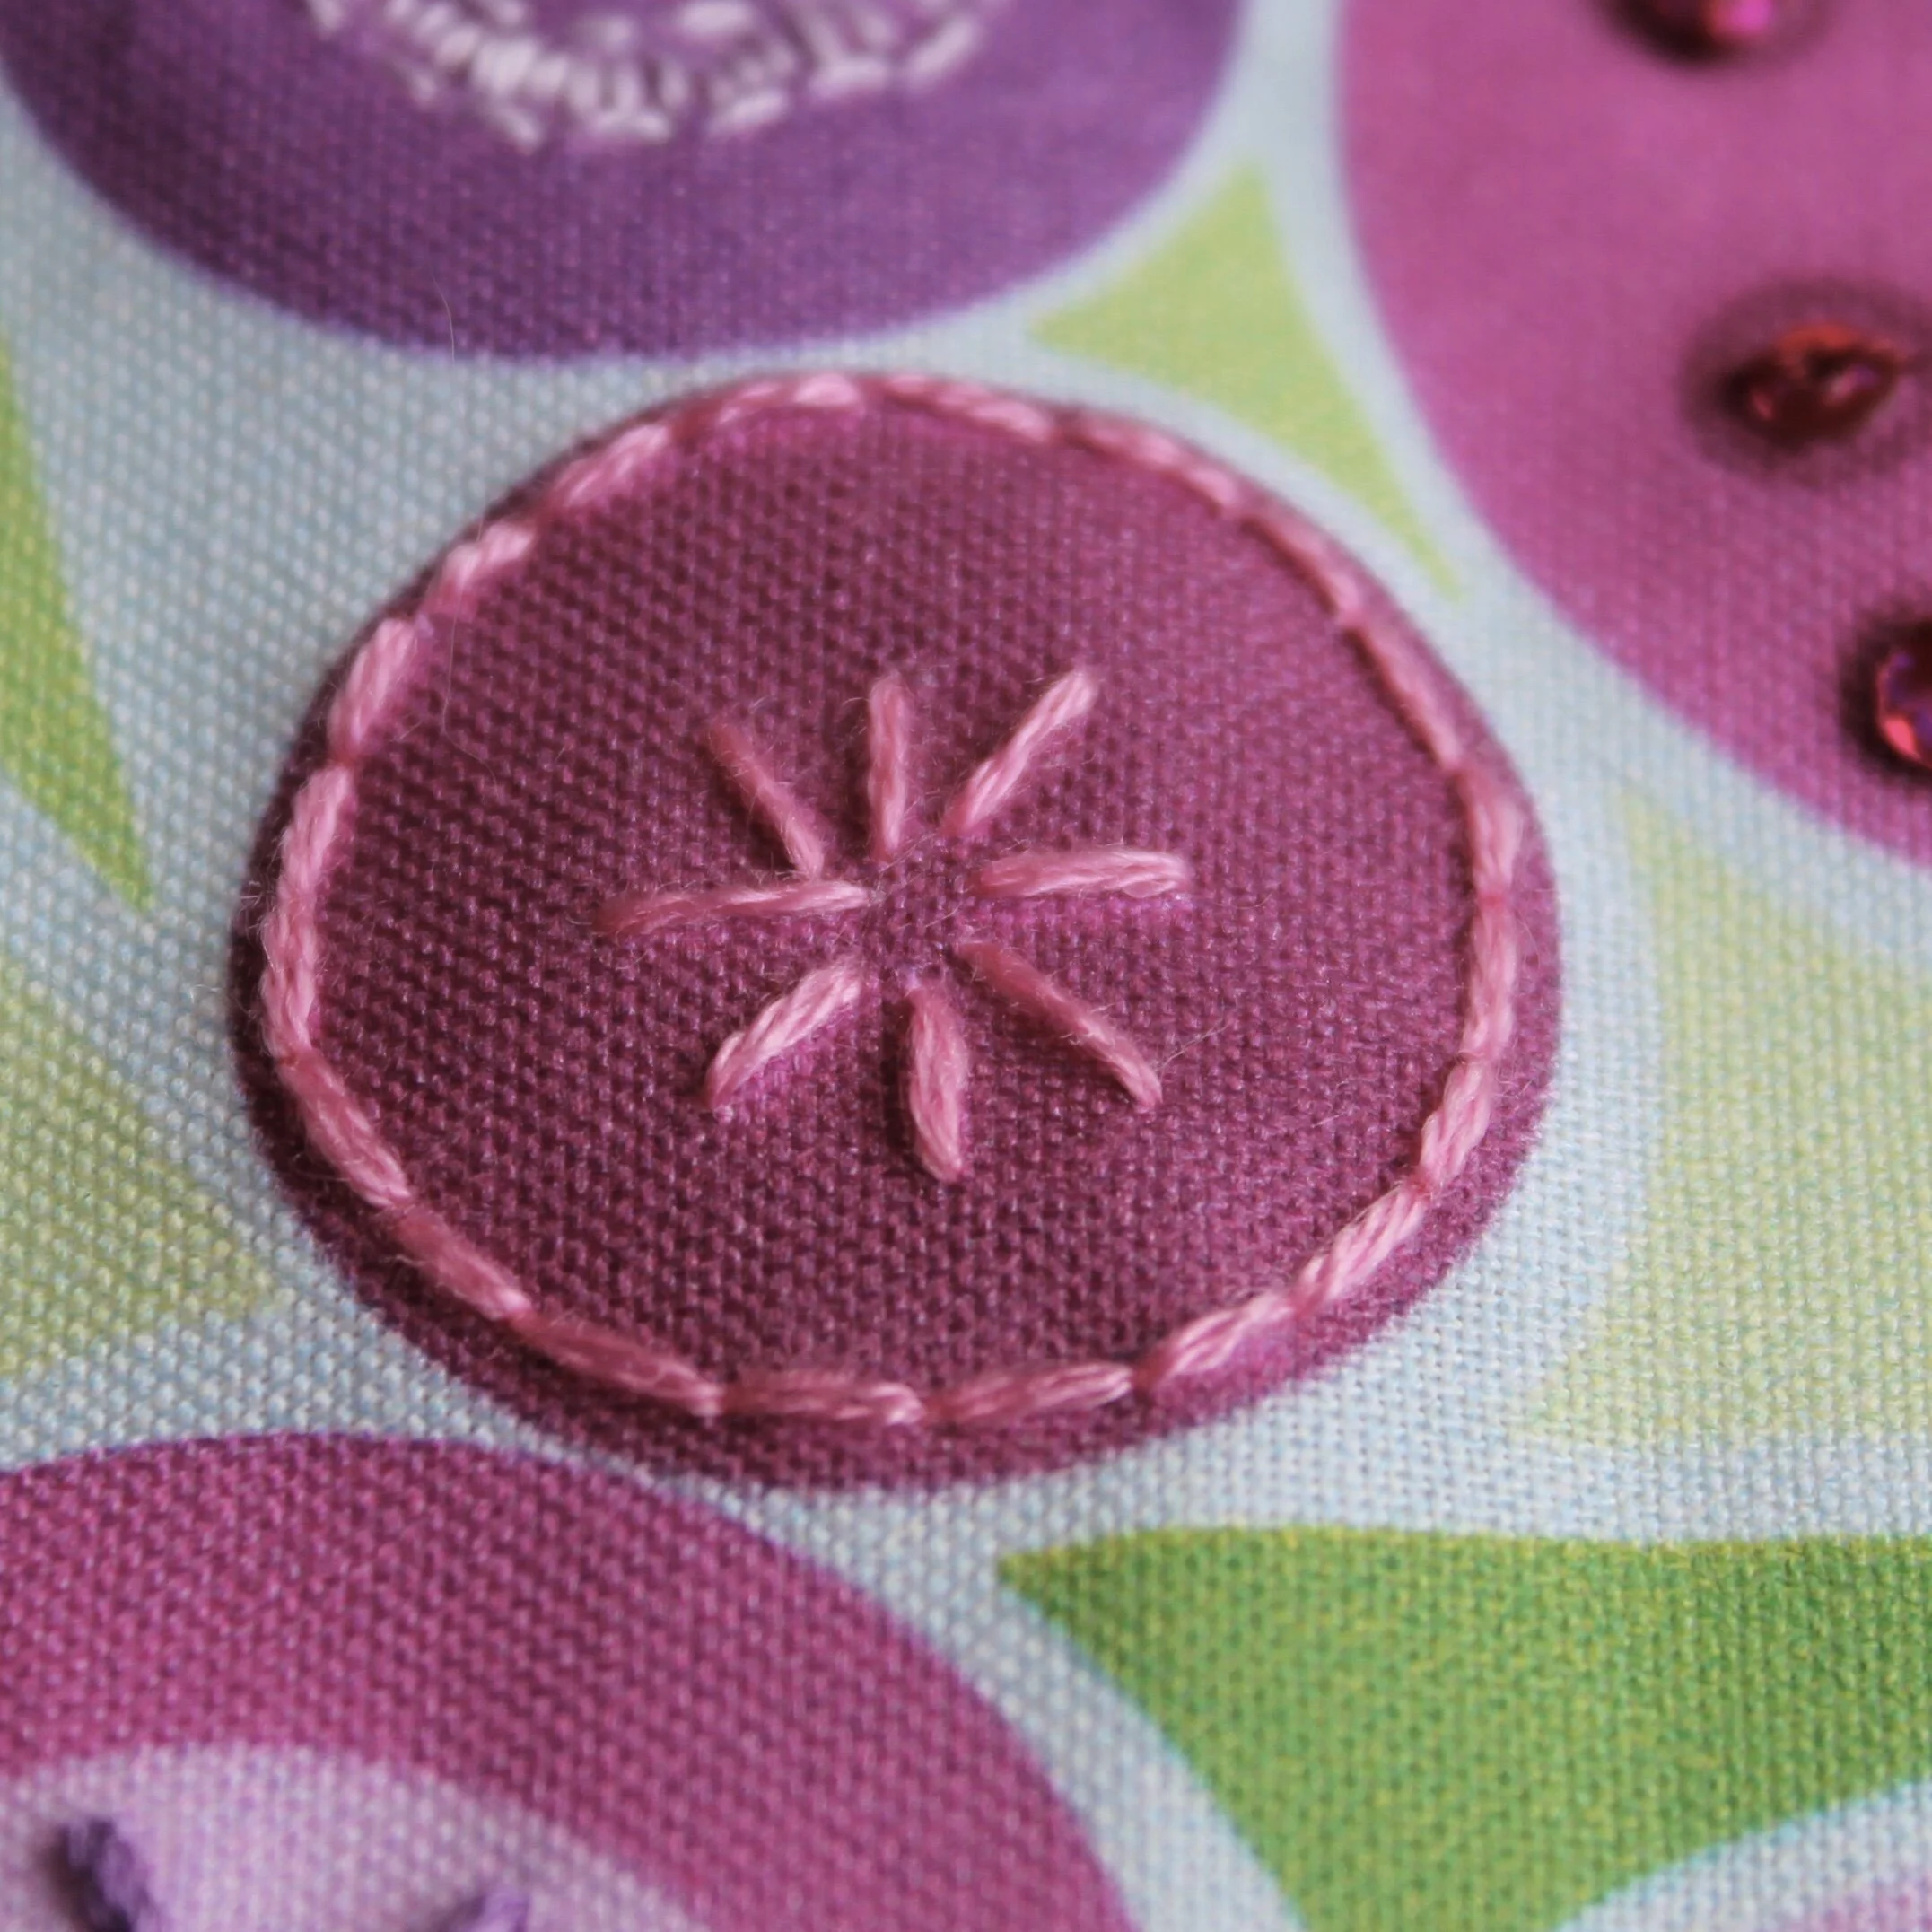
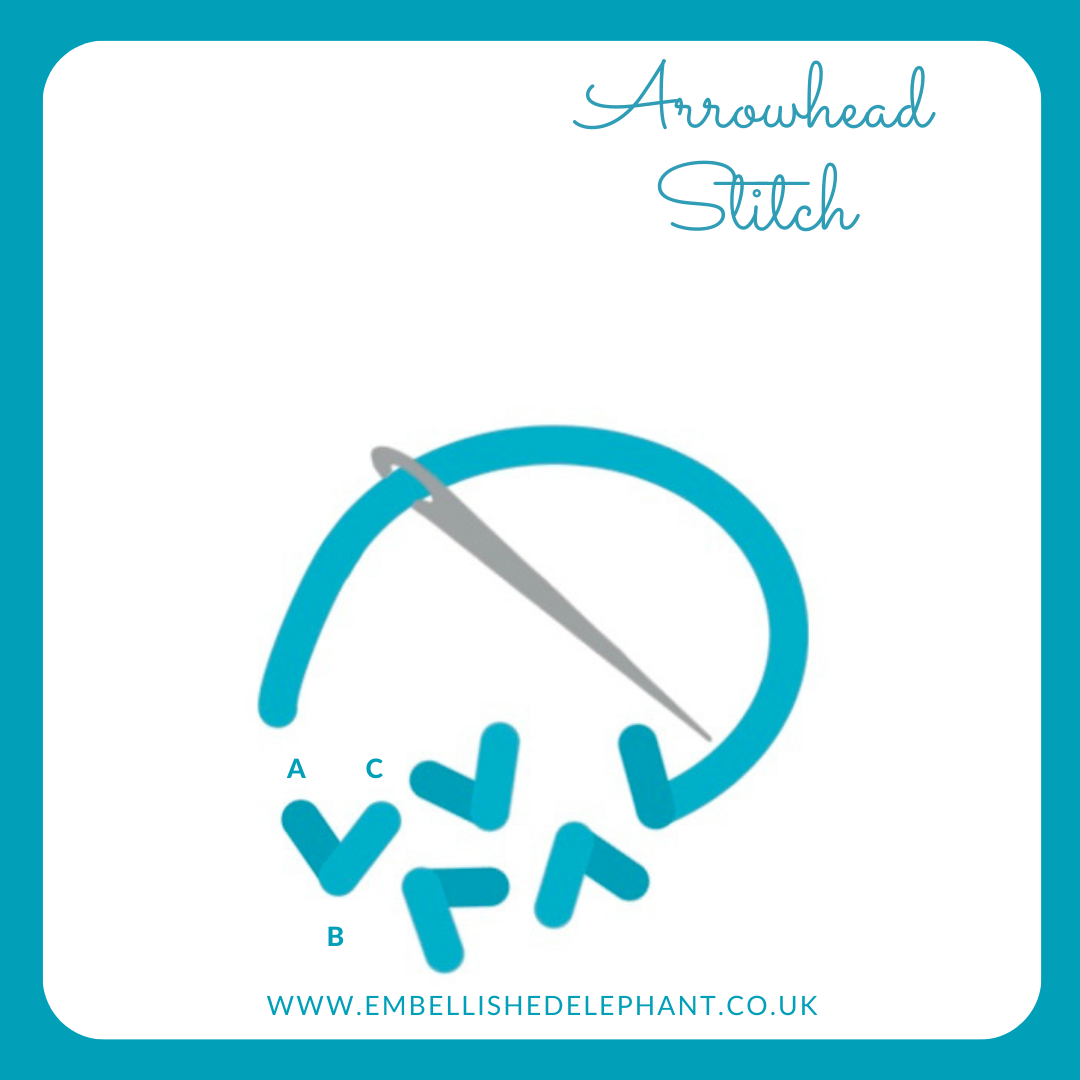
  • Bring the thread up at the centre of the wheel

  • Pass the thread under the nearest base stitch and then over and under the base stitch to create a whole wrap around

  • Repeat with each base stitch and keep on going round and round until the base stitches are completely covered

  • At the end, or if the thread runs out and needs to be changed, take the thread down through the fabric after completing one wrap. It should be slightly under one of the base threads and, if needed start a new thread from the same place.

In stitch showcase 2 Tags Stitch Showcase, Isolated Stitch
Comment
A close up of some multi coloured embroidery stitches slightly out of focus. Overlaid is a blue square with white text saying - hand embroidery, how to decide which embroidery stitch to use, www.embellishedelephant.co.uk

How to decide which embroidery stitch to use?

February 22, 2023

There are hundreds of different embroidery stitches so how do you decide which ones to use in an embroidery project?

Most embroidery patterns will be made up of elements involving lines, areas and details. The type of stitch to pick will depend on the element that you are stitching.

A picture of a felt leaf with the veins of the leaf stitched using split stitch

Lines or outlines

You need to consider whether you want a basic look that you get from a stitch such as backstitch or something that makes a feature from the line stitch such as split stitch. I share some of my favourite line stitches here.

A picture of the edge of an embroidery hoop. In the hoop is green fabric and on the fabric is stitched a monstera leaf. The embroidery is in light green at the edge and darker green in the centre using long and short stitch

Areas that need filling

These require stitches that can cover the fabric. Satin stitch is a popular stitch for filling large areas but I really like long and short stitch which breaks up satin stitch into sections. You can see a selection of filling stitches here.

A close up of an embroidery on calico fabric. The embroidery is brown branches with pink french knot stitch to represent blossom

Details

There are a range of stitches that can be used to highlight a feature or add texture or detail. Texture stitches such as the ones I’ve selected here can add a 3-D feel to the embroidery. Isolated stitches are those that can be stitched on their own (or in groups) to highlight a feature for example the centre of a flower. A range of isolated stitches are listed here.

Enjoyed this blog post? I share embroidery tips and a free embroidery pattern in my monthly newsletter. Sign up here to receive the newsletter on the 1st of each the month.

In tips 4 Tags Isolated Stitch, Texture Stitch, Line Stitch, Filling Stitch
Comment
A close up of green embroidery thread on calico fabric. The thread is stitched in fan stitch to create palm leaves. Overlaid is a blue square with the text Hand Embroidery - Fan/Ray stitch

Stitch Showcase: Fan Stitch

February 23, 2022

Fan stitch is also commonly called ray stitch, I prefer the name fan as I thing it really describes what it looks like. To me this stitch conjures up images in my mind of large palm leaves and this stitch can be used to represent leaves.

  • Create the base of the fan by stitching one long straight stitch. It is generally about half the length of the fan centre line

  • Now create the central fan line. It should be in a straight line with the base stitch

  • Either draw on guide lines or imagine the shape of a diamond

  • Bring the needle through the fabric a few mm down from the top of the centre line and a few mm away from the centre line. Complete this stitch at the point at which the base and centre lines meet.

  • Repeat on the other side of the centre line, making a mirror image stitch.

  • Repeat for a further two pairs of lines so there are 7 lines in total coming from the base stitch (the centre line and 3 pairs of stitches)

An illustration of how to create the embroidery stitch fan stitch. The illustration is in shades of blue and grey on a white background.

Want to have a go at this stitch? Sign up to my newsletter to hear when the palm houseplant kit that uses a variation of this stitch will be launched.

In stitch showcase 2, 100days Tags Stitch Showcase, Isolated Stitch
Comment
a picture of yellow fabric with yellow layered lazy daisy stitches in rows. Overlaid is a blue square with text saying - stitch showcase, layered lazy daisy stitch, www.embelllishedelephant.co.uk

Stitch Showcase: Layered Lazy Daisy Stitch

January 12, 2022

Layered lazy daisy stitch is a variation of lazy daisy stitch and can be used if you want to fill in the centre of a lazy daisy stitch .

  • I recommend working this stitch by creating the inner lazy daisy and then then outer one

  • Bring the needle up through the fabric at the point where you want your stitch to start (A)

  • Take it back down as close as possible to the original hole

  • Gently pull the thread through until you have a small loop - don't pull fully tight at this point

  • Push the needle up through the fabric at the point where you want the stitch to end, 5mm is a good length (B)

  • Create a tiny straight stitch over the loop so it can’t come loose (C)

  • Repeat the steps above creating the start and end points of the stitch just a millimetre away from the first.

an illustration of the steps to follow to create layered lazy daisy stitch. The illustration is blue on a white background with a blue border

Want to try this stitch? It’s not one that is currently included as a recommended stitch for any of my kits but you can switch this for any of the stitches in the floral stitch sample kit that you can find here.

Enjoyed this blog post? I share embroidery tips and a free embroidery pattern in my monthly newsletter. Sign up here to receive the newsletter on the 1st of each the month.

In stitch showcase 2 Tags Isolated Stitch, Stitch Showcase
Comment
An image of yellow stitching on yellow fabric. Overlaid is a blue square with text in white saying, stitch showcase, double seed stitch, www.embellishedelephant.co.uk

Stitch Showcase: Double Seed Stitch

November 3, 2021

I love this variation on the standard seed stitch. I think it makes the stitched pieces have a more geometric style and look about them.

  • Bring the needle up from the back of the fabric (A)

  • Take it back down a few millimetres along (B)

  • Repeat this to create a second stitch that runs parallel to the first (C-D) that is the same length and angle

  • Create the next pair of stitches at a different angle.

An illustration of how to create double seed embroidery stitch. The illustration is in shades of blue and grey on a white background.

This piece shows how double seed stitch can be contrasted against other stitches.

Want to try this stitch? It’s a stitch I suggest using in my heart stitch sampler kit and floral sampler kit.

Sign up to my email newsletter to get a monthly free embroidery pattern and a round up of Stitch Showcase blogs.

A close up of an embroidery piece featuring double seed stitch in teal thread on a mustard coloured fabric.

Enjoyed this blog post? I share embroidery tips and a free embroidery pattern in my monthly newsletter. Sign up here to receive the newsletter on the 1st of each the month.

In stitch showcase 2 Tags Isolated Stitch
Comment
A picture of yellow fabric with small yellow stitches in the shape of tulips scattered. Overlaid is a blue square with white text saying - stitch showcase, tulip stitch, www.embellishedelephant.co.uk

Stitch Showcase: Tulip Stitch

October 6, 2021

I’ve been experimenting with a few stitches that I’ve not tried before - there are so many different stitches.

Tulip stitch is so called as it is meant to look like a tulip flower (I think it looks more like a flower bud!).

When I was designing my free tulip pattern earlier in the year, I considered trying to come up with a design to use tulip stitch but in the end went in a different direction.

It’s based on a lazy daisy (or single chain) stitch, so if you are familiar with these, then this stitch just needs one extra element.

  • Create the lazy daisy stitch

  • At the bottom of the lazy daisy stitch add a small straight stitch, this will be the stem of the tulip so can be a little bit longer than the straight stitch normally used in a lazy daisy stitch

  • To create the leaf element, bring the needle up through the fabric to one side of the tulip

  • Pass the needle underneath the ‘stem’ but don’t pierce the fabric

  • Take the needle down through the fabric to the other side of the tulip as symmetrically as you can.

An illustration showing step by step guide to tulip stitch

Enjoyed this blog post? I share embroidery tips and a free embroidery pattern in my monthly newsletter. Sign up here to receive the newsletter on the 1st of each the month.

In stitch showcase 2 Tags Stitch Showcase, Isolated Stitch
Comment
a picture of lavender embroidery stitched using granitos. Overlaid is a blue square with white text saying - stitch showcase, granitos stitch, www.embellishedelephant.co.uk

Stitch showcase: Granitos stitch

September 1, 2021

I see this stitch as a textured variation on a satin stitch. It creates a raised bump on the fabric and looks like a grain (hence the name granitos).

  • Create a straight stitch slightly shorter than the finished length of stitch

  • Bring the needle up through the fabric as close to the first stitch as possible without going through the same hole. Complete the stitch as close to the first stitch as possible

  • Add another stitch the other side of your first stitch so there are three stitches lying right next to each other

  • The final step is to layer some stitches over this base. Working at the centre of the base stitches, bring the needle up a tiny bit away from the base stitch to create a little point. Bring the needle back down a tiny bit away from the base stitches at the other end

  • Stitch through these exact holes a couple more times to create more of a bump. Try using a different shade of thread for these layering stitches for some definition.

An illustration of how to create granitos stitch - it is white background with blue illustration and text
An image of blue stitching on calico showing how to create granitos stitch

Want to try this stitch? It’s a stitch I suggest using in my lavender kit.

Sign up to my email newsletter to get a monthly free embroidery pattern and a round up of Stitch Showcase blogs.

In stitch showcase 2 Tags Stitch Showcase, Isolated Stitch
Comment
A picture of small single stitches in different colours stitched on pink dyed fabric. Overlaid is a blue square with white text saying - hand embroidery - five isolated embroidery stitches  - www.embellishedelephant.co.uk

Five isolated stitches for embroidery

August 11, 2021

I love working with isolated stitches, just picking a colour and placing a stitch where I think it will look great. My heart embroidery kit is designed to work in this way. Here are some of my favourites:

A picture of seed stitch in black thread on calico - this is lots of different small stitches in different directions

Seed Stitch

A series of straight stitches placed at different angles to create a scattered seed effect. The seeds can be the same length or varied. They can even be overalapped.

An embroidery on calico with thin brown stitches creating branches. At the end of each branch are clusters of pink french knots

French Knot

One of my favourite stitches, it is unlike any other on this list and is great for bringing texture to embroidery but it does take a little bit of practice!

A close up on a purple circle with bullion knots stitched in a random way in purple floss

Bullion Knot

If you think French Knot is hard, then beware of bullion stitch. I’ve been stitching it as much as I can lately as practice really helps. And it is worth the wait as it looks great when you’ve perfected it.


A picture of lavender embroidery stitched using lazy daisy stitch in different shades of purple

Lazy Daisy Stitch

Lazy daisy is just a single chain stitch. It is a series of small loops secured by a tiny straight stitch. It’s great for floral embroidery.

An image of calico background with blue embroidery stitches in the shape of an arrow. The needle is halfway through the fabric in creating the second part of an arrowhead stitch

Arrowhead stitch

A simple V shaped stitch which can also be worked in a line of stitches.

The angle of the V can be varied and the addition of a small straight stitch can create a flock of birds!

Enjoyed this blog post? I share embroidery tips and a free embroidery pattern in my monthly newsletter. Sign up here to receive the newsletter on the 1st of each the month.

In tips 2 Tags Stitch Showcase, Isolated Stitch
Comment
An image of a spray of pistil stitch in blue thread on white fabric. Overlaid is a blue square with white text saying - stitch showcase, pistil stitch, www.embellishedelephant.co.uk

Stitch Showcase: Pistil Stitch

March 24, 2021

Until recently I didn’t realise that this was a proper stitch with a proper name. I thought this was the result of when my French knots went horrendously wrong. Another name for pistil stitch is elongated French knot which describes perfectly how you create this stitch. If you are familiar with French knots then the only difference is the point at which you take the needle back down through the fabric.

  • Bring the needle up through the fabric at the point you want the long tail of your stitch to finish (A)

  • Wrap the thread around the needle 3 or 4 times

  • Put the tip of the needle through the fabric where you want the knot part of the stitch to lie (B)

  • Gently pull the needle through the wraps, hold your thumb over them to keep them in place if needed

an illustration of how to create pistil embroidery stitch. the illustration is in shades of blue on a white background

When I created my daffodil pattern I wanted a bit of extra texture at the centre of the trumpet to represent the stamen and pistil stitch was the perfect stitch for this detail.

Enjoyed this blog post? I share embroidery tips and a free embroidery pattern in my monthly newsletter. Sign up here to receive the newsletter on the 1st of each the month.

In stitch showcase 2 Tags Isolated Stitch, Stitch Showcase
Comment
A picture of several algerian eye embroidery stitches in blue thread on calico fabric. Overlaid is a blue square with white text saying - stitch showcase, algerian eye stitch

Stitch Showcase: Algerian Eye Stitch

February 24, 2021

This is one of a group of stitches that creates a star shape and because of the isolated points it can be tricky to make it look even. Drawing a two guides circle may be useful if you want a perfect star shape, but I tend to stitch by eye and use the needle to help measure the length of each point.

  • I find it easier to work by stitching from the outside edge to the inner edge

  • Bring the needle up through the fabric at the appropriate starting point

  • Create the first arm of the star shape (A), then work across on the opposite side of the star (B) so there are two stitches of even length in a line, wth a gap in the centre

  • Work the next two stitches at right angles to the first (C & D)

  • Then fill in the third and forth lines in between the first two lines (E & F, G & H)

An illustration of how to create Algerian Eye stitch. The illustration is in shades of blue on a white background.

I used Algerian eye stitch in my floral sampler kit as the centre point for one of the flowers, but I also like combining it randomly with other star shaped stitches such as in this sampler.

A picture of some printed fabric with a circle in purple. Stitched in the centre of the circle is a an algerian eye stitch in pink thread
A stitch sampler on white cotton. In a range of blue threads are stitched lots of different star shaped stitches including Algerian Eye Stitch

Enjoyed this blog post? I share embroidery tips and a free embroidery pattern in my monthly newsletter. Sign up here to receive the newsletter on the 1st of each the month.

In stitch showcase 1 Tags Stitch Showcase, Isolated Stitch
Comment
A picture of some calico fabric with navy blue thread in arrowhead embroidery stitch. Overlaid is a blue square with white text saying - stitch showcase, arrowhead stitch

Stitch Showcase: Arrowhead Stitch

February 17, 2021

Arrowhead stitch can be worked in rows or isolation. In isolation it is a great alternative to a V shaped detached fly stitch.

  • If working as a row, it can help to draw three parallel guide lines, one for each side and one for the centre

  • Bring the needle up on one side of the stitch shape and bring it down at the centre point

  • Repeat on the other side of the stitch to create a V shape

  • If stitching in a row, then aim to space each stitch evenly apart.

An illustration of arrowhead stitch. The illustration is in shades of blue on a white background.

As well as being stitched in a row of arrows stacked on top of each other, the arrows can also be stitched side by side to create a zig-zag pattern.

Want to try this stitch? Use it as an alternative to detached fly stitch in my heart stitch sampler kit.

Sign up to my email newsletter to get a monthly free embroidery pattern and a round up of Stitch Showcase blogs.

A picture of an embroidery hoop with calico fabric. In navy blue thread are stitched a row of arrowhead stitches and in the top right hand corner you can just see some scattered arrowhead stitches
A picture of calico fabric with light blue thread. Arrowhead stitch is stitched in a line to create waves of stitches
In stitch showcase 1 Tags Stitch Showcase, Isolated Stitch, Line Stitch
Comment
A close up picture of detached fly stitch on calico fabric with turquoise thread. Overlaid is a blue square with white text saying - stitch showcase, detached fly stitch, www.embellishedelephant.co.uk

Stitch Showcase: Detached Fly Stitch

February 3, 2021

Fly stitch is a V or Y shaped stitch that can be stitched in rows, columns or as single stitches (called detached fly stitch).

  • Bring the needle up through the fabric (A)

  • Take the needle down through the fabric at the point you want the width of the stitch to be (B)

  • Push it up through the fabric at the bottom point of the V, but don't pull the needle through the fabric (C)

  • Hook the thread around the point of the needle and then pull the needle through to form the V shape

  • Complete the stitch by creating a tiny straight stitch to secure the V (D)

  • Or create a Y shape by making a longer straight stitch.

an illustration of detached fly stitch. the illustration is on a white background with blue illustration details

I like to use detached fly stitch as part of a mix of different stitches and it is one of the stitches I’ve included in my heart stitch sampler kit.

Sign up to my email newsletter to get a monthly free embroidery pattern and a round up of Stitch Showcase blogs.

A sampler of several different embroidery stitches in shades of pink on calico including detached fly stitch
In stitch showcase 1 Tags Stitch Showcase, Isolated Stitch
Comment
A picture of lots of different embroidery stitches in shades of pink scattered across calico fabric. Overlaid is a blue square with white text saying - stitch showcase, double cross stitch, www.embellishedelephant.co.uk

Stitch Showcase: Double Cross Stitch

January 27, 2021

Double cross stitch is a simple way to add a star shape to your embroidery - it creates an eight-pointed star.

  • Double cross stitch uses straight stitches in four different orientations. to create the eight-pointed star.

  • To start make a straight stitch in any direction, then make another stitch of the same length at right angles to create a plus sign.

  • To finish the stitch, create another cross diagonally over the first and then one final stitch in the opposite direction to make an 8 pointed star.

An illustration of steps to create double cross stitch. The illustration is in blue on a white background

This stitch is most often used as an isolated stitch such as in the pink firework at the bottom of this sampler. However, it can also be stitched in a row to create a decorative border such as in the second sampler which shows how different weights of thread can impact the finished look.

Want to try this stitch - it’s one of the stitches I recommend using in my heart stitch sampler kit.

Sign up to my email newsletter to get a monthly free embroidery pattern and a round up of Stitch Showcase blogs.

An image of a firework embroidery on navy blue fabric stitched with metallic threads
A picture of a stitch sampler using different thicknesses of thread. The thread is in black and is stitched on calico fabric
In stitch showcase 1 Tags Stitch Showcase, Isolated Stitch
Comment
A picture of a colourful embroidery piece using felt and embroidery. Overlaid is a blue square with white text saying - stitch showcase, woven picot stitch, www.embellishedelephant.co.uk

Stitch Showcase: Woven Picot Stitch

January 20, 2021

Woven picot stitches give texture and depth to a piece of embroidery and are often used as leaf or petal detail on raised embroidery.

  • A pin is needed to make this stitch - the pin should be placed through the fabric so as where the pin goes through the fabric is where the top of the stitch will be and where it comes back through the fabric is where the base of the stitch will be.

  • I also recommend having a much longer length of thread than normal as making these picot stitches is hungry on the thread.

  • Bring the threaded needle up through the fabric aligned with the lower part of the pin, the distance away from the pin governs the width of the picot.

  • Loop the thread around the top of the pin and pass the needle back through the fabric in line with the lower part of the pin and the same width away from the pin as the other side you should have an inverted V shape.

an illustration of woven picot stitch. the illustration is in blue on a white background and shows step by step stages of creating the stitch
  • Bring the needle back up through the fabric as close to the lower part of the pin (the centre of the V as possible) and loop it around the top of the pin to create a second V.

  • Rather than pass the needle back through the fabric, start the weaving at the point of the V.

  • Pass the needle under the right thread, over the centre thread and under the left thread.

  • Then working back in the other direction over the left thread (to loop round it), under the centre thread and over the right thread.

  • Keep on working under/over/under and over/under/over in opposite directions.

  • Once the weaving has reached the bottom of the picot, pass the needle back through the fabric and secure.

  • Remove the pin to release your finished picot.

If the weaving is too loose, use the needle to push the weaving close together. The fewer strands of thread used for the weaving, the more rows will be needed.

The finished picots can be left loose so they can be moved back and forwards or a tiny stitch can hold them in place.

Want to try this stitch? It’s one of the stitches I suggest for my floral sampler kit.

Sign up to my email newsletter to get a monthly free embroidery pattern and a round up of Stitch Showcase blogs.

In stitch showcase 1 Tags Stitch Showcase, Isolated Stitch, Raised Stitch
Comment
a picture of multiple layers of herringbone stitch in different shades of blue on calico fabric. Overlaid is a blue square with white text saying - stitch showcase, herringbone stitch, www.embellishedelephant.co.uk

Stitch Showcase: Herringbone Stitch

January 13, 2021

Herringbone stitch is a variation on a cross stitch - the point of the cross is off centre so that there are two long legs and two short legs off the cross ie it’s a cross stitch at a jaunty angle.

  • If you are stitching this as a border then you might want to draw two parallel lines to guide your stitching. If you are using it as an isolated or textural stitch then this is not necessary.

  • Bring the needle up though the fabric and then take it at a diagonal and pass the needle down through the fabric and then up a little further along (you can do this in one motion or up and then down).

  • To complete the stitch take it diagonally down to create a (wonky) cross.

An illustration of herringbone stitch in blue on a white background

Most commonly you’ll see this stitch worked in a line to create a border, but I prefer to use it as isolated stitches, varying the size and point of cross. Layering the stitches using different thread gives a great textured look.

Want to try this stitch? It’s one of the stitches I suggest in my sunflower sampler kit.

Sign up to my email newsletter to get a monthly free embroidery pattern and a round up of Stitch Showcase blogs.

A picture of a sunflower embroidery using herringbone stitch at the centre of the sunflower
A stitch sampler using different types of blue thread and herringbone stitch in an abstract arrangement
In stitch showcase 1 Tags Stitch Showcase, Isolated Stitch
Comment
A picture of bullion knots in black threads on a calico background. Overlaid is a blue square with white text saying - stitch showcase, bullion knot, www.embellishedelephant.co.uk

Stitch Showcase: Bullion Knot

January 6, 2021

This is one of the trickiest stitches in embroidery but I’ve been stitching it as much as I can lately as, much like the French knot, practice really helps.

There are two methods for creating a bullion knot. The method I prefer isn’t the one that you’ll find in most stitch tutorials. I like it as I with the traditional method my knots are often thicker at one end than the other, but give them both a try and see which works for you

Traditional method

  • Create a straight stitch but leave a loop when you complete the stitch, then poke the needle through the fabric at the start of the stitch, but don't push it all the way through.

  • Using the loop, wrap the loop around the needle enough times to match the length of the stitch.

  • Carefully pull the rest of the loop so the needle lies flat, then push the needle through (holding onto the wraps) and finally complete the stitch.

An illustration with step by step guidance on how to create bullion knots. The illustration is in blue on a white background

My method

  • Bring the needle up through the fabric at the point you want the knot to start, then pass it back through the fabric where you want the stitch to end, don't pull the thread all the way through.

  • Push the needle back up through the fabric at the starting point of the stitch, but don't push it all the way through. Wrap the thread around the needle enough times so the wraps are the same length as the stitch will be, you can flip the needle down to check.

  • Using your thumb to hold the wraps in place, pull the needle back slightly so you can push the tip of the needle through the fabric at the end point. Pull the excess thread on the top of the fabric through to the back then pull the needle through carefully to complete the stitch.


In both these examples below, the bullion knot has been used as an isolated stitch - in combination with other stitches and on its own.

Want to try this stitch? It’s one of the stitches I suggest in my heart stitch sampler kit and my floral stitch sampler kit.

Sign up to my email newsletter to get a monthly free embroidery pattern and a round up of Stitch Showcase blogs.

A picture of lots of individual stitches scattered across calico fabric. The stitches are in different shades of pink and using a range of different embroidery stitches
A close up of a pink circle with purple bullion knot stitches scattered within the circle
In stitch showcase 1 Tags Stitch Showcase, Isolated Stitch
Comment
An image of embroidered lavender in shades of purple and light green on a light purple background. Overlaid is a blue square with white text saying - stitch showcase, lazy daisy, www.embellishedelephant.co.uk

Stitch Showcase: Lazy Daisy Stitch

November 18, 2020

Lazy daisy stitch is also known as a single chain stitch, and that’s all this stitch is - one chain stitch. It’s great to use to create the petals of flowers.

  • Bring the needle up through the fabric at the point where you want your stitch to start (A)

  • Take it back down as close as possible to the original hole (B)

  • Gently pull the thread through until you have a small loop - don't pull fully tight at this point

  • Push the needle up through the fabric at the point where you want the stitch to end, 5mm is a good length (C)

  • Create a tiny straight stitch over the loop so it can’t come loose (D).

An illustration of how to create lazy daisy embroidery stitch. The illustration is in shades of blue and grey on a white background.

Lazy daisy stitches can be worked randomly, but commonly they are placed in a circle to form a flower.

Want to try this stitch? It is one I recommend using in my lavender embroidery kit.

Sign up to my email newsletter to get a monthly free embroidery pattern and a round up of Stitch Showcase blogs.

An image of an embroidered needle minder with the letter S surrounded by pink flowers made from lazy daisy stitch.
In stitch showcase 1 Tags Stitch Showcase, Isolated Stitch
Comment
A picture of seed stitches in black thread of different thicknesses on white fabric. Overlaid is a blue square with white text saying - stitch showcase, seed stitch, www.embellishedelephant.co.uk

Stitch Showcase: Seed Stitch

October 21, 2020

Seed stitch is basically a running stitch but stitched randomly rather than in a line and is a great decorative stitch especially when you want to fill a space but still see the backing fabric.

  • Bring the needle up from the back of the fabric (A)

  • Take it back down a few millimetres along (B)

  • Repeat this at different angles (eg C-D) and with different spacing between the stitches.

  • The stitches can be of the same length or differing lengths.

  • Seed stitch can also be layered up with the ‘seeds’ overlapping and this works particularly well when using different threads that overlap.

An illustration showing how to create seed stitches. The illustration is in shades of blue and grey on a white background

The light blue section of this sampler shows how seed stitches can be layered over each other and how different thicknesses of thread and stitch length can also add variation. It’s also really effective when used to emphasise colours in the fabric. Seed stitches were added intuitively to this hand dyed piece of fabric to highlight areas of colour.

Want to try this stitch? It’s a stitch I suggest using in my heart stitch sampler kit and floral sampler kit.

Sign up to my email newsletter to get a monthly free embroidery pattern and a round up of Stitch Showcase blogs.

A picture showing layered seed stitches an isolated seed stitches
A picture showing hand dyed pink fabric with seed stitches in shades of yellow, blue and yellow picking out patches of dye in these colours
In stitch showcase 1 Tags Stitch Showcase, Isolated Stitch
Comment
A picture of an embroidery of a tree branch with pink blossoms created from french knots. Overlaid is a blue square with white text saying - stitch showcase, french knot, www.embellishedelephant.co.uk

Stitch Showcase: French Knot

October 7, 2020

I think French knots are my all time favourite embroidery stitch. I know that some people can’t stand them but a little practice goes a long way with this one if this is one you haven’t tried before or don’t like I would recommend practicing on a scrap piece of fabric until you are comfortable with the motion of this stitch.

  • Push the needle up through the fabric in the place you want your knot to approximately sit (A)

  • Wrap the thread around the needle (the number of wraps affects the size of the knot) I tend to use three wraps

  • Take the tip of the needle back through the fabric as close to the original hole as possible (B). If the same hole is used then the knot can be pulled all the way through to the back of the fabric

  • Use your thumb over the thread wraps and gently pull the thread through, being careful of tangles.

An illustration of how to do french knot embroidery stitch. The illustration is in blue and grey on a white background.

Commonly French knots are used in isolation or in groups as in the blossom embroidery in the header picture, but can also be used to fill areas, such as in this negative space word art. (You need to REALLY love French knots if you are going to attempt a piece like this.)

They can also be used effectively as a counter point to more linear stitches such as in this blue piece of intuitive embroidery (where they also fill small gaps between the linear stitches.)

Want to try this stitch? It’s one I suggest using in my heart stitch sampler kit, flamingo flower plant kit, floral sampler kit and spring blossom kit.

Enjoyed this blog post? I share embroidery tips and a free embroidery pattern in my monthly newsletter. Sign up here to receive the newsletter on the 1st of each the month.

A picture of an embroidery hoop with yellow fabric and the word sunshine stitched in negative space style with the outline of the letters stitched in yellow french knots
A close up image of an abstract embroidery stitched in shades of blue yarn featuring a range of stitches including french knots
In stitch showcase 1 Tags Stitch Showcase, Filling Stitch, Isolated Stitch
Comment
A picture of flowers stitched in shades of pink, purple and yellow using straight stitches. Overlaid is a blue square with white text saying - stitch showcase, straight stitch, www.embellishedelephant.co.uk

Stitch showcase: Straight stitch

September 2, 2020

If you’ve ever knitted you’ll know that there are really only two stitches, knit and purl, and that all the stitch patterns used in knitting are just combinations of knit and purl.

I see the straight stitch as the embroidery version of knit and purl. It’s just a single stitch of any length and in any direction. So it really is the building block for the majority of other embroidery stitches - running stitch, backstitch, seed stitch, satin stitch and cross stitch to name just a few.

  • Creating a straight stitch is easy, bring the needle up through the fabric at the point the stitch will start

  • Push it back through the fabric at the point at which you want the stitch to end.

An illustration of how to create straight stitch in blue and white

The image in the header shows one way of using straight stitches - to create a flower. But a fun way to use straight stitches is when stitching on paper. This is a card I made for my niece’s birthday using long straight stitches at random angles and overlapping.

Want to try this stitch? It’s one I suggest using in my floral sampler kit.

Sign up to my email newsletter to get a monthly free embroidery pattern and a round up of Stitch Showcase blogs.

IMG_5511.JPG
In stitch showcase 1 Tags Stitch Showcase, Isolated Stitch, Line Stitch
Comment

Tags

  • About me
  • Artists/Designers
  • Basics
  • Christmas
  • colour
  • Couching Stitch
  • Fabric
  • Filling Stitch
  • Finishing
  • Hoops
  • Isolated Stitch
  • Line Stitch
  • London
  • My Makes
  • Needles
  • Stitch Showcase
  • Texture Stitch
  • Thread
  • Transfer
  • Travel

Latest Posts

Featured
May 1, 2025
How to manage your backlog of craft projects
May 1, 2025
May 1, 2025
Apr 1, 2025
What to do if you don't like what you've stitched
Apr 1, 2025
Apr 1, 2025
Feb 15, 2025
How to decide which embroidery stitch to use
Feb 15, 2025
Feb 15, 2025
Feb 1, 2025
Focus on stitches for flowers
Feb 1, 2025
Feb 1, 2025
Jan 1, 2025
Focus on stitches for leaves
Jan 1, 2025
Jan 1, 2025
Nov 1, 2024
Stitch Showcase: Six-pointed star stitch
Nov 1, 2024
Nov 1, 2024
Oct 1, 2024
Focus on transferring or tracing patterns
Oct 1, 2024
Oct 1, 2024
Sep 1, 2024
Focus on hoops
Sep 1, 2024
Sep 1, 2024
Aug 1, 2024
A focus on needles
Aug 1, 2024
Aug 1, 2024
Jul 1, 2024
Focus on threads
Jul 1, 2024
Jul 1, 2024

Home — Shop — Stockists — Wholesale — Portfolio — Contact — Reviews — Policies — FAQs