• Home
  • Shop
  • Stitch Showcase
  • Embroidery tips
  • Freebies
  • About
  • Contact
Menu

Embellished Elephant

  • Home
  • Shop
  • Stitch Showcase
  • Embroidery tips
  • Freebies
  • About
  • Contact
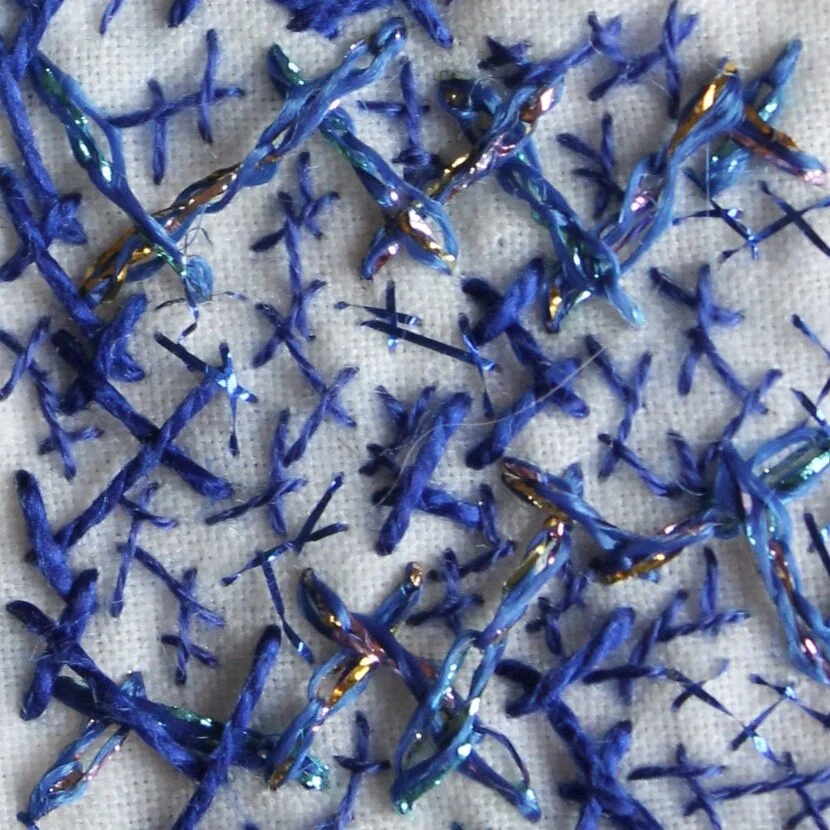
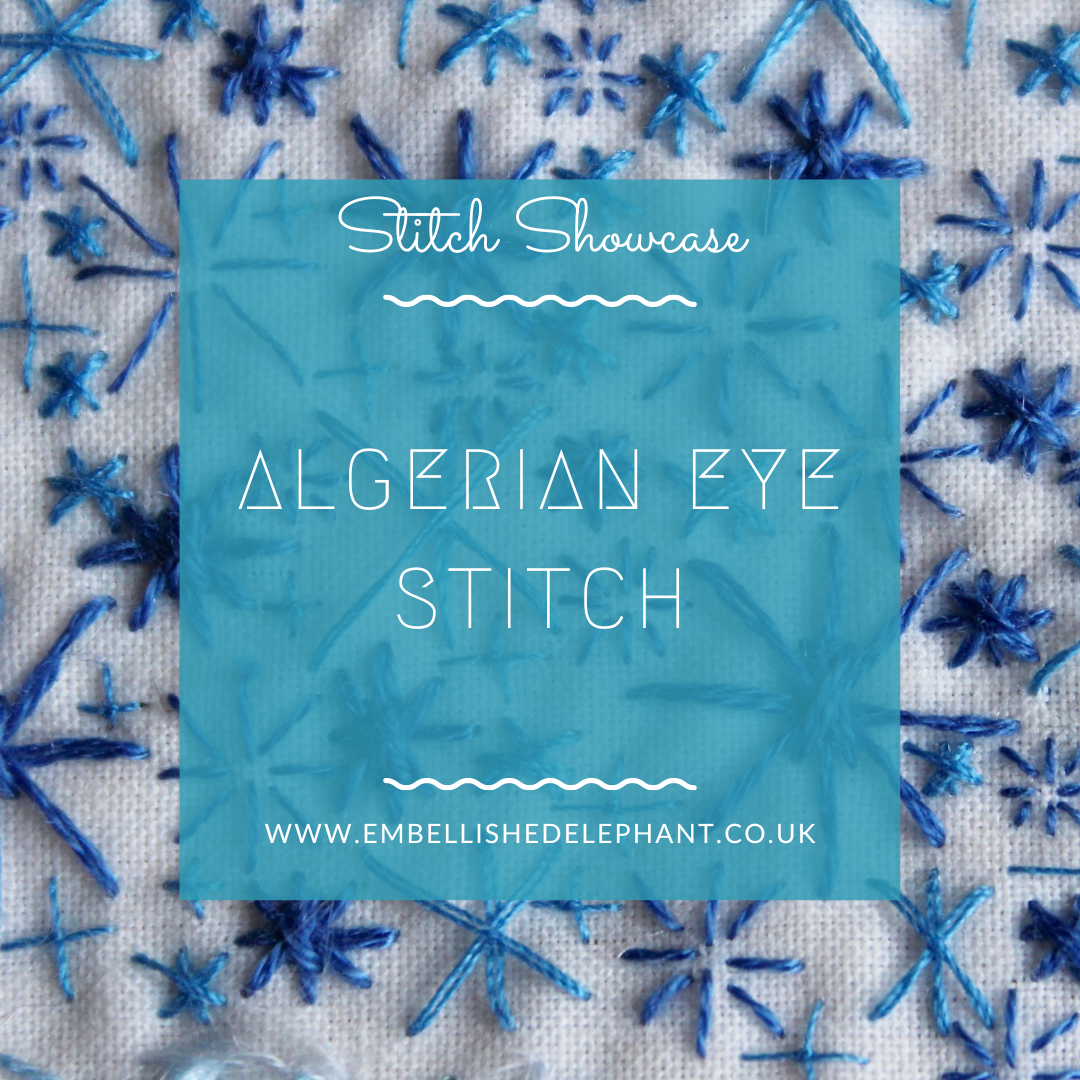
A picture of several algerian eye embroidery stitches in blue thread on calico fabric. Overlaid is a blue square with white text saying - stitch showcase, algerian eye stitch

Stitch Showcase: Algerian Eye Stitch

February 24, 2021

This is one of a group of stitches that creates a star shape and because of the isolated points it can be tricky to make it look even. Drawing a two guides circle may be useful if you want a perfect star shape, but I tend to stitch by eye and use the needle to help measure the length of each point.

  • I find it easier to work by stitching from the outside edge to the inner edge

  • Bring the needle up through the fabric at the appropriate starting point

  • Create the first arm of the star shape (A), then work across on the opposite side of the star (B) so there are two stitches of even length in a line, wth a gap in the centre

  • Work the next two stitches at right angles to the first (C & D)

  • Then fill in the third and forth lines in between the first two lines (E & F, G & H)
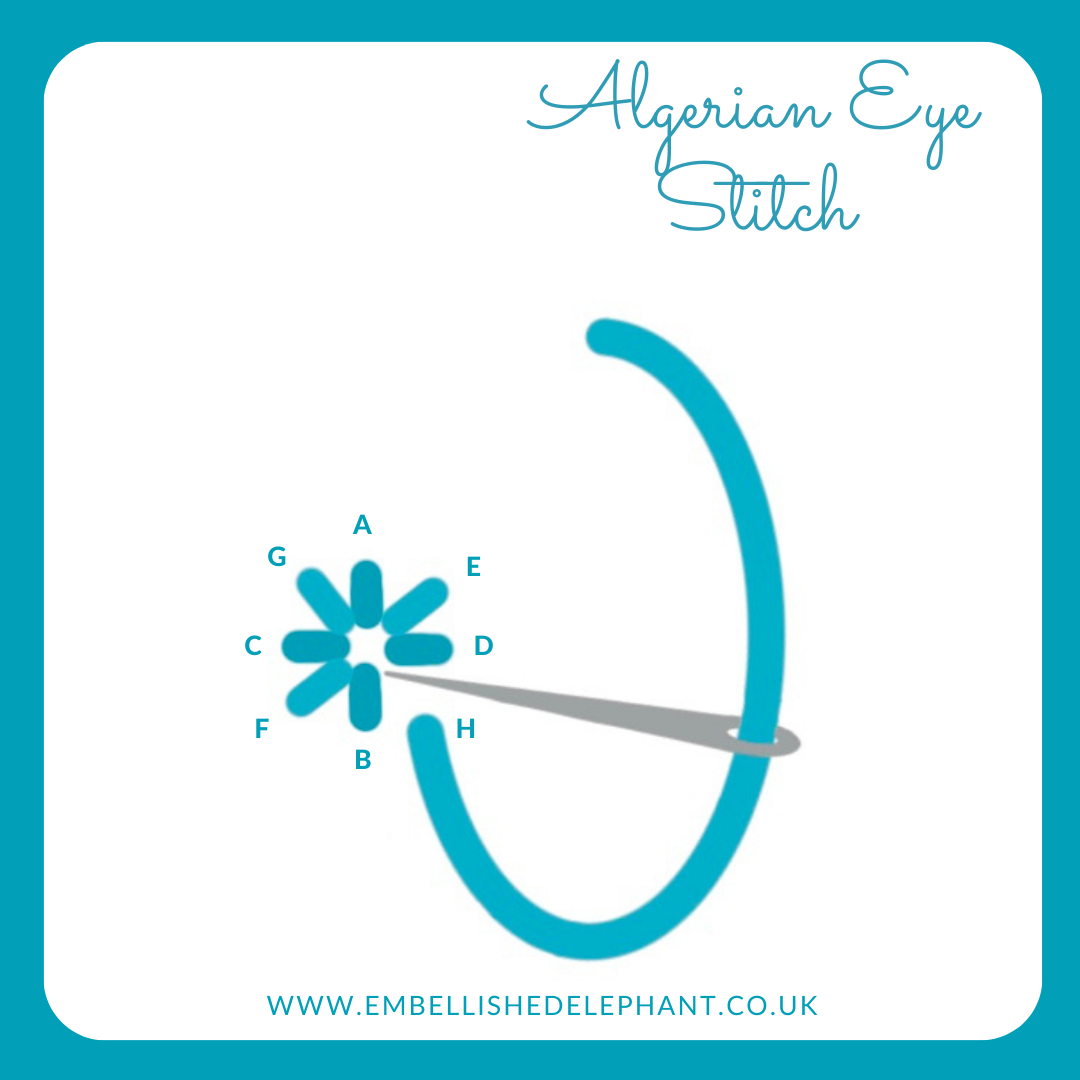
An illustration of how to create Algerian Eye stitch. The illustration is in shades of blue on a white background.

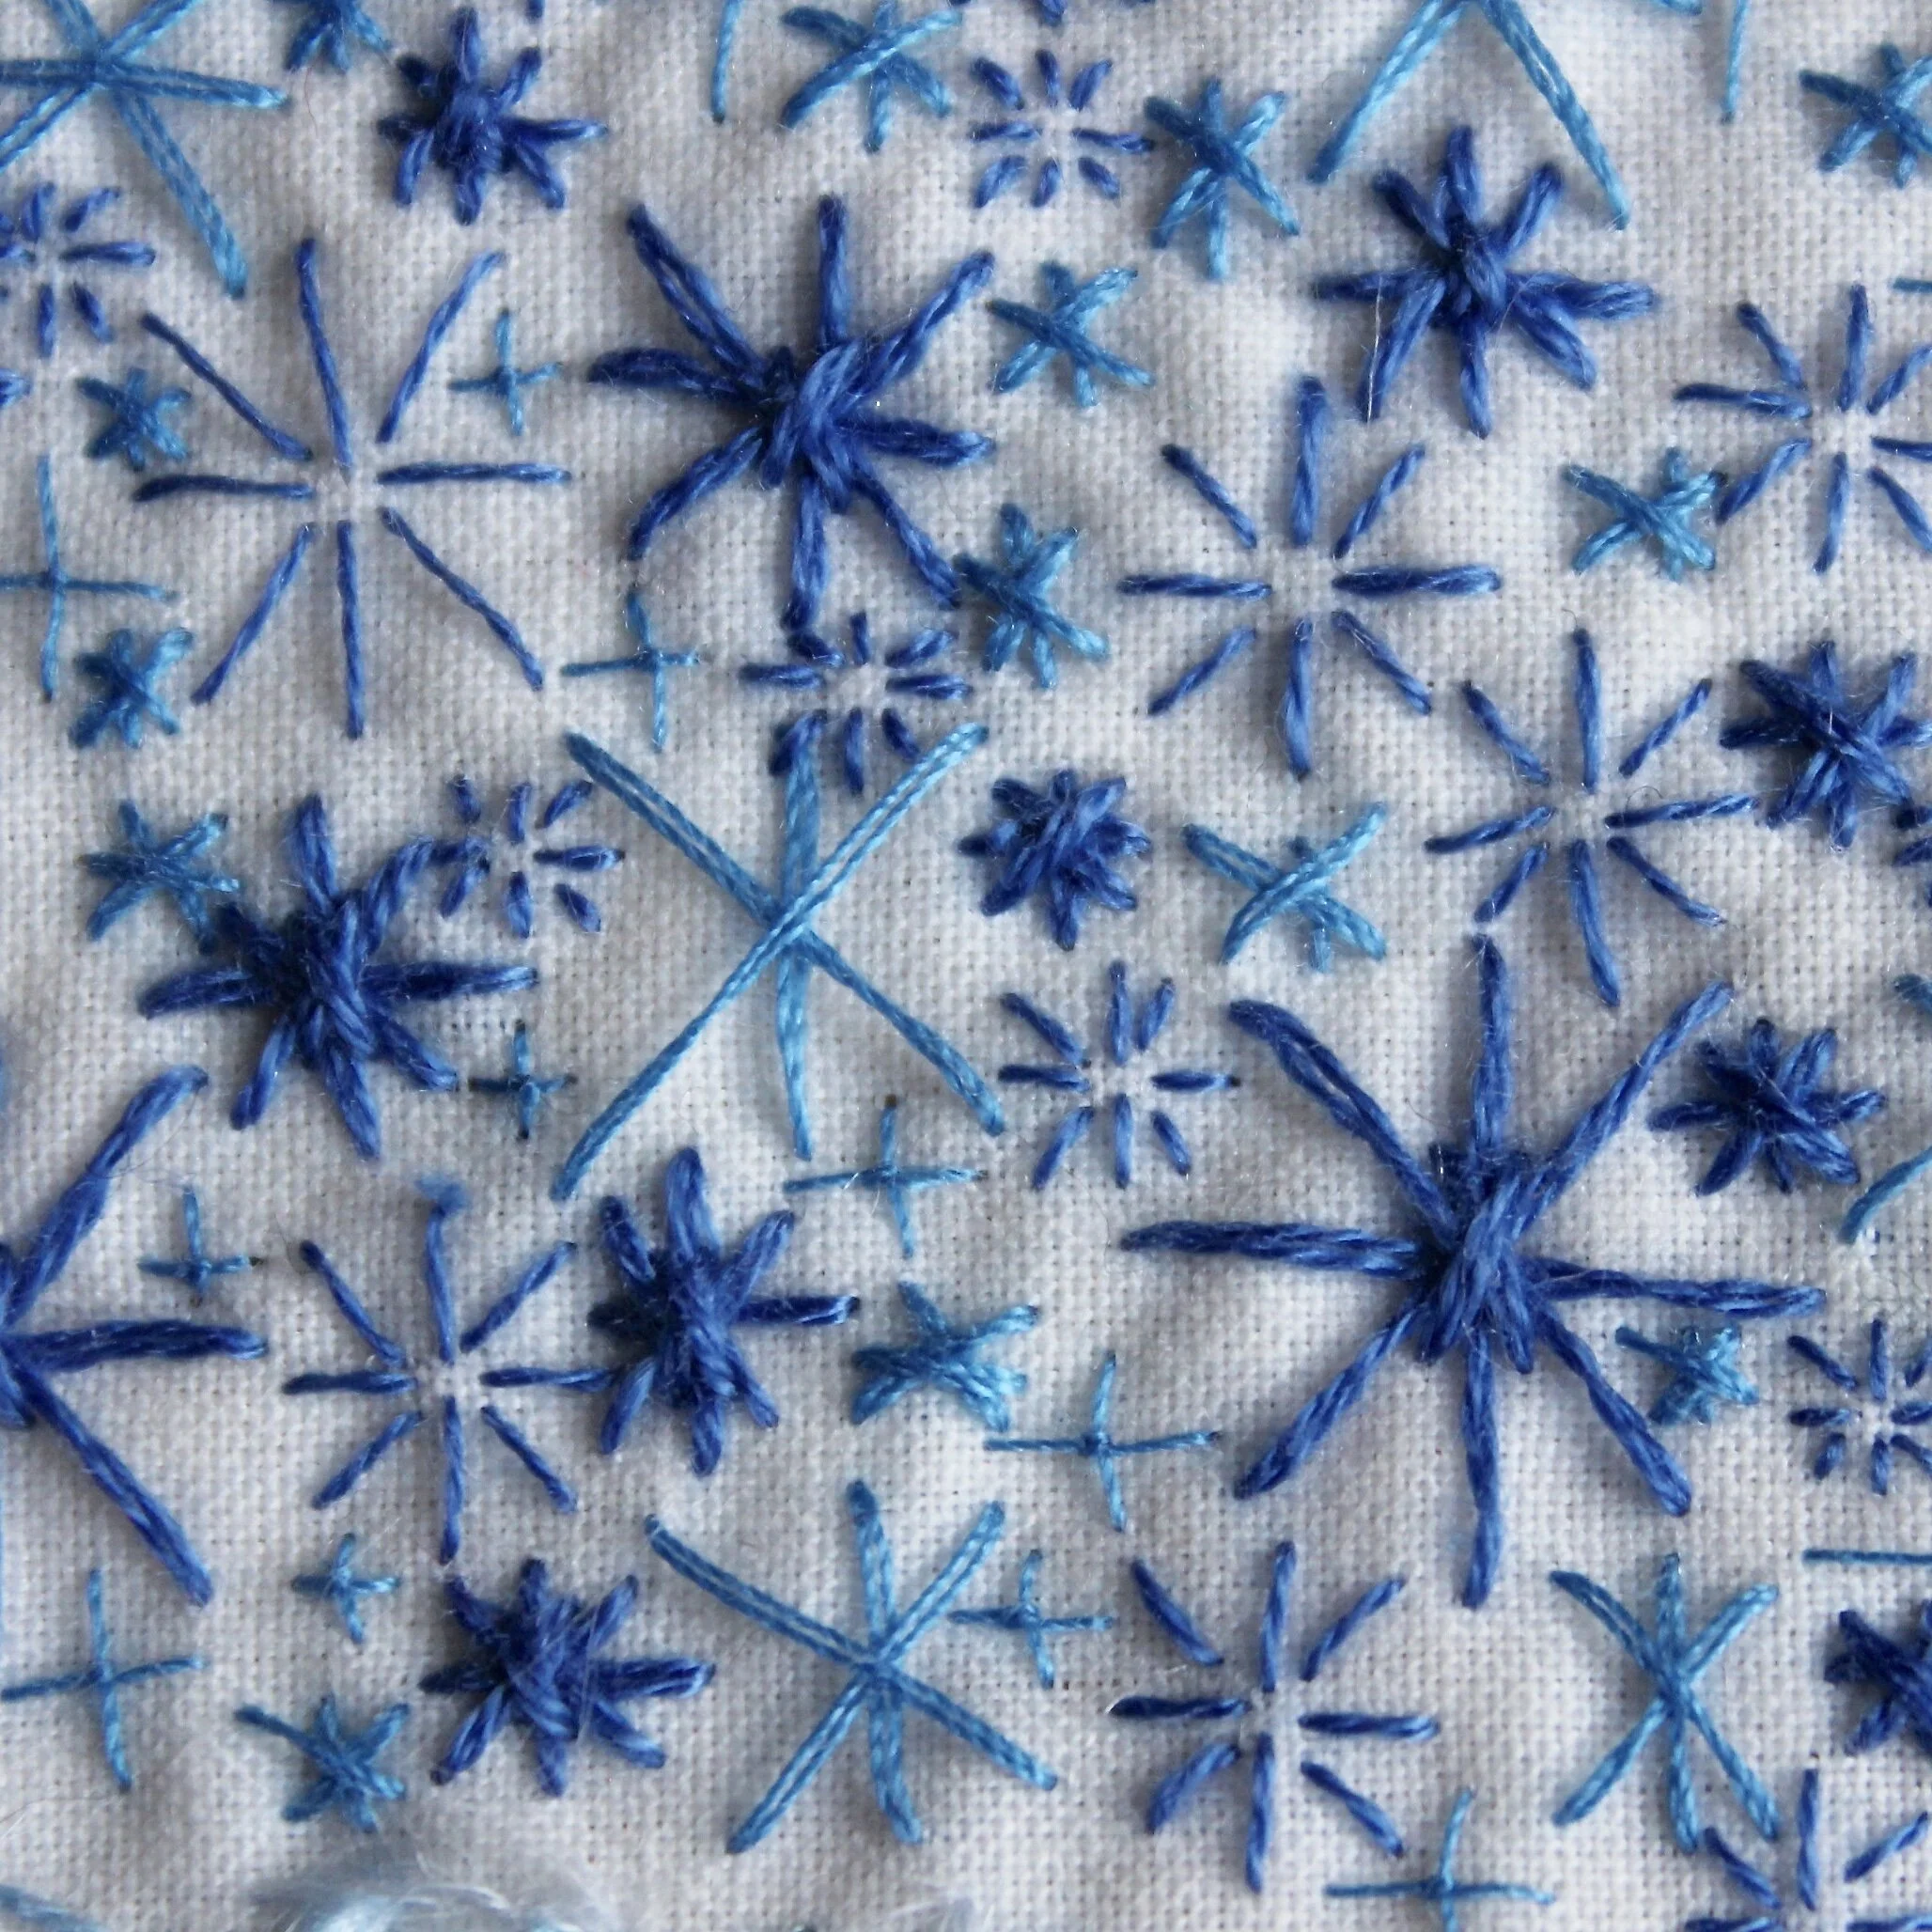
I used Algerian eye stitch in my floral sampler kit as the centre point for one of the flowers, but I also like combining it randomly with other star shaped stitches such as in this sampler.
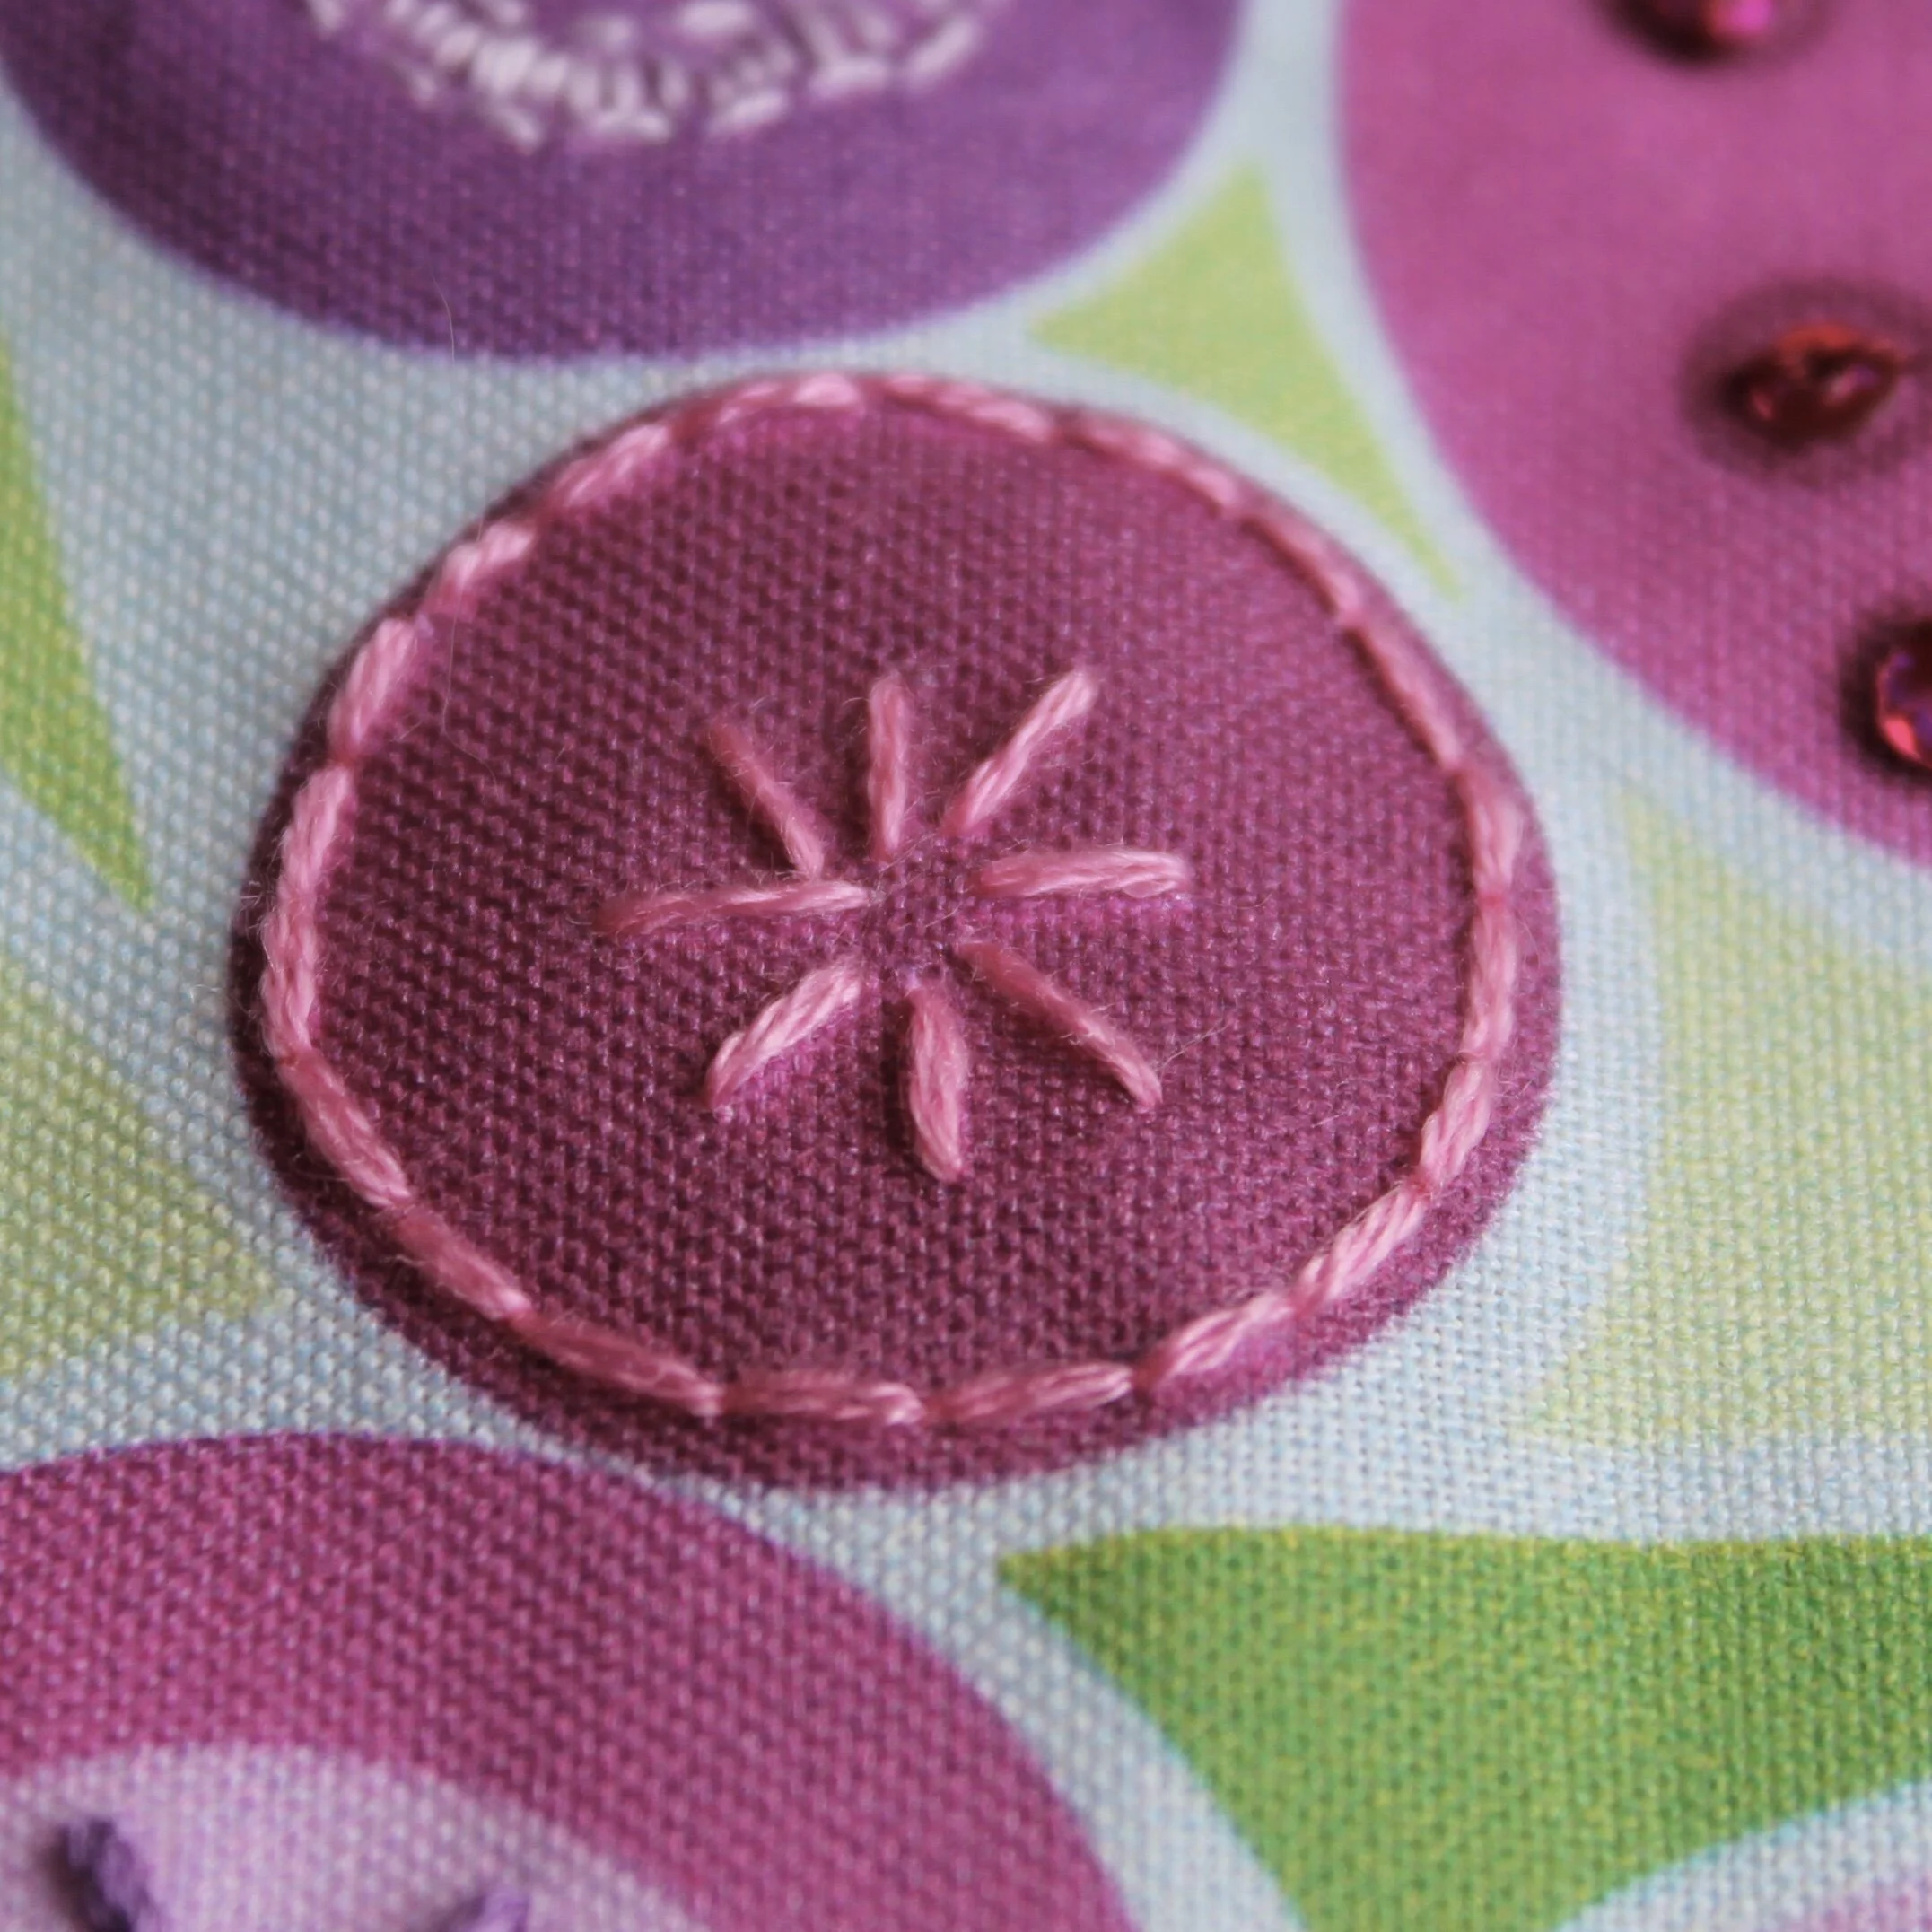
A picture of some printed fabric with a circle in purple. Stitched in the centre of the circle is a an algerian eye stitch in pink thread
A stitch sampler on white cotton. In a range of blue threads are stitched lots of different star shaped stitches including Algerian Eye Stitch

Enjoyed this blog post? I share embroidery tips and a free embroidery pattern in my monthly newsletter. Sign up here to receive the newsletter on the 1st of each the month.
In stitch showcase 1 Tags Stitch Showcase, Isolated Stitch
Comment
A picture of a hand holding an embroidery hoop with fabric over a piece of paper. Overlaid is a blue square with white text saying - hand embroidery, how to trace a paper embroidery pattern, www.embellishedelephant.co.uk

How to trace a paper embroidery pattern

February 20, 2021

When I first started embroidering I used patterns from books and designs I found for free or purchased which I downloaded and printed. However, in order to know what elements to stitch and where you need to transfer the pattern onto the fabric. This is one of the most challenging steps for a novice embroiderer so in this blog post I’ll walk you through how to go about transferring paper patterns onto fabric.

This method works best for thinner and lighter coloured fabrics, if the fabric is too dark or too thick then you’ll need to use another method of transfer such as carbon paper, tissue paper or water soluble paper (blog posts to come on these).

In order to transfer a paper pattern you need a source of light. There are two main options a light box (or light box app on a tablet device) and a window.

I’ll walk you through using a window, if you want more information on using a light box app on a tablet device head over to this blog post that takes you through this method (the only difference being you would just lay the paper pattern on top of a plain white screen in the app).

The benefit of using a window is that you can trace much larger patterns than you can on a tablet.

I recommend using an air, water or heat soluble pen for tracing, for more information about the different pens you can use for transferring patterns take a look at this blog post.

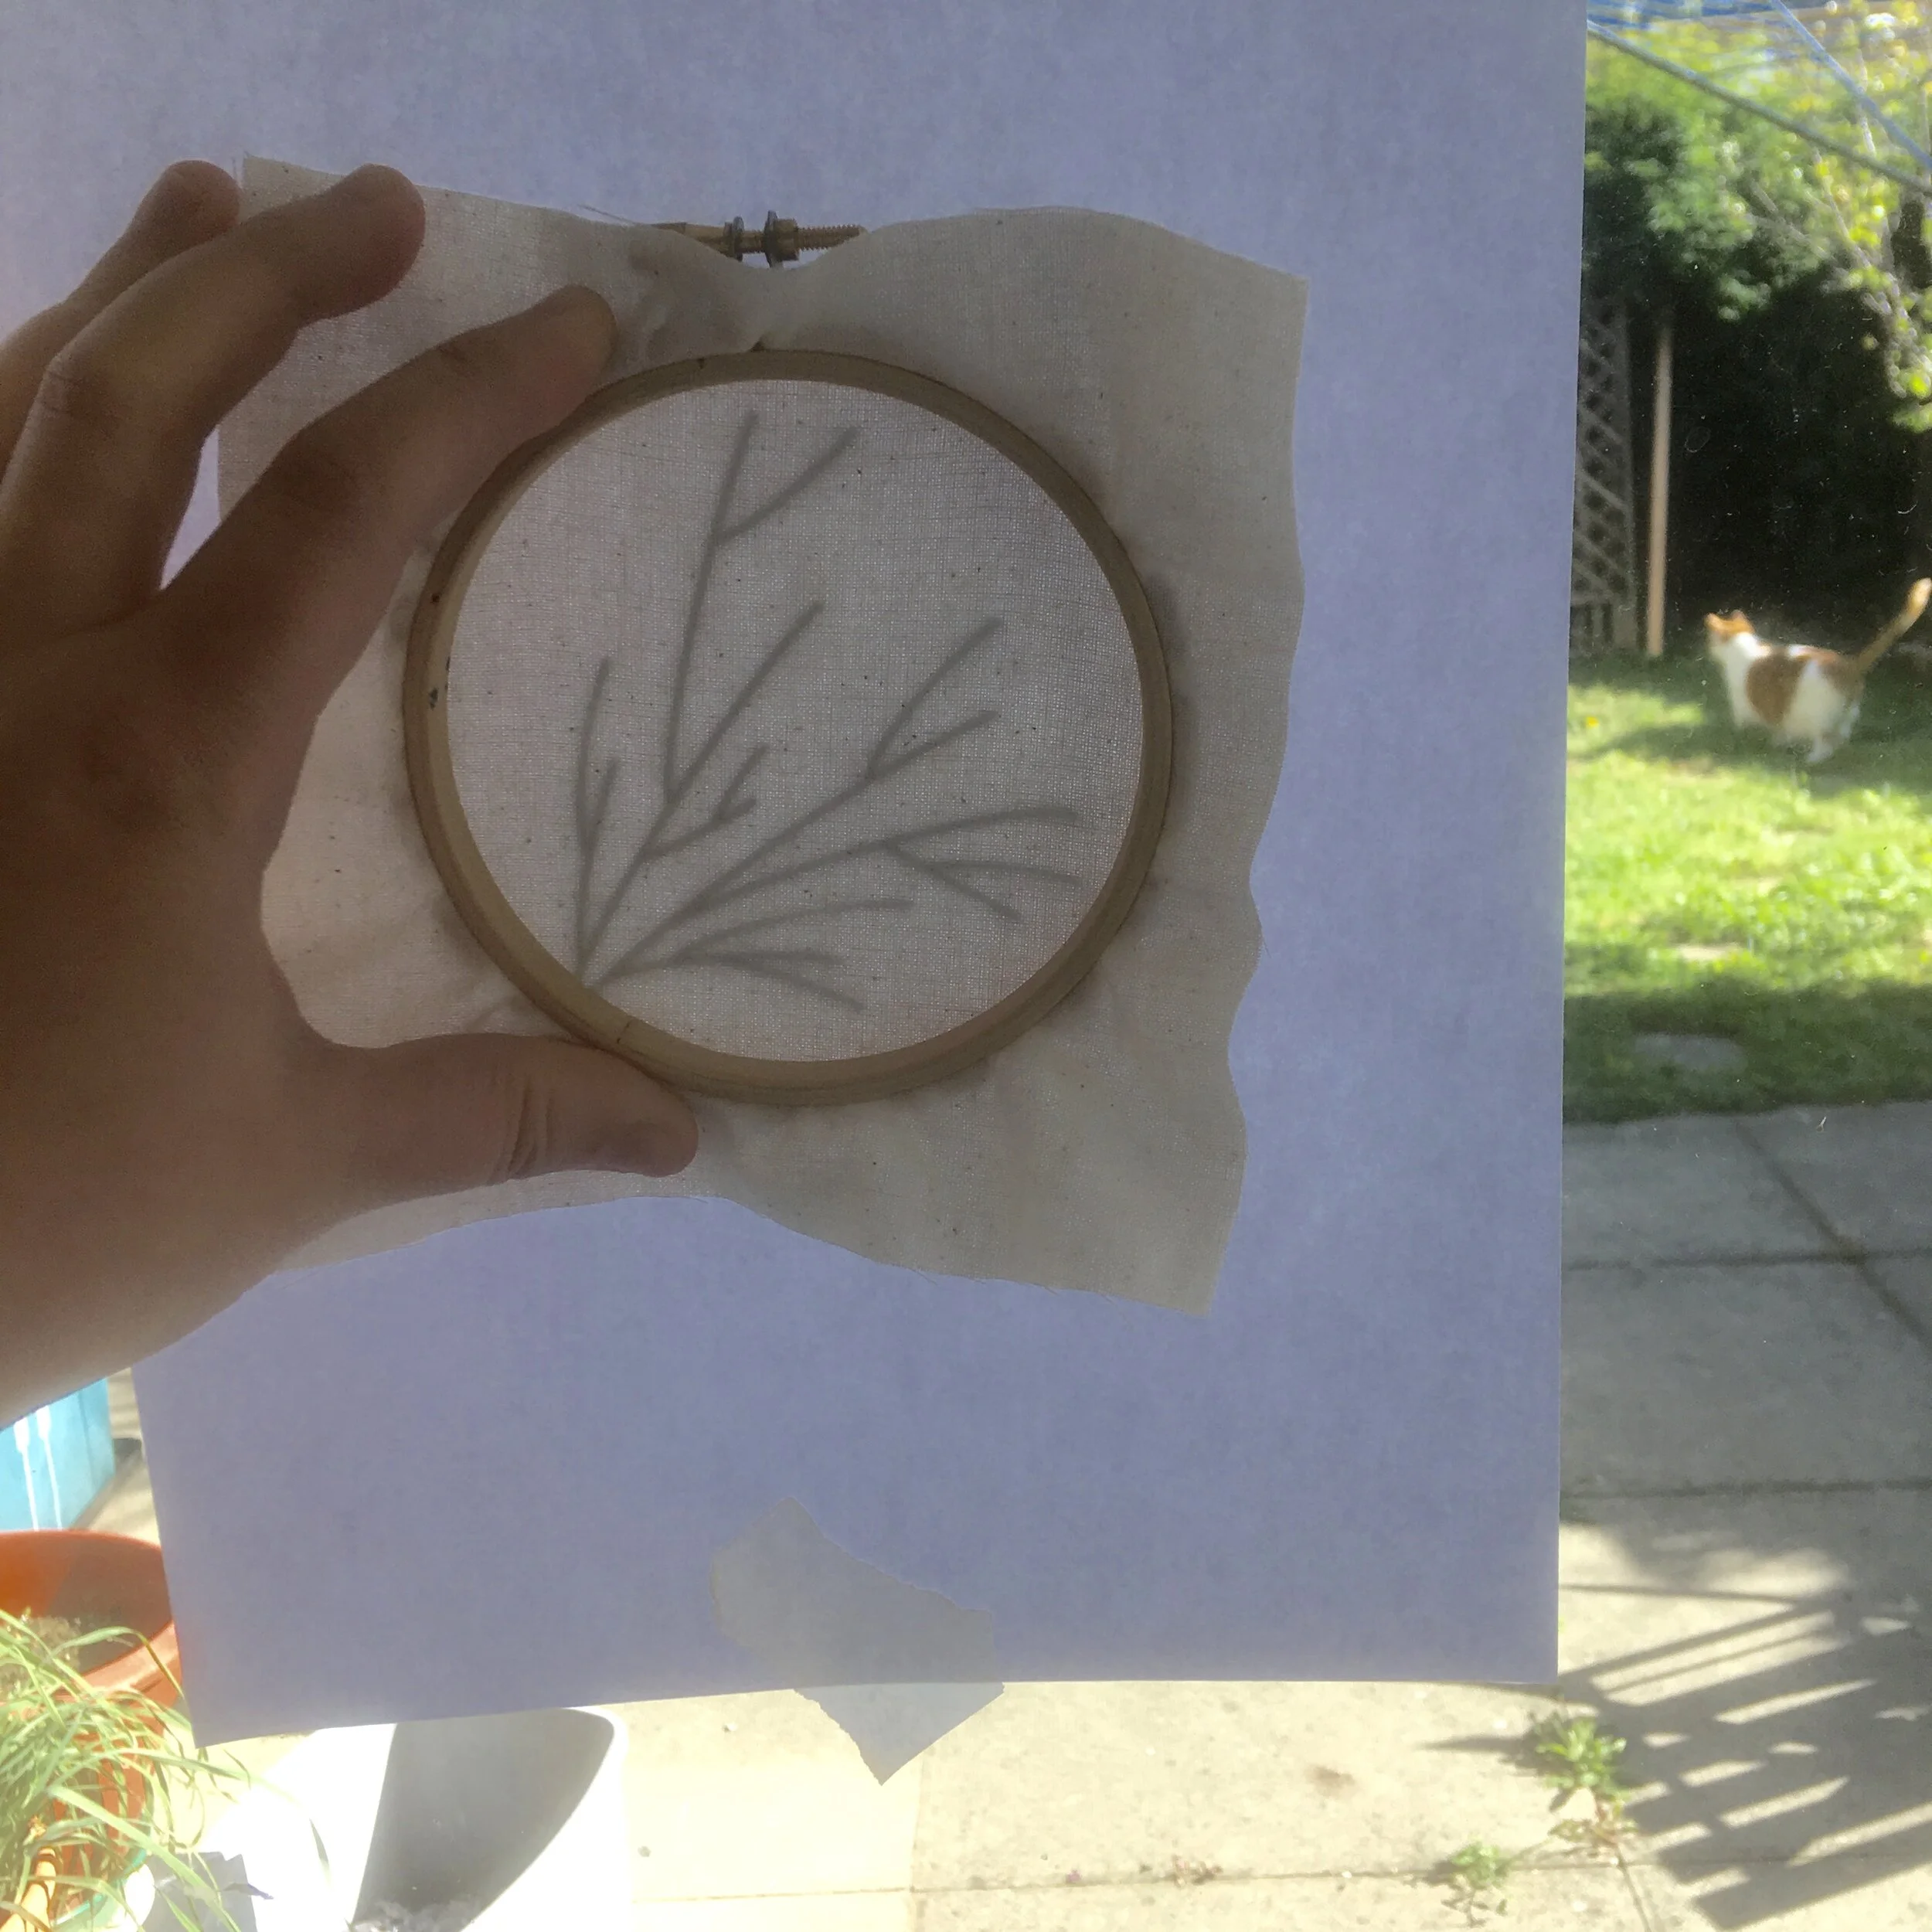
  • Start by making sure that you have the ‘right’ side of the fabric facing towards the inner hoop and stretching the fabric in the hoop as tight as possible

  • Tape the paper pattern to the window

  • Press the hoop up to the window and line it up with any guidelines on the pattern

  • Start by tracing the main elements

  • If you need to move the hoop to see whether you have missed anything use the main elements to help re-align the fabric on the pattern

  • Trace any smaller elements or details

  • Loosen the hoop and turn the fabric over so that the ‘right’ side is on the same side as the outer hoop

A picture of a hand holding an embroidery hoop with fabric against a sheet of paper on a window. On the right hand side a patio and garden can be seen including a white and ginger cat

Enjoyed this blog post? I share embroidery tips and a free embroidery pattern in my monthly newsletter. Sign up here to receive the newsletter on the 1st of each the month.
In tips 2 Tags Transfer, Basics
Comment
A picture of some calico fabric with navy blue thread in arrowhead embroidery stitch. Overlaid is a blue square with white text saying - stitch showcase, arrowhead stitch

Stitch Showcase: Arrowhead Stitch

February 17, 2021

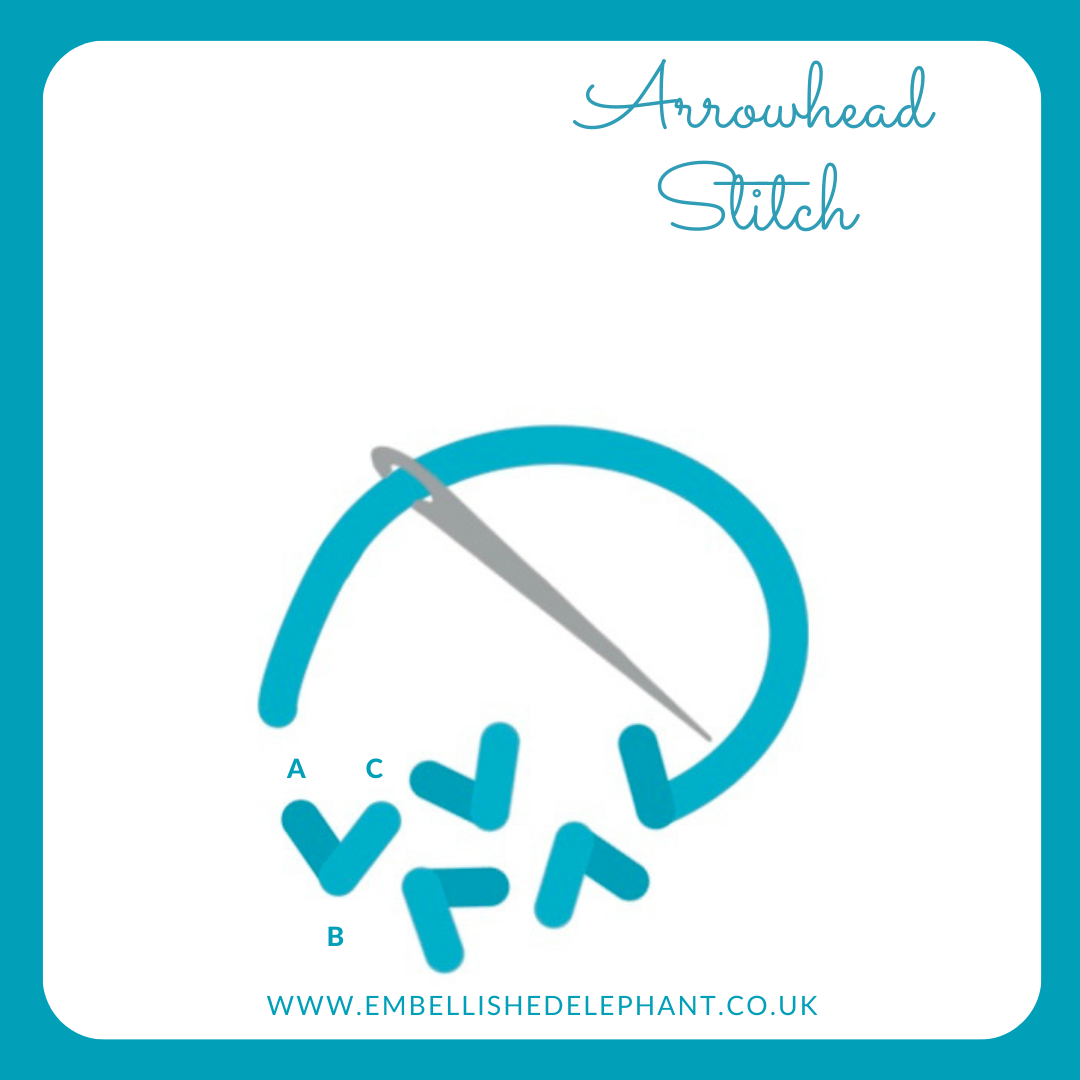
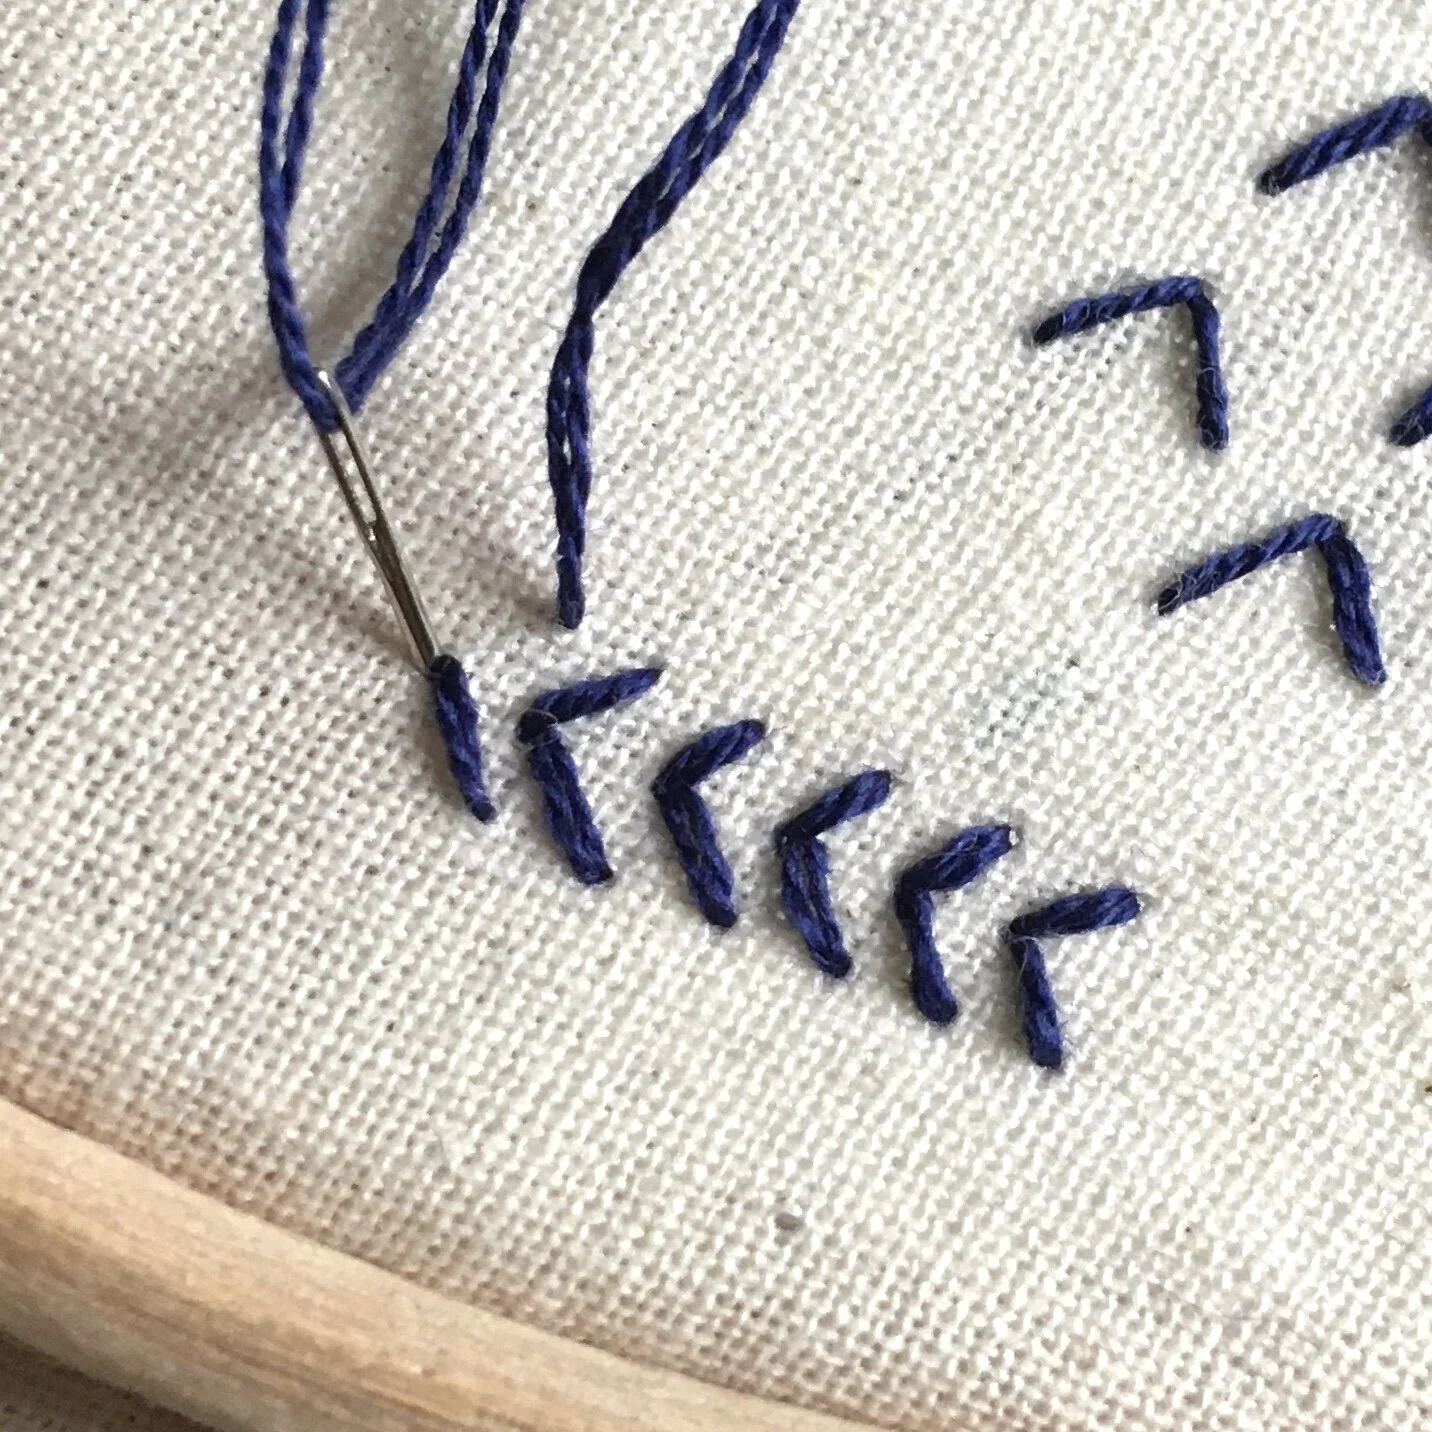
Arrowhead stitch can be worked in rows or isolation. In isolation it is a great alternative to a V shaped detached fly stitch.

  • If working as a row, it can help to draw three parallel guide lines, one for each side and one for the centre

  • Bring the needle up on one side of the stitch shape and bring it down at the centre point

  • Repeat on the other side of the stitch to create a V shape

  • If stitching in a row, then aim to space each stitch evenly apart.

An illustration of arrowhead stitch. The illustration is in shades of blue on a white background.

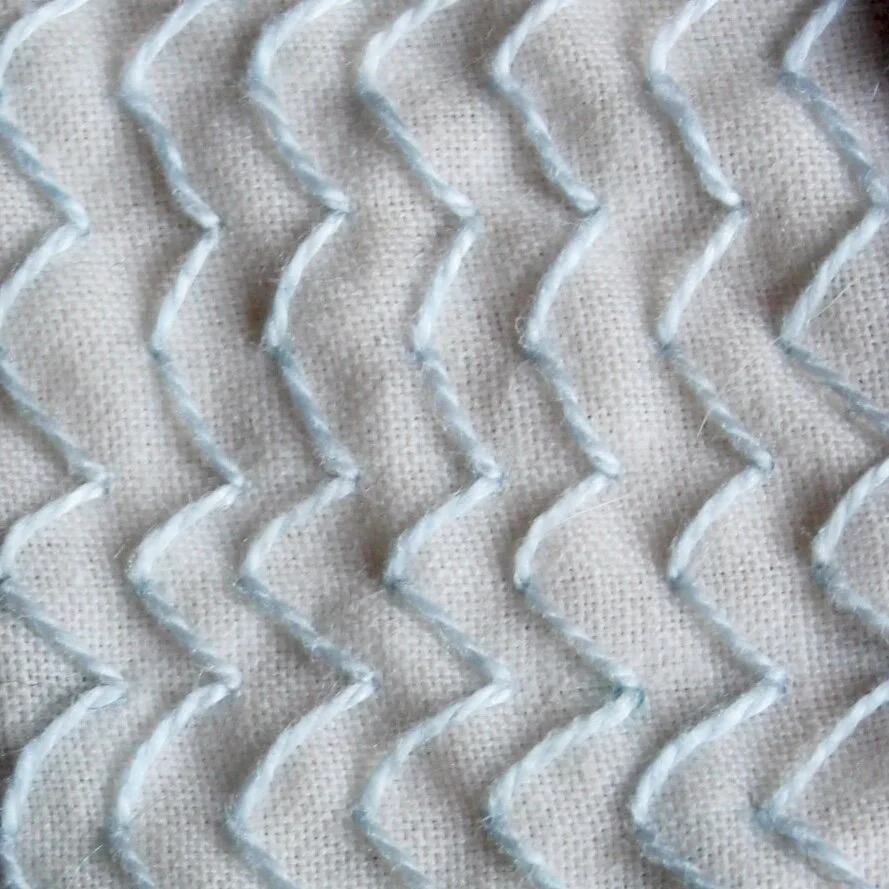
As well as being stitched in a row of arrows stacked on top of each other, the arrows can also be stitched side by side to create a zig-zag pattern.

Want to try this stitch? Use it as an alternative to detached fly stitch in my heart stitch sampler kit.

A picture of an embroidery hoop with calico fabric. In navy blue thread are stitched a row of arrowhead stitches and in the top right hand corner you can just see some scattered arrowhead stitches
A picture of calico fabric with light blue thread. Arrowhead stitch is stitched in a line to create waves of stitches

Enjoyed this blog post? I share embroidery tips and a free embroidery pattern in my monthly newsletter. Sign up here to receive the newsletter on the 1st of each the month.
In stitch showcase 1 Tags Stitch Showcase, Isolated Stitch, Line Stitch
Comment
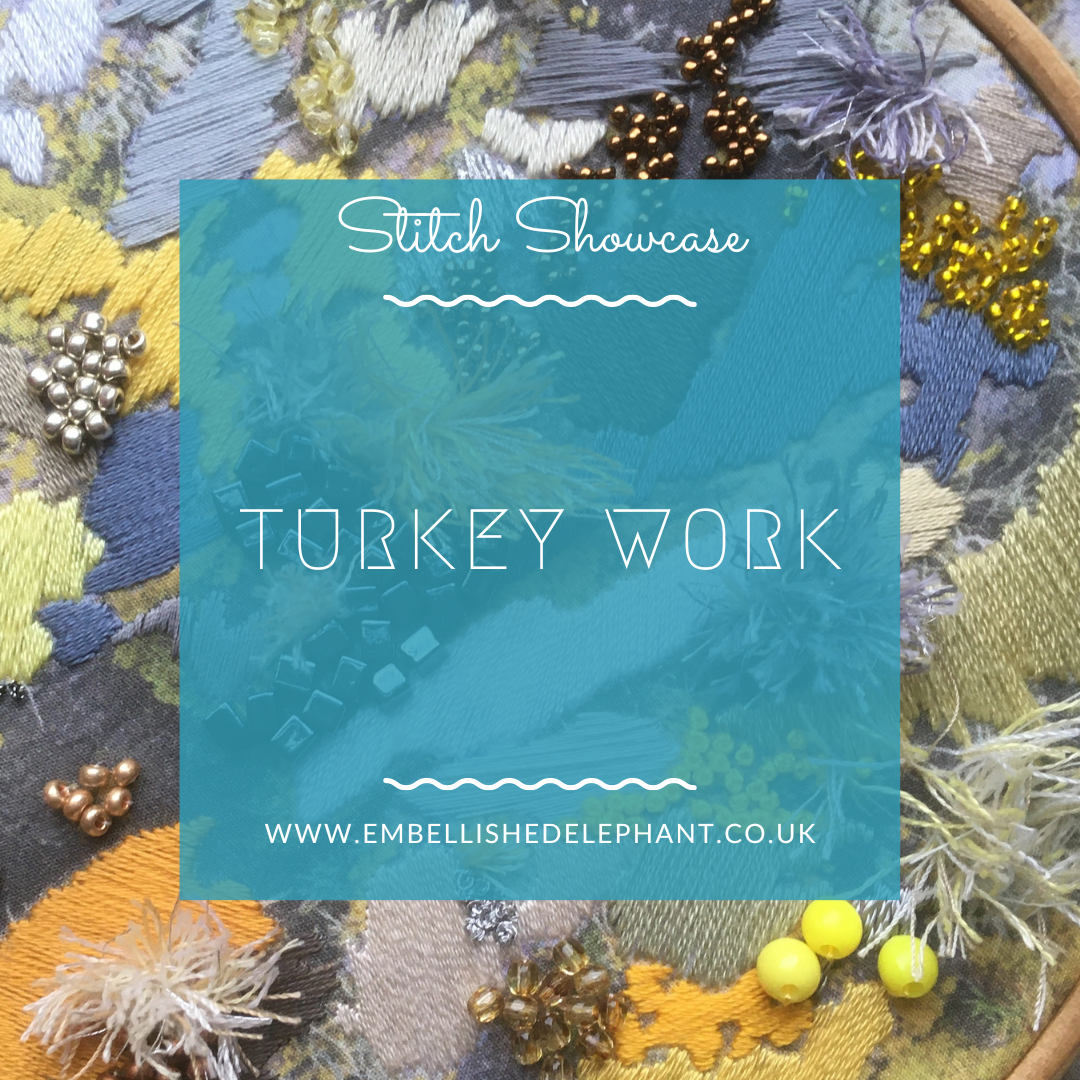
A picture of a modern abstract embroidery in shades of grey and yellow. Overlaid is a blue square with white text saying - stitch showcase, turkey work, www.embellishedelephant.co.uk

Stitch Showcase: Turkey Work

February 10, 2021

Turkey work is a great stitch to add some texture to a piece of embroidery. This stitch works well with multiple strands are used together, they can be the same colour or strands of different shades

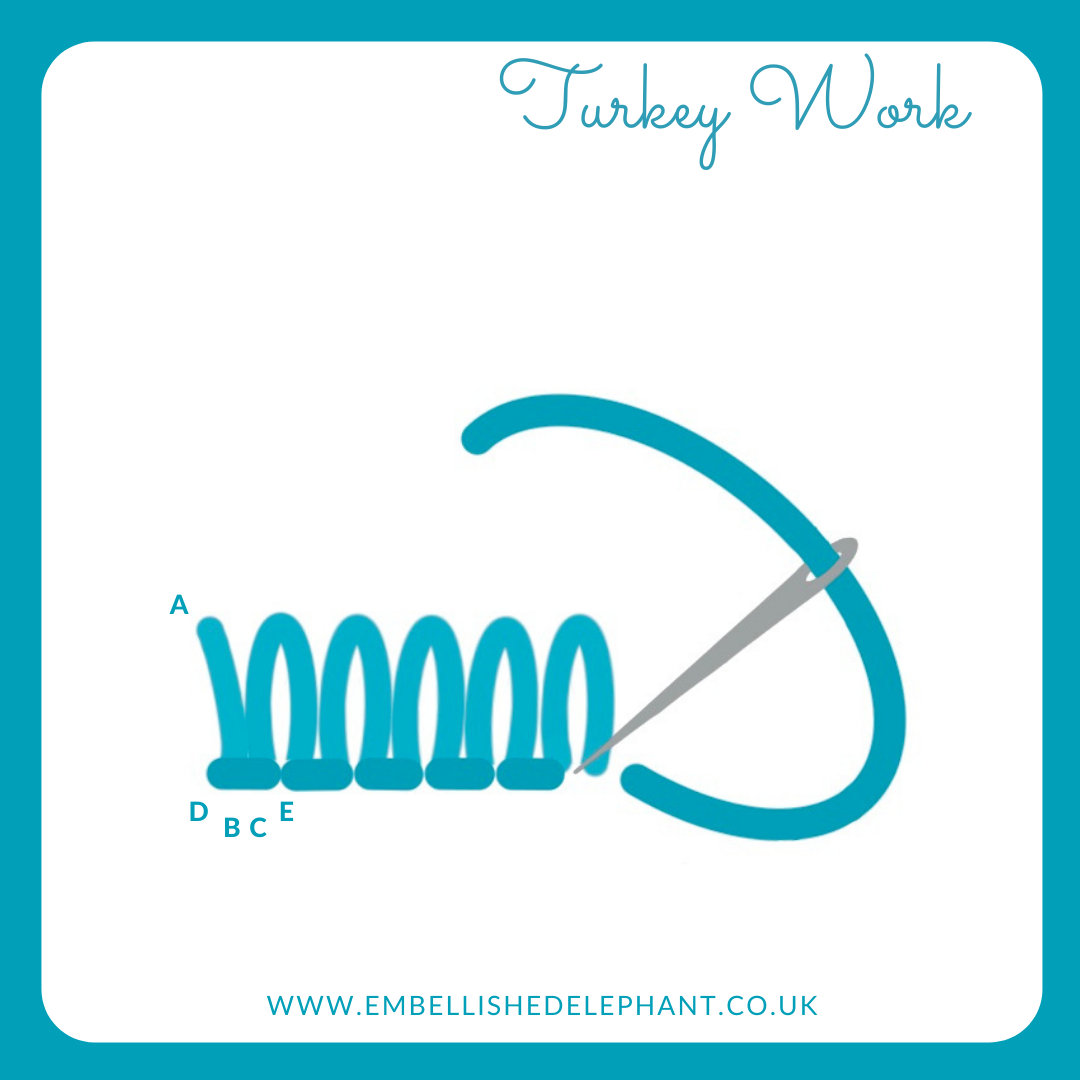
  • Bring the thread down through the fabric (B) from the top leaving a tail (A)

  • Push the needle up through the fabric close to the first hole (C)

  • Take the needle back down through the fabric but leaving a loop. A finger or a pen can be used to loop around to create loops of the same diameter

  • For the next stitch, create this so that it lies across the end of one loop (D) and the beginning of the next (E). pull the thread tight to the fabric ie don’t make a loop

  • Repeat creating a loop stitch followed by a standard stitch

An illustration of how to create the embroidery stitch called turkey work. The illustration is in shades of blue and grey on a white background
  • Each loop can be stitched in rows or randomly to fill an area

  • It might be necessary to hold the loops already made out of the way so they don’t get caught

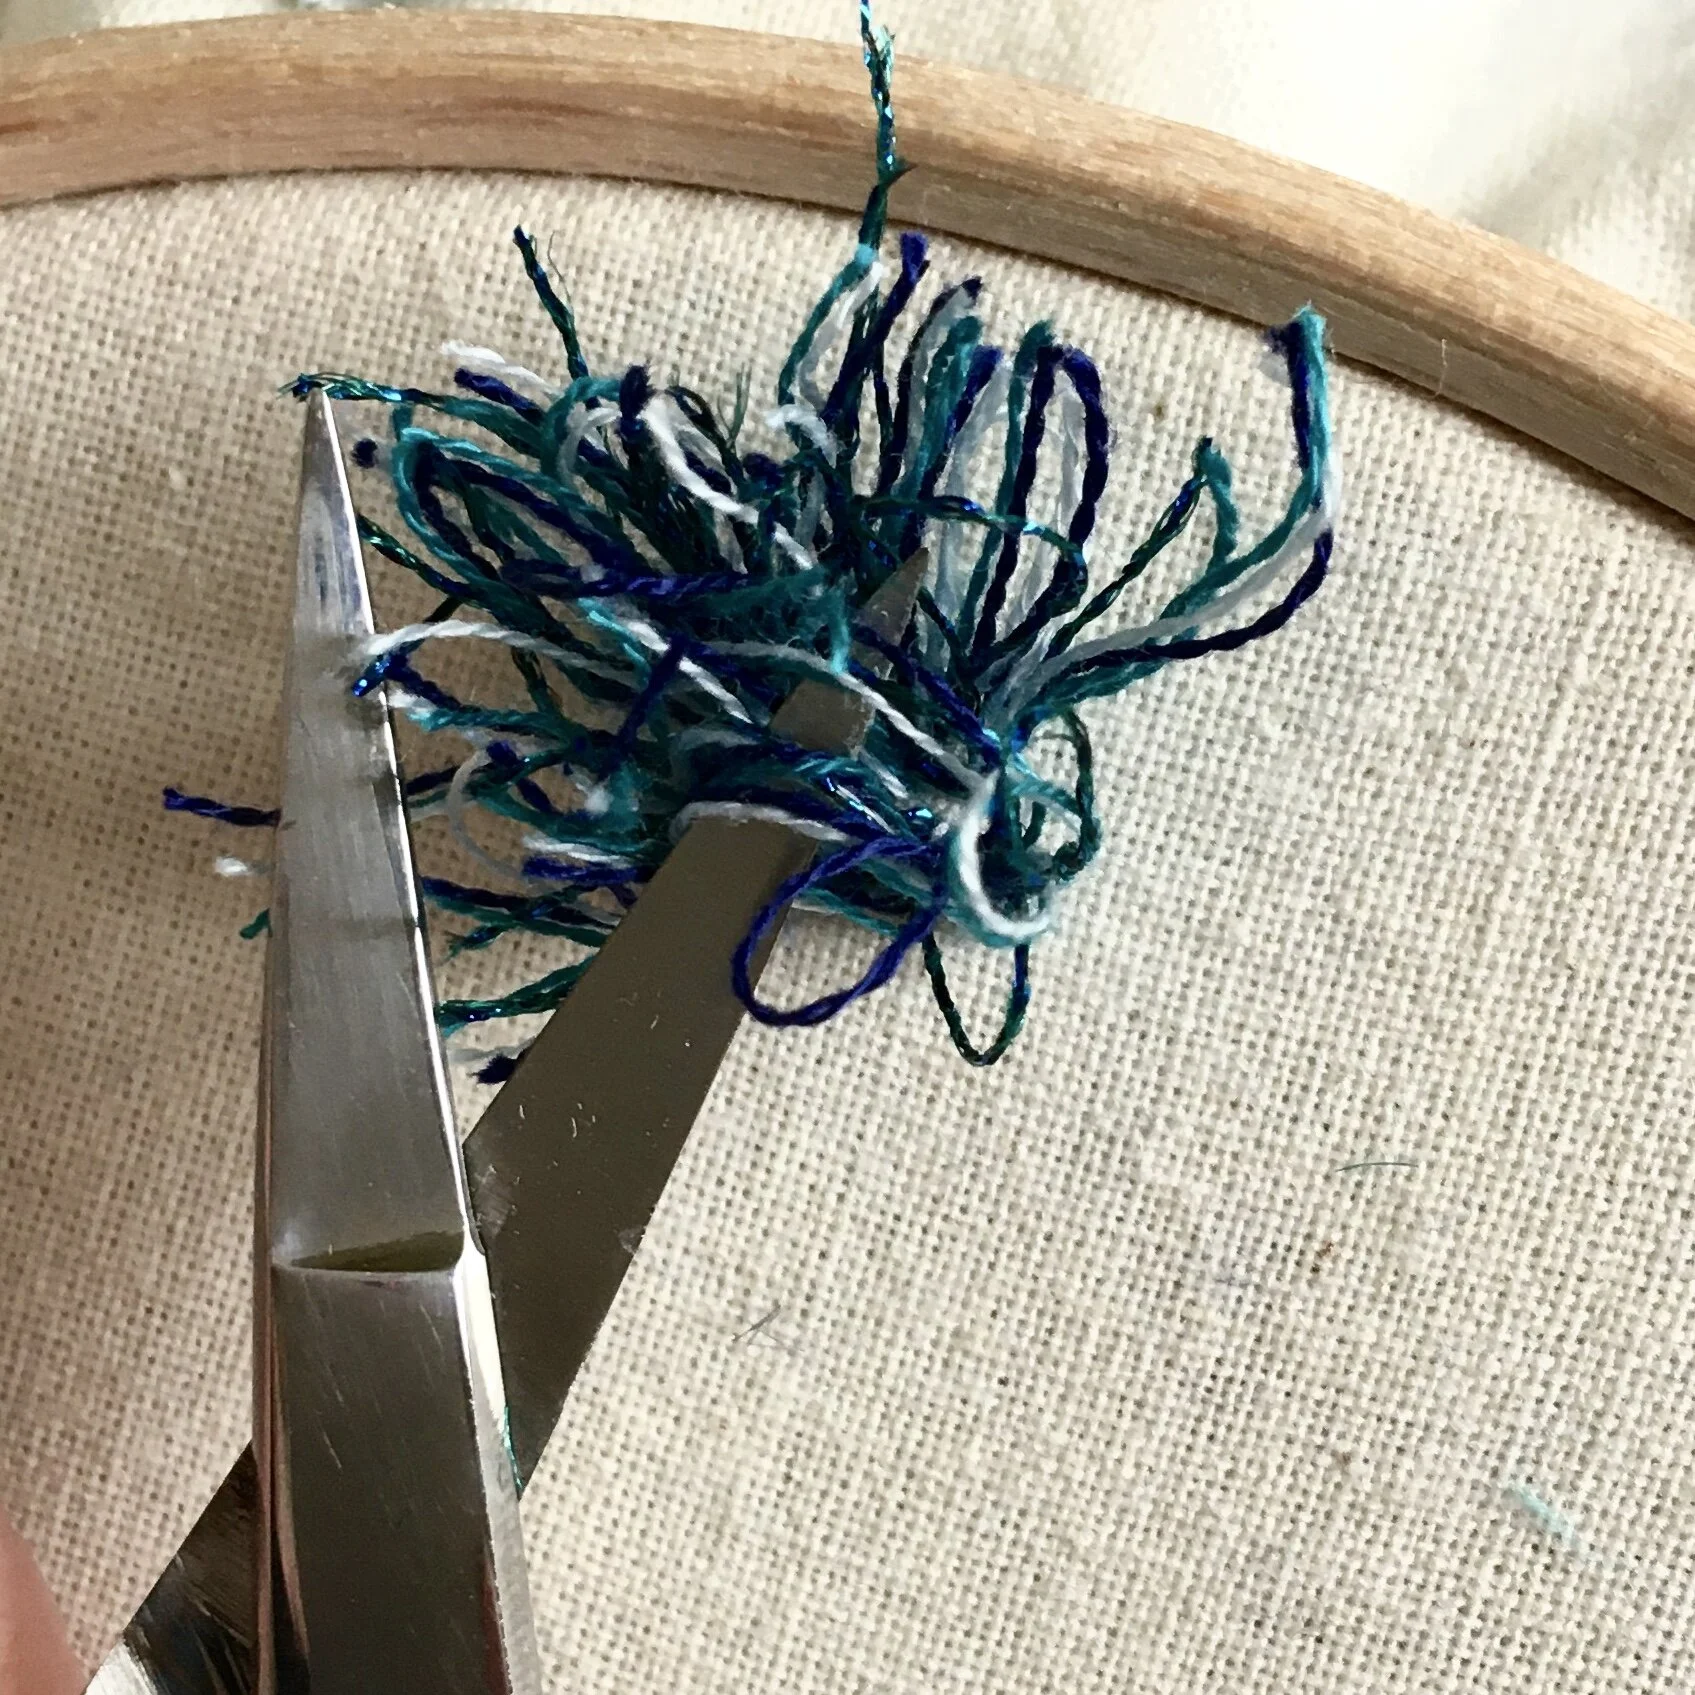
  • Once all the loops have been made snip through them to give the ‘hairy’ texture

  • The strands can be trimmed down to the same length or left uneven depending on the style of the finished piece.

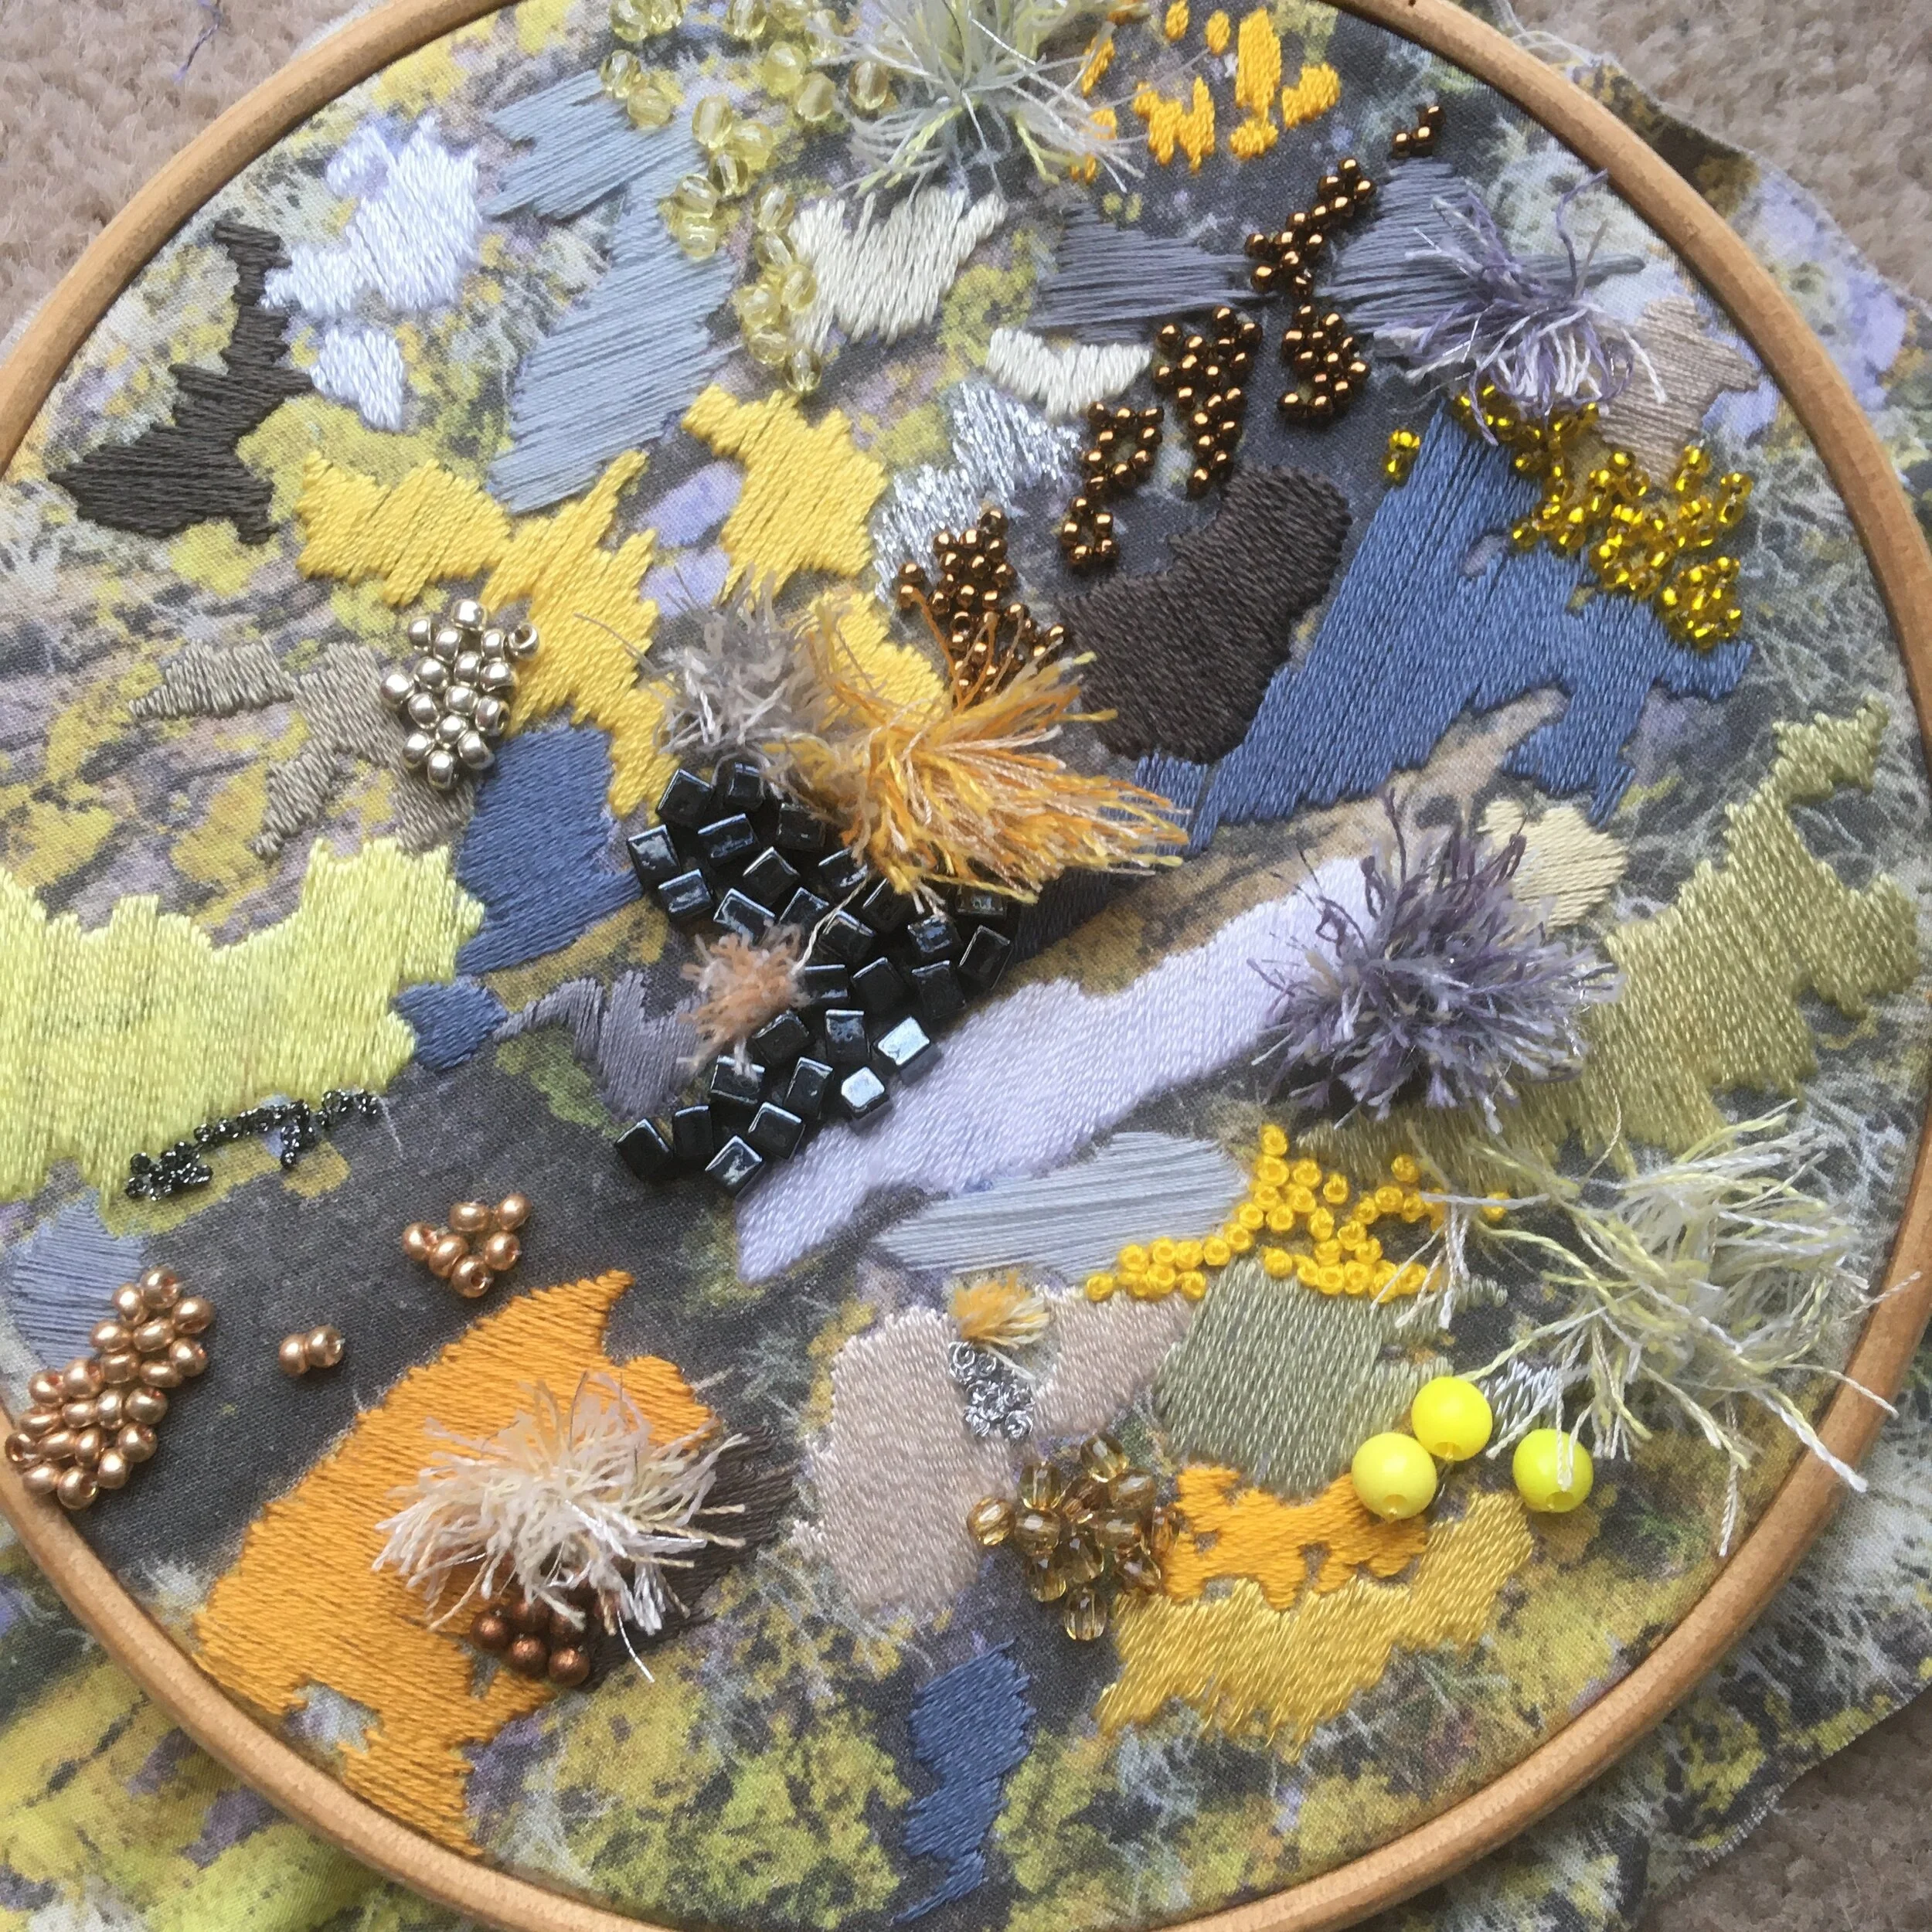
Modern embroidery artists such as Salt Stitches and Katy Biele use this stitch frequently in their work. This picture is of a Salt Stitches DIY kit that I embroidered.

A close up picture of an embroider hoop with loops of thread being cut by scissors to create turkey work
A picture of a finished embroidery hoop stitched from a DIY kit by Salt Stitches. It is an abstract modern embroidery with a range of stitches and beads

Enjoyed this blog post? I share embroidery tips and a free embroidery pattern in my monthly newsletter. Sign up here to receive the newsletter on the 1st of each the month.
In stitch showcase 1 Tags Stitch Showcase, Filling Stitch, Texture Stitch
Comment
A close up picture of detached fly stitch on calico fabric with turquoise thread. Overlaid is a blue square with white text saying - stitch showcase, detached fly stitch, www.embellishedelephant.co.uk

Stitch Showcase: Detached Fly Stitch

February 3, 2021

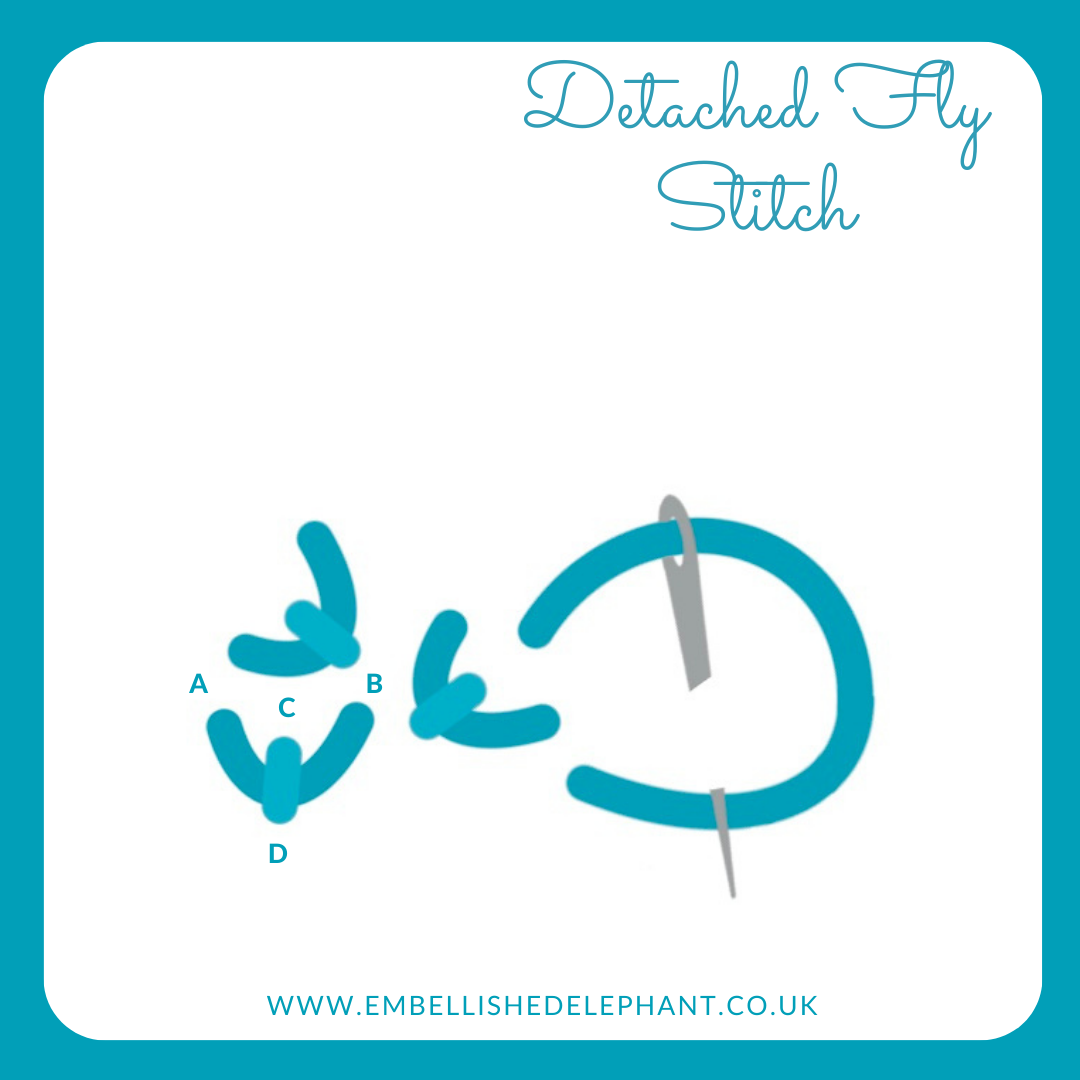
Fly stitch is a V or Y shaped stitch that can be stitched in rows, columns or as single stitches (called detached fly stitch).

  • Bring the needle up through the fabric (A)

  • Take the needle down through the fabric at the point you want the width of the stitch to be (B)

  • Push it up through the fabric at the bottom point of the V, but don't pull the needle through the fabric (C)

  • Hook the thread around the point of the needle and then pull the needle through to form the V shape

  • Complete the stitch by creating a tiny straight stitch to secure the V (D)

  • Or create a Y shape by making a longer straight stitch.

an illustration of detached fly stitch. the illustration is on a white background with blue illustration details

I like to use detached fly stitch as part of a mix of different stitches and it is one of the stitches I’ve included in my heart stitch sampler kit.

A sampler of several different embroidery stitches in shades of pink on calico including detached fly stitch

Enjoyed this blog post? I share embroidery tips and a free embroidery pattern in my monthly newsletter. Sign up here to receive the newsletter on the 1st of each the month.
In stitch showcase 1 Tags Stitch Showcase, Isolated Stitch
Comment
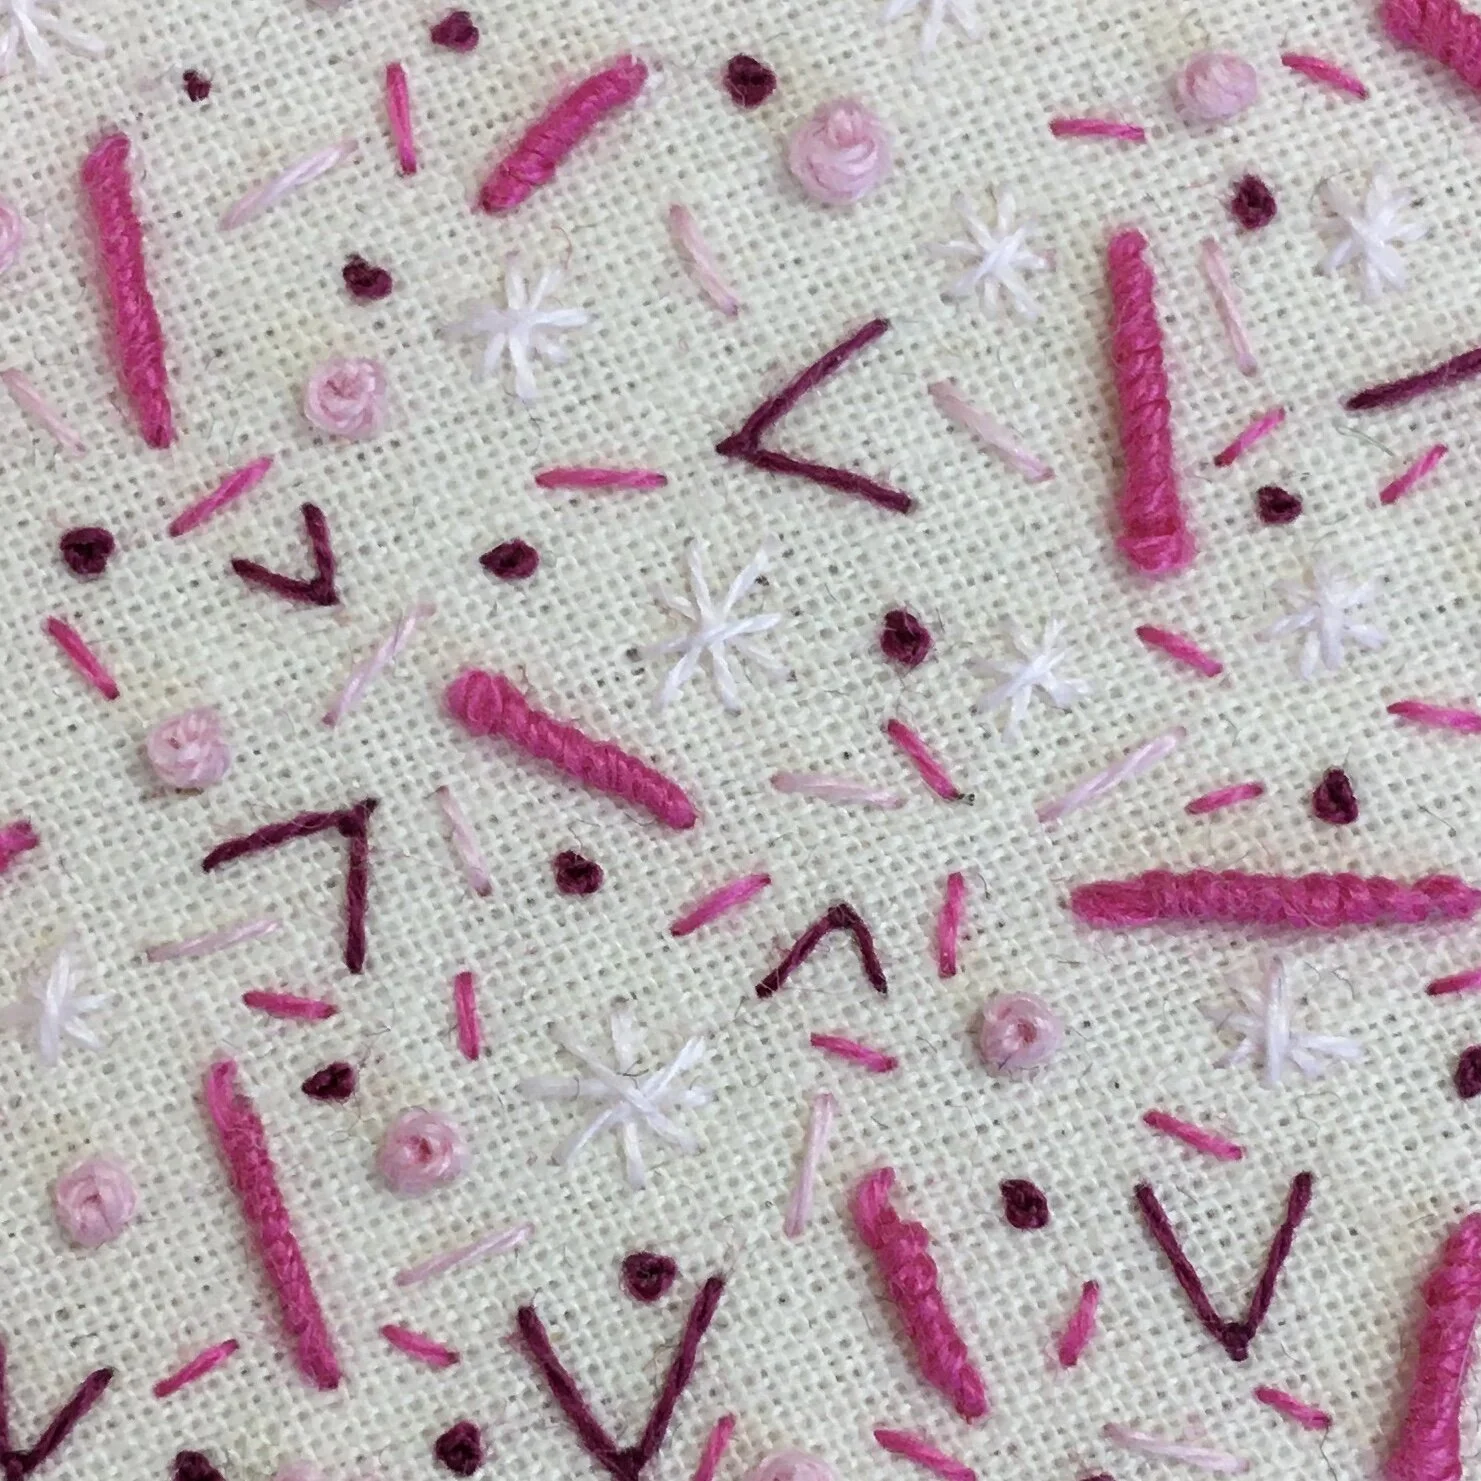
A picture of lots of different embroidery stitches in shades of pink scattered across calico fabric. Overlaid is a blue square with white text saying - stitch showcase, double cross stitch, www.embellishedelephant.co.uk

Stitch Showcase: Double Cross Stitch

January 27, 2021

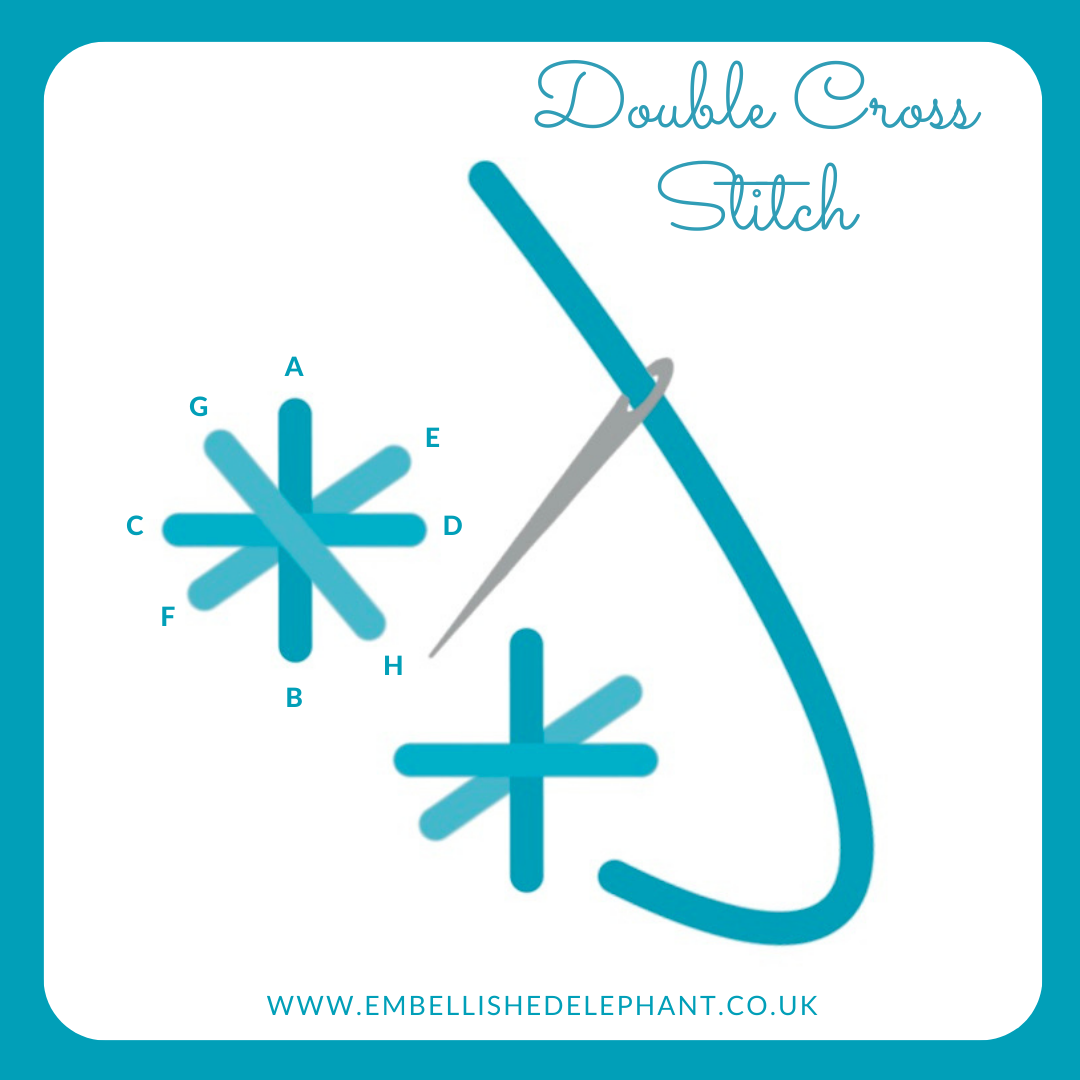
Double cross stitch is a simple way to add a star shape to your embroidery - it creates an eight-pointed star.

  • Double cross stitch uses straight stitches in four different orientations. to create the eight-pointed star.

  • To start make a straight stitch in any direction, then make another stitch of the same length at right angles to create a plus sign.

  • To finish the stitch, create another cross diagonally over the first and then one final stitch in the opposite direction to make an 8 pointed star.

An illustration of steps to create double cross stitch. The illustration is in blue on a white background

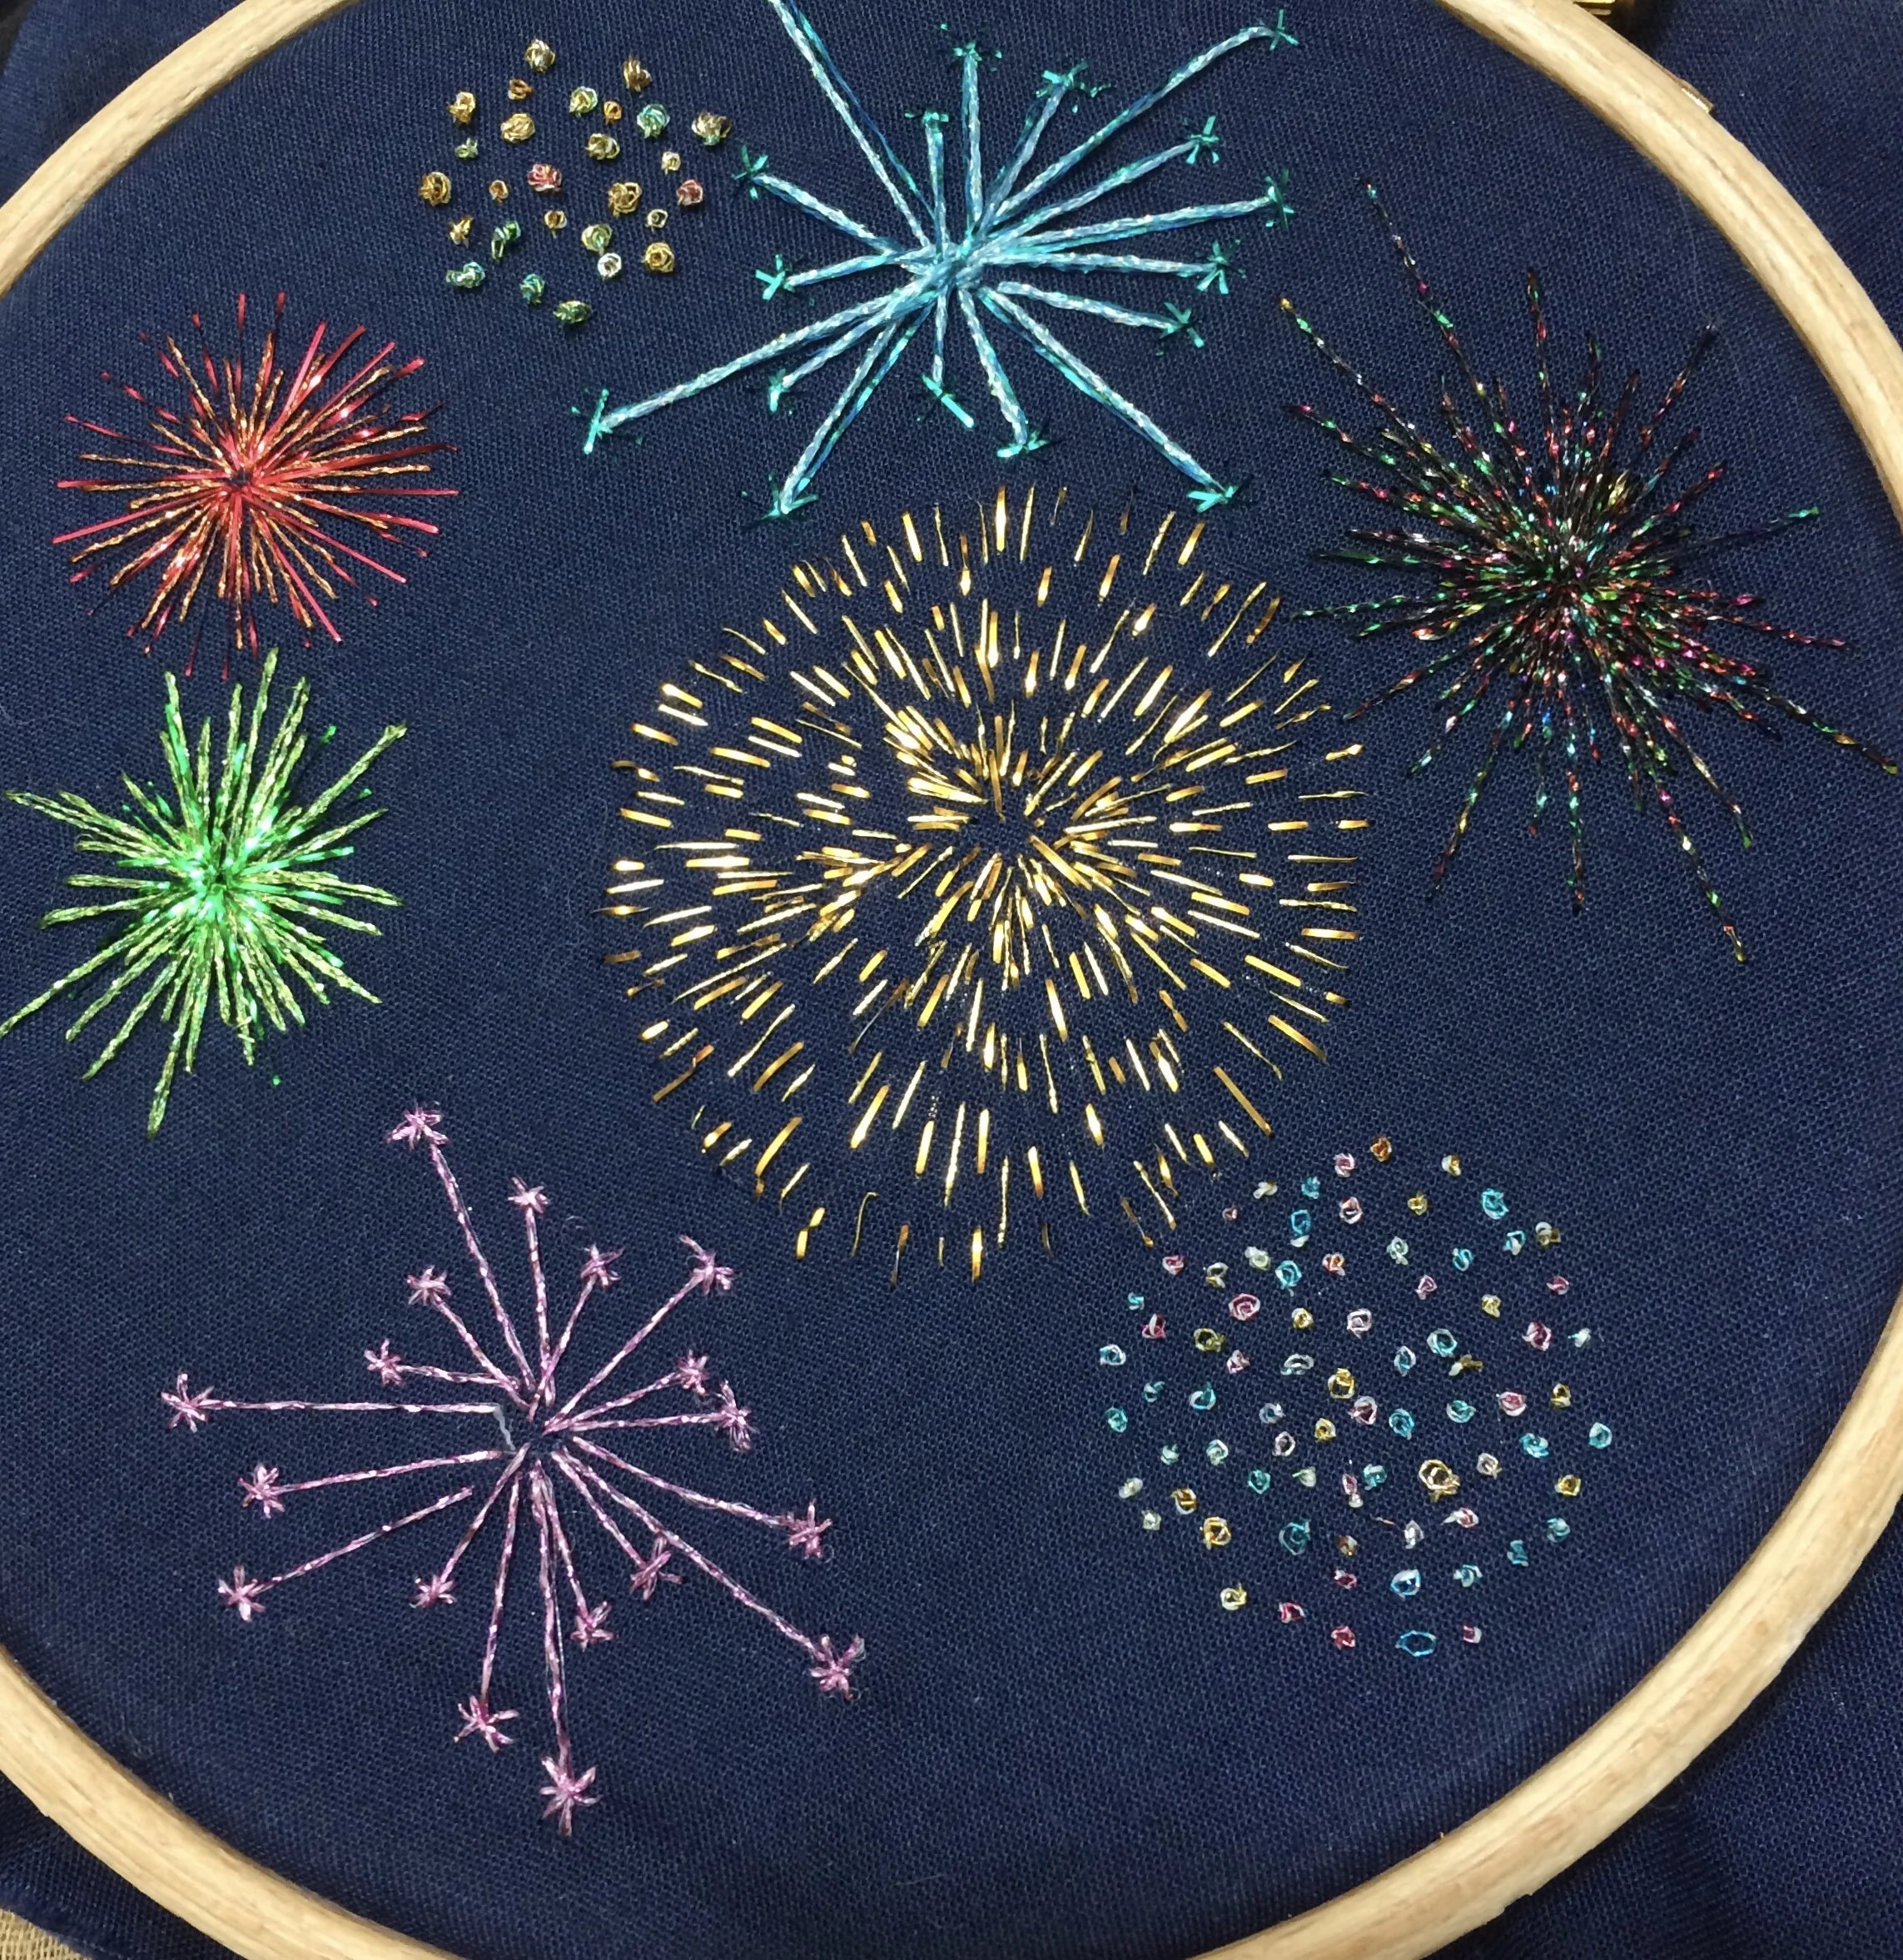
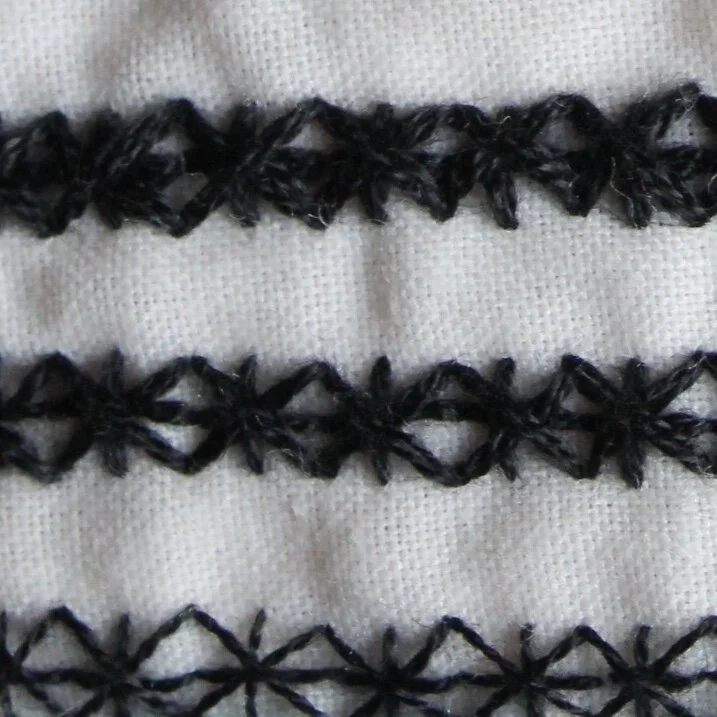
This stitch is most often used as an isolated stitch such as in the pink firework at the bottom of this sampler. However, it can also be stitched in a row to create a decorative border such as in the second sampler which shows how different weights of thread can impact the finished look.

Want to try this stitch - it’s one of the stitches I recommend using in my heart stitch sampler kit.

Sign up to my email newsletter to get a monthly free embroidery pattern and a round up of Stitch Showcase blogs.

An image of a firework embroidery on navy blue fabric stitched with metallic threads
A picture of a stitch sampler using different thicknesses of thread. The thread is in black and is stitched on calico fabric
In stitch showcase 1 Tags Stitch Showcase, Isolated Stitch
Comment
A picture of an embroidery hoop held over a tablet screen showing an embroidery pattern. Overlaid is a blue square with white text saying - hand embroidery, how to track patterns from a tablet, wwww.embellishedelephant.co.uk

How to trace a digital embroidery pattern on a tablet

January 23, 2021

When I’m stitching personal projects I prefer to trace the pattern I’m going to use from a digital image rather than a printer one (mainly because I have a very old printed that’s a bit of a faff to set up and never seems to have ink or paper!) This method does only work for projects that are no bigger than your tablet screen. For bigger projects then the paper based method is probably best.

First up take a screenshot of the pattern - how you do this will depend on your type and model of tablet. For iPads there are instructions on the Apple support site. Save this image to your photos.

a screenshot of a tablet device showing some photography apps

I have an iPad and use an app called Lightbox Trace. There are other apps out there but I like the simplicity of this app.

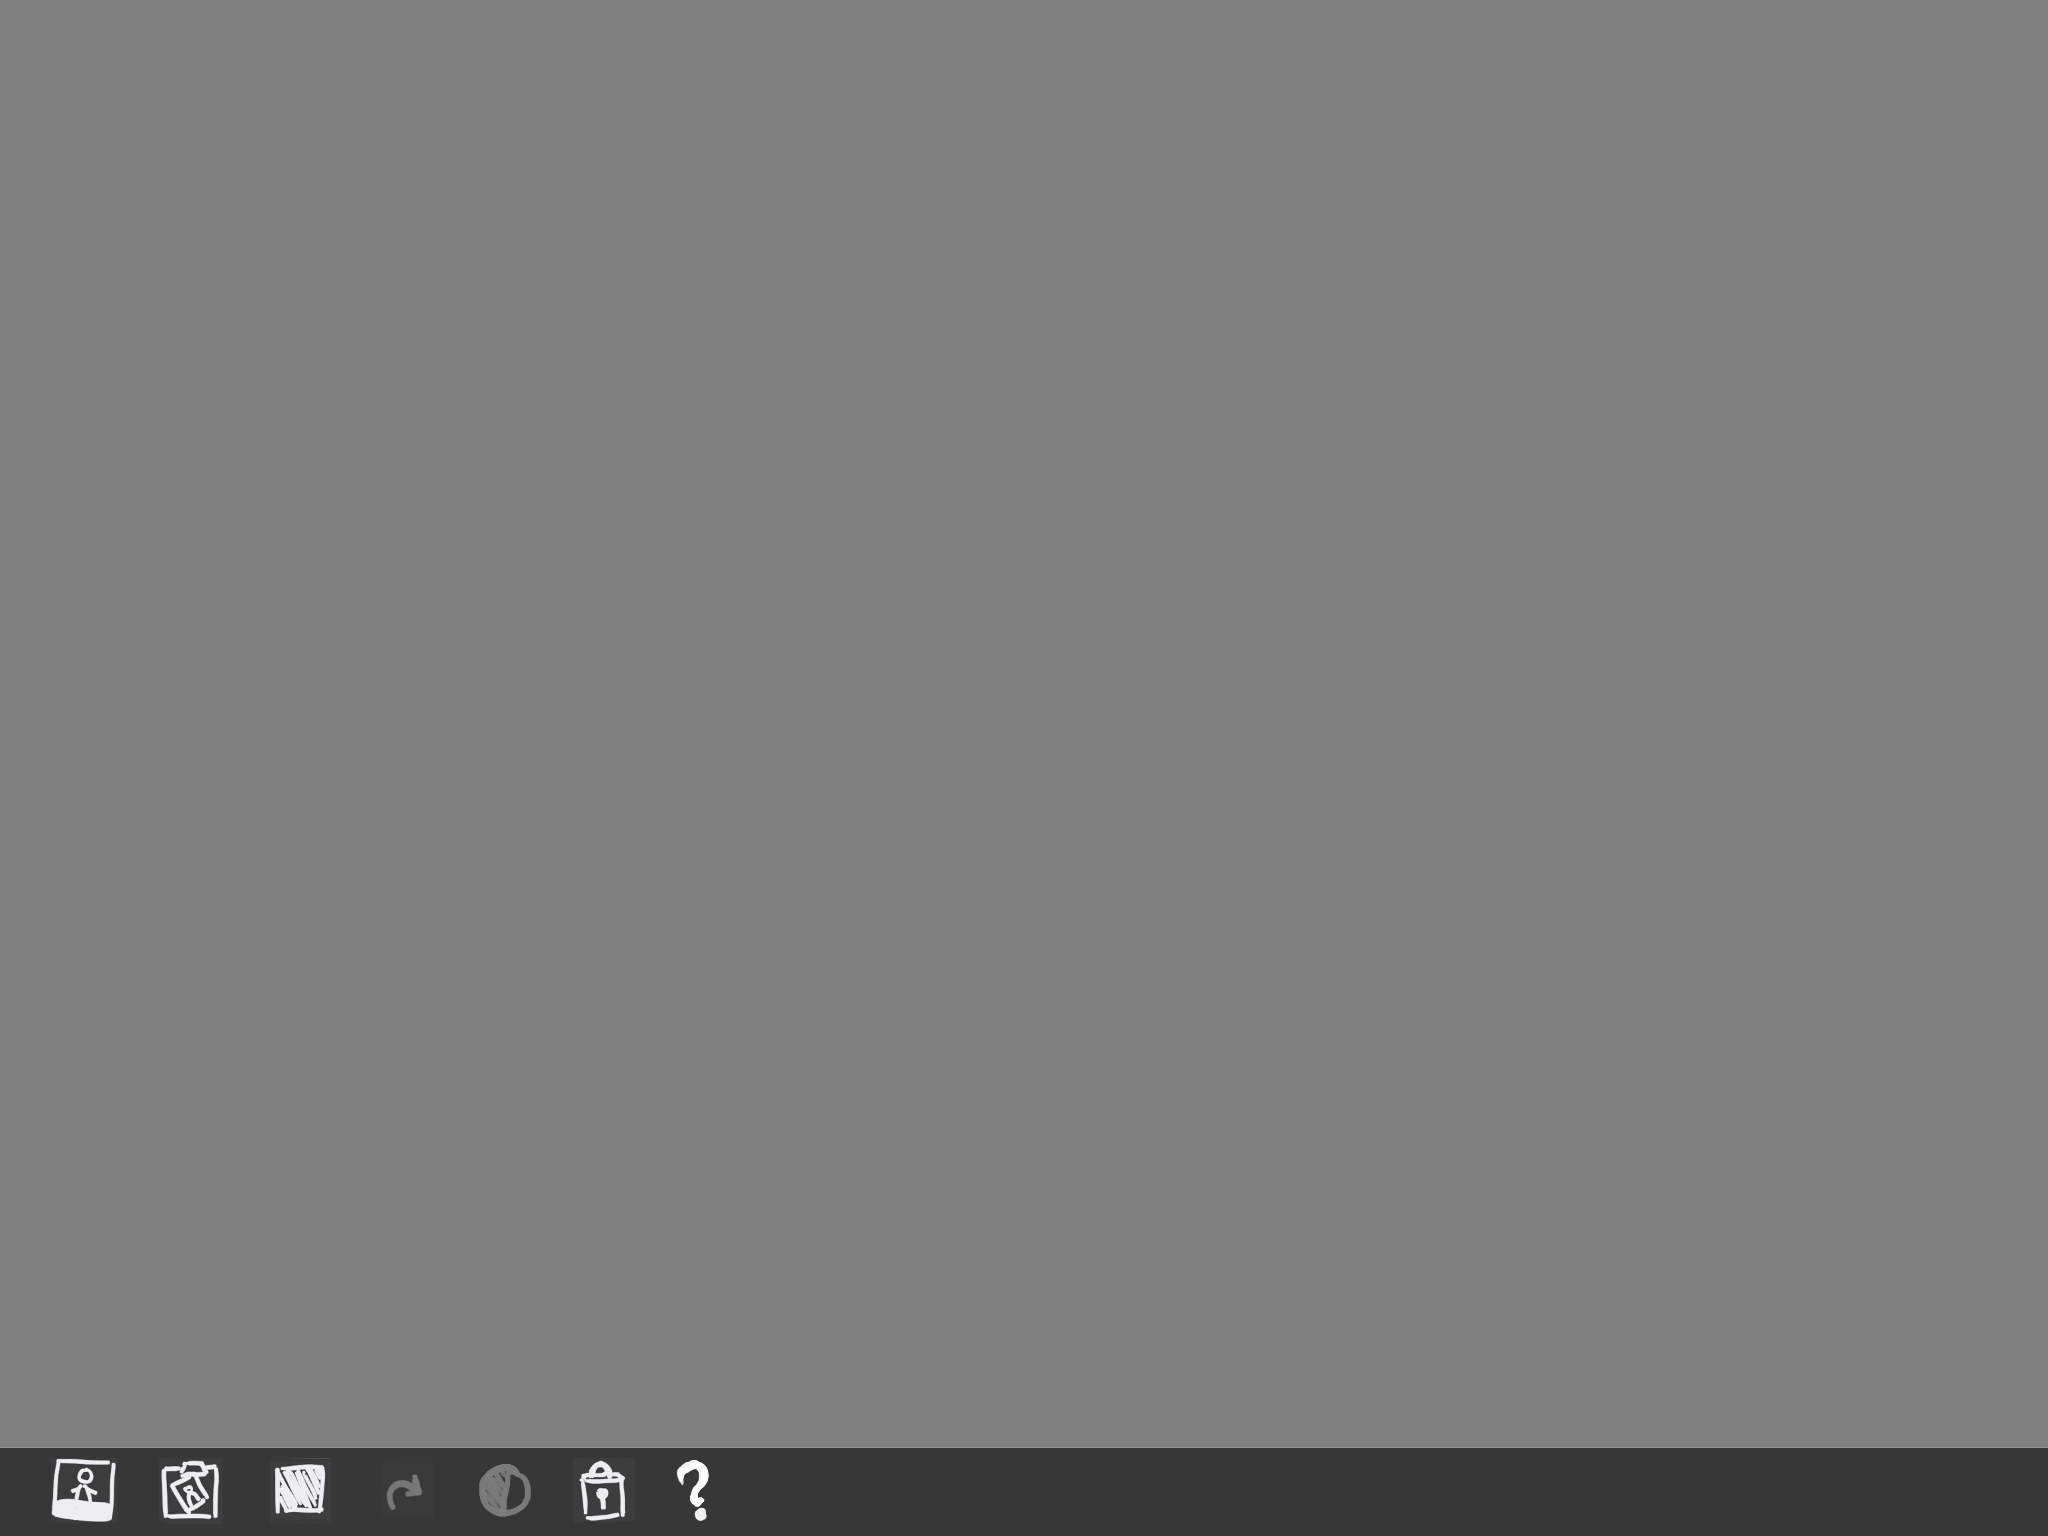
a screenshot of the lightbox trace app

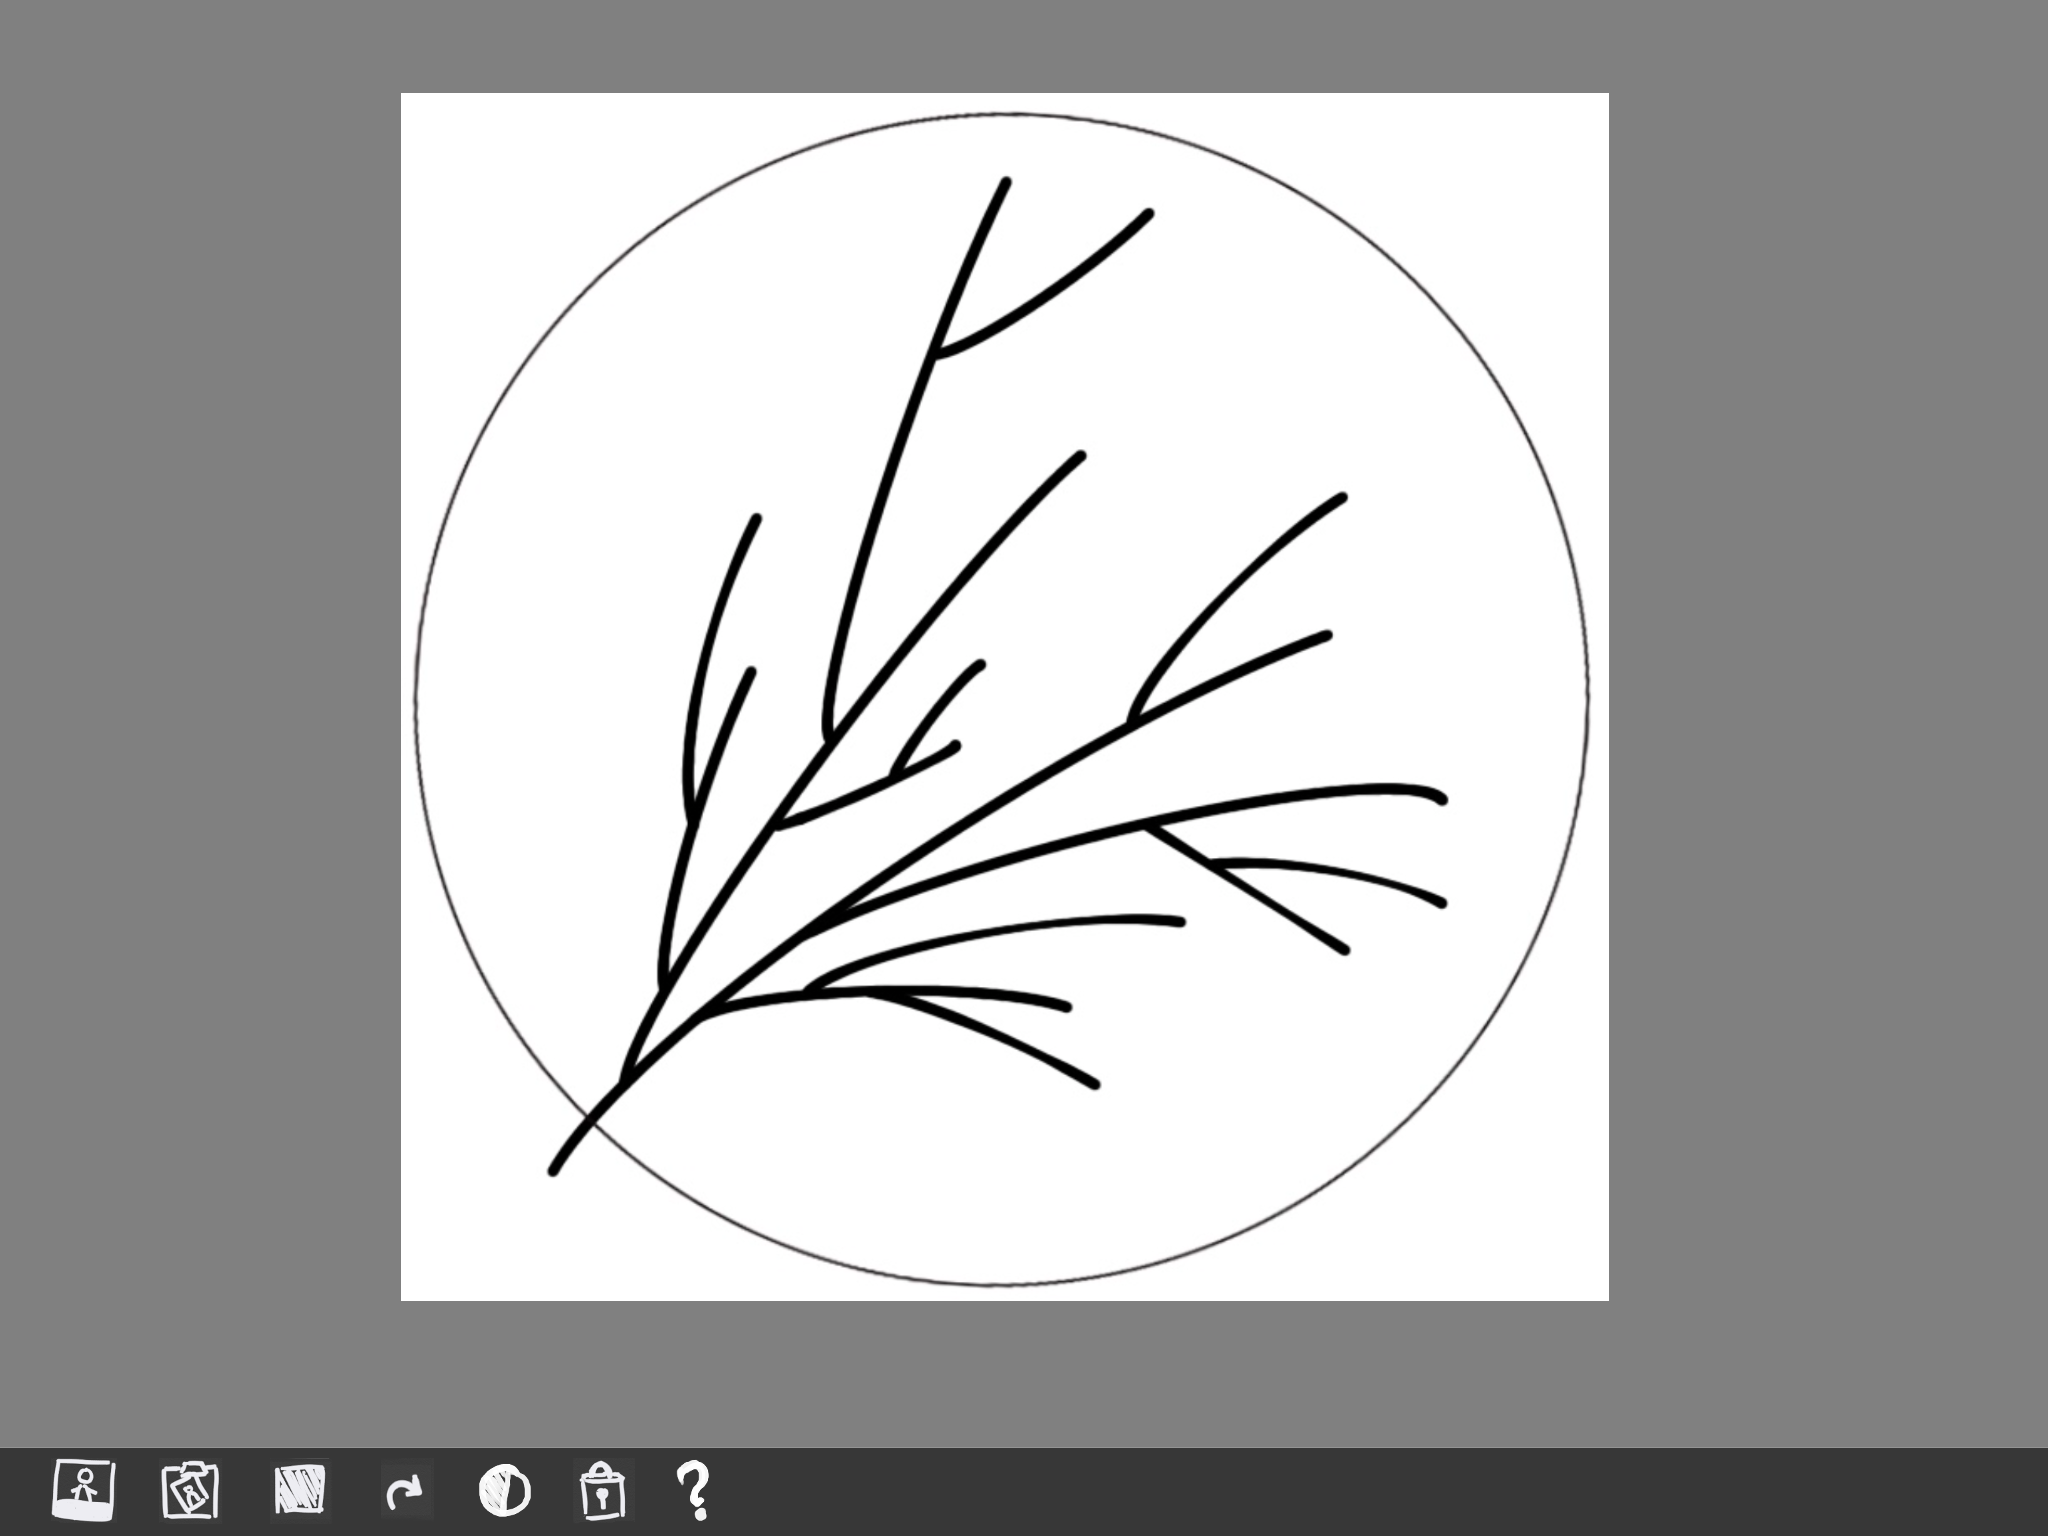
When you open up the app you get this rather boring grey screen. Tap on the button in the bottom left of the screen and select the pattern image from your photo library.

a screenshot of the lightbox trace app with an image to be traced onto an embroidery

Resize the image so that it is the right size for the hoop you are using.

Then click on the ‘padlock’ icon (second from the right on the tool bar.

This will lock the image and stop it moving around. You should also see your screen noticeably brighter.

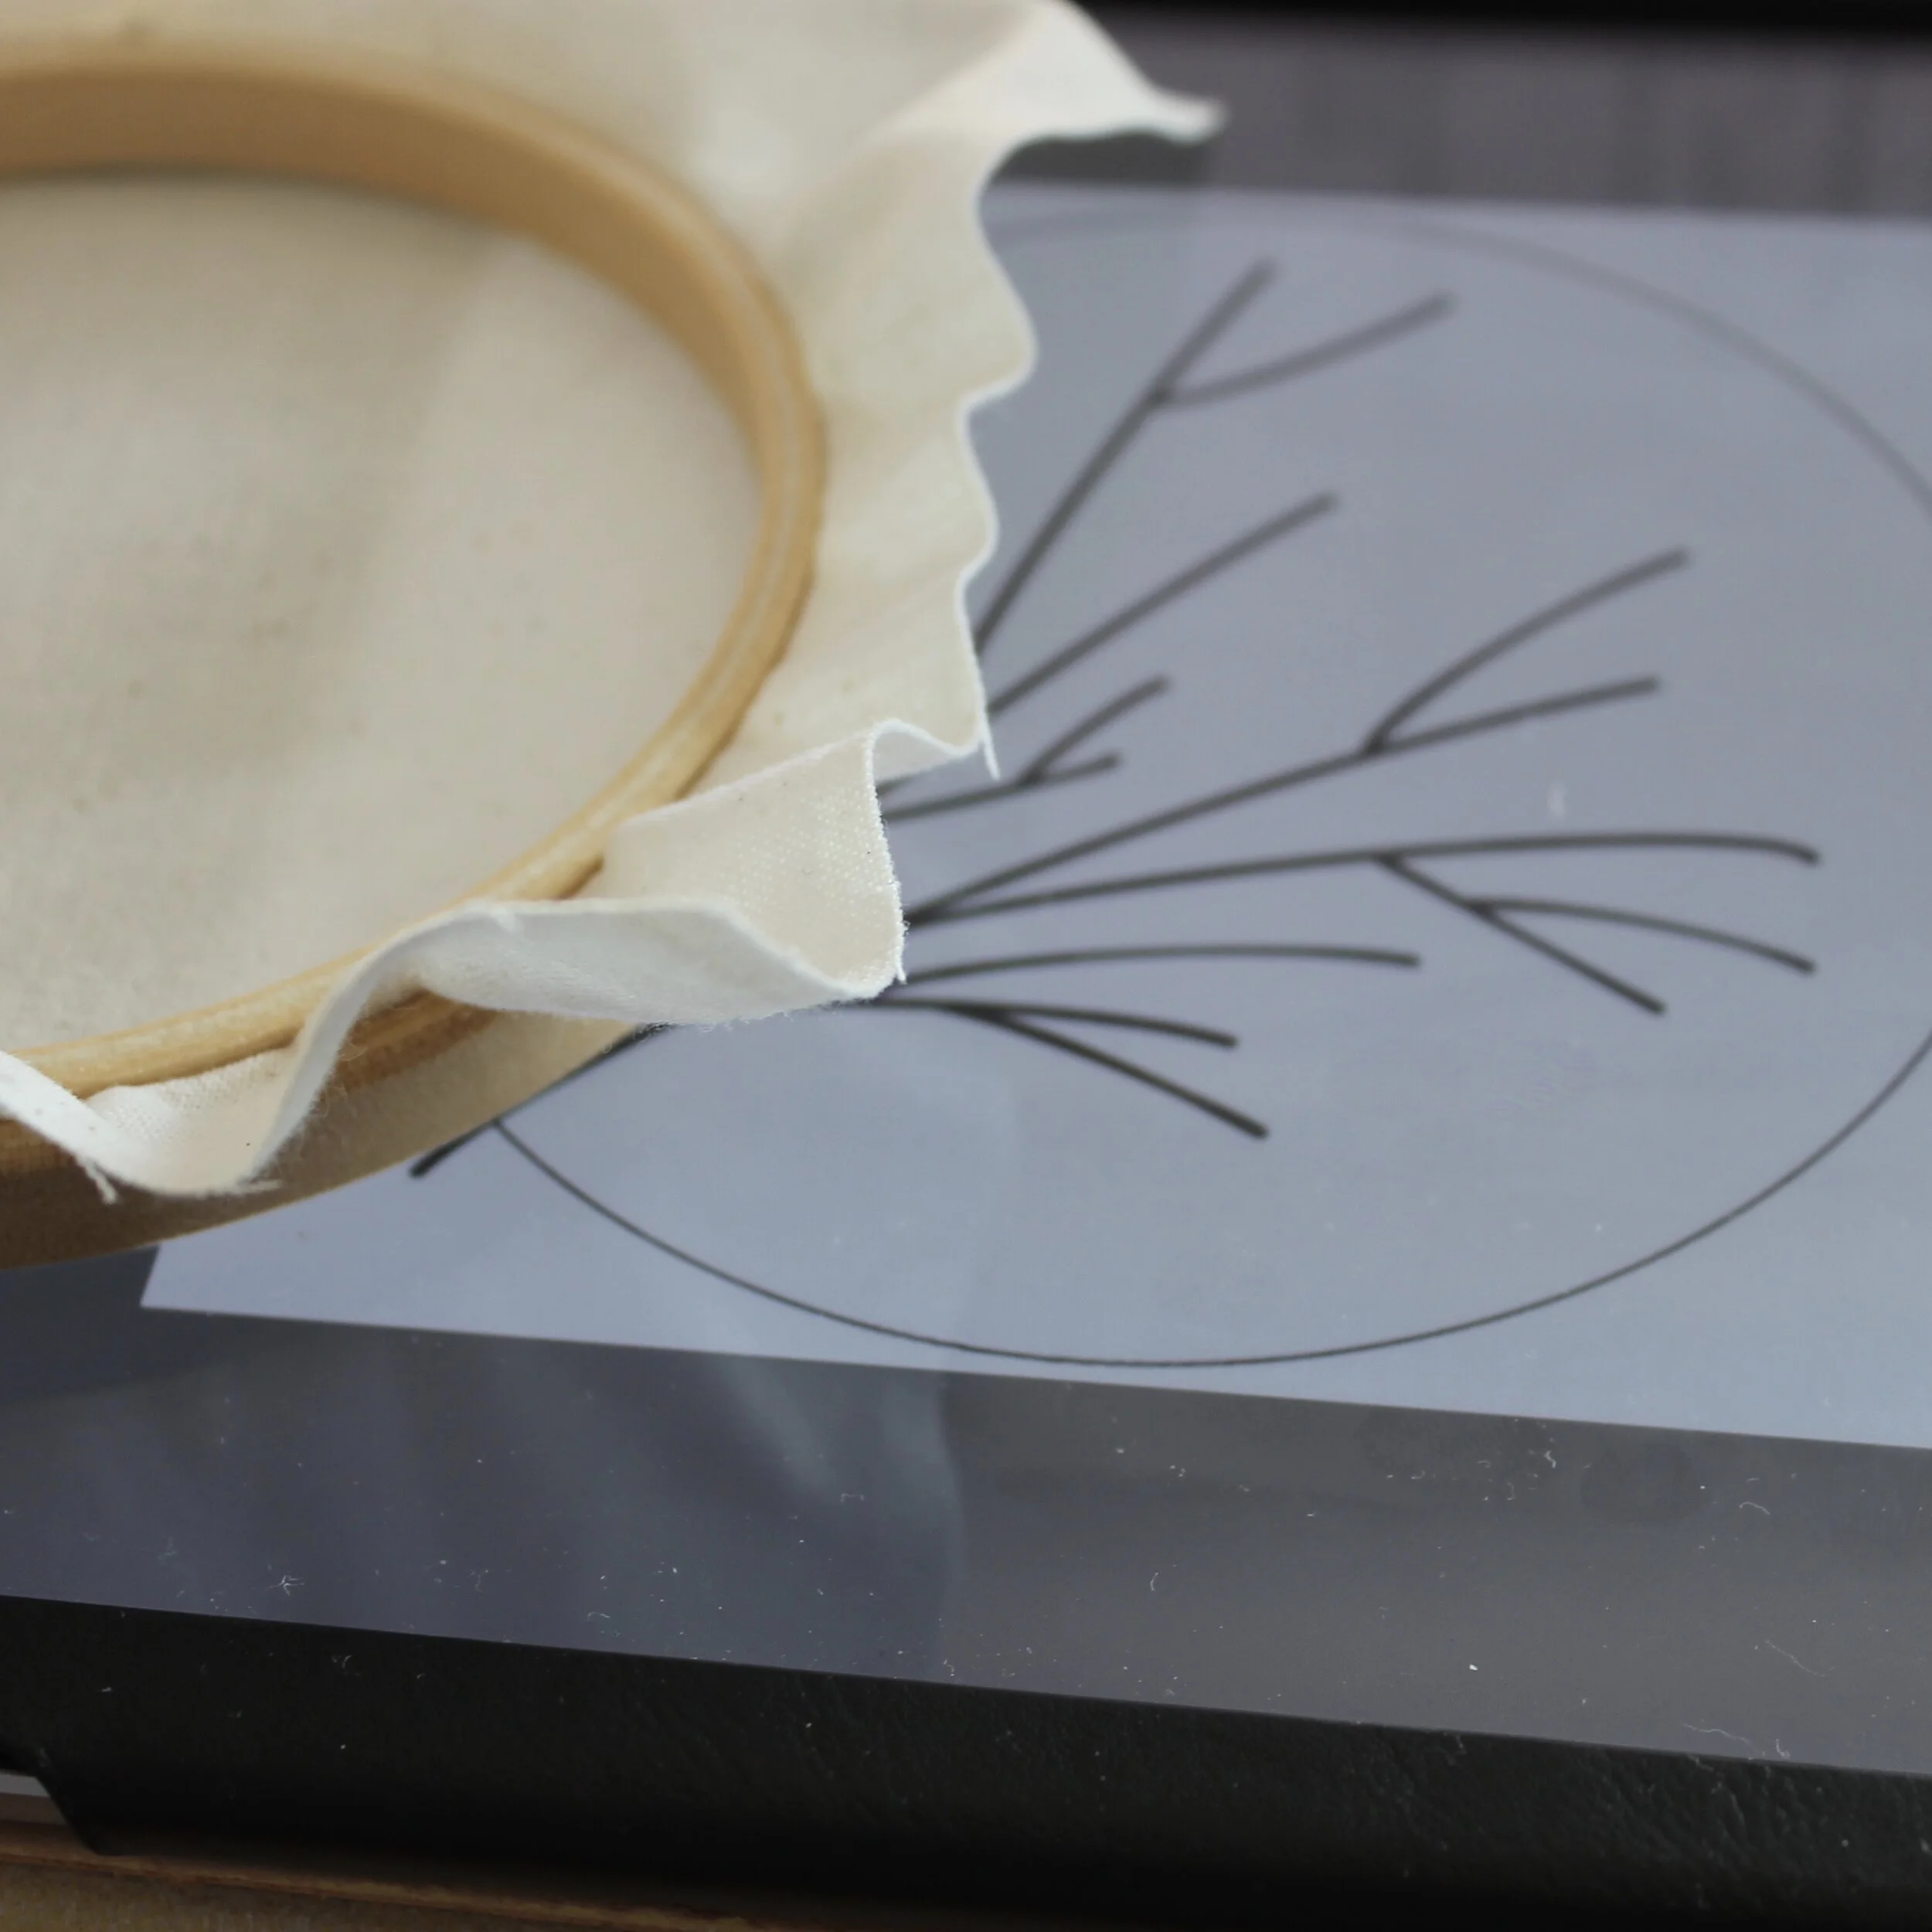
a picture of an embroidery pattern to trace on a tablet screen with an embroidery hoop about to be held over it

Make sure that you’ve added your fabric to you hoop and it’s as tight as possible. Flip the hoop over so that you can see the inner ring and the fabric can lie flat on the screen.

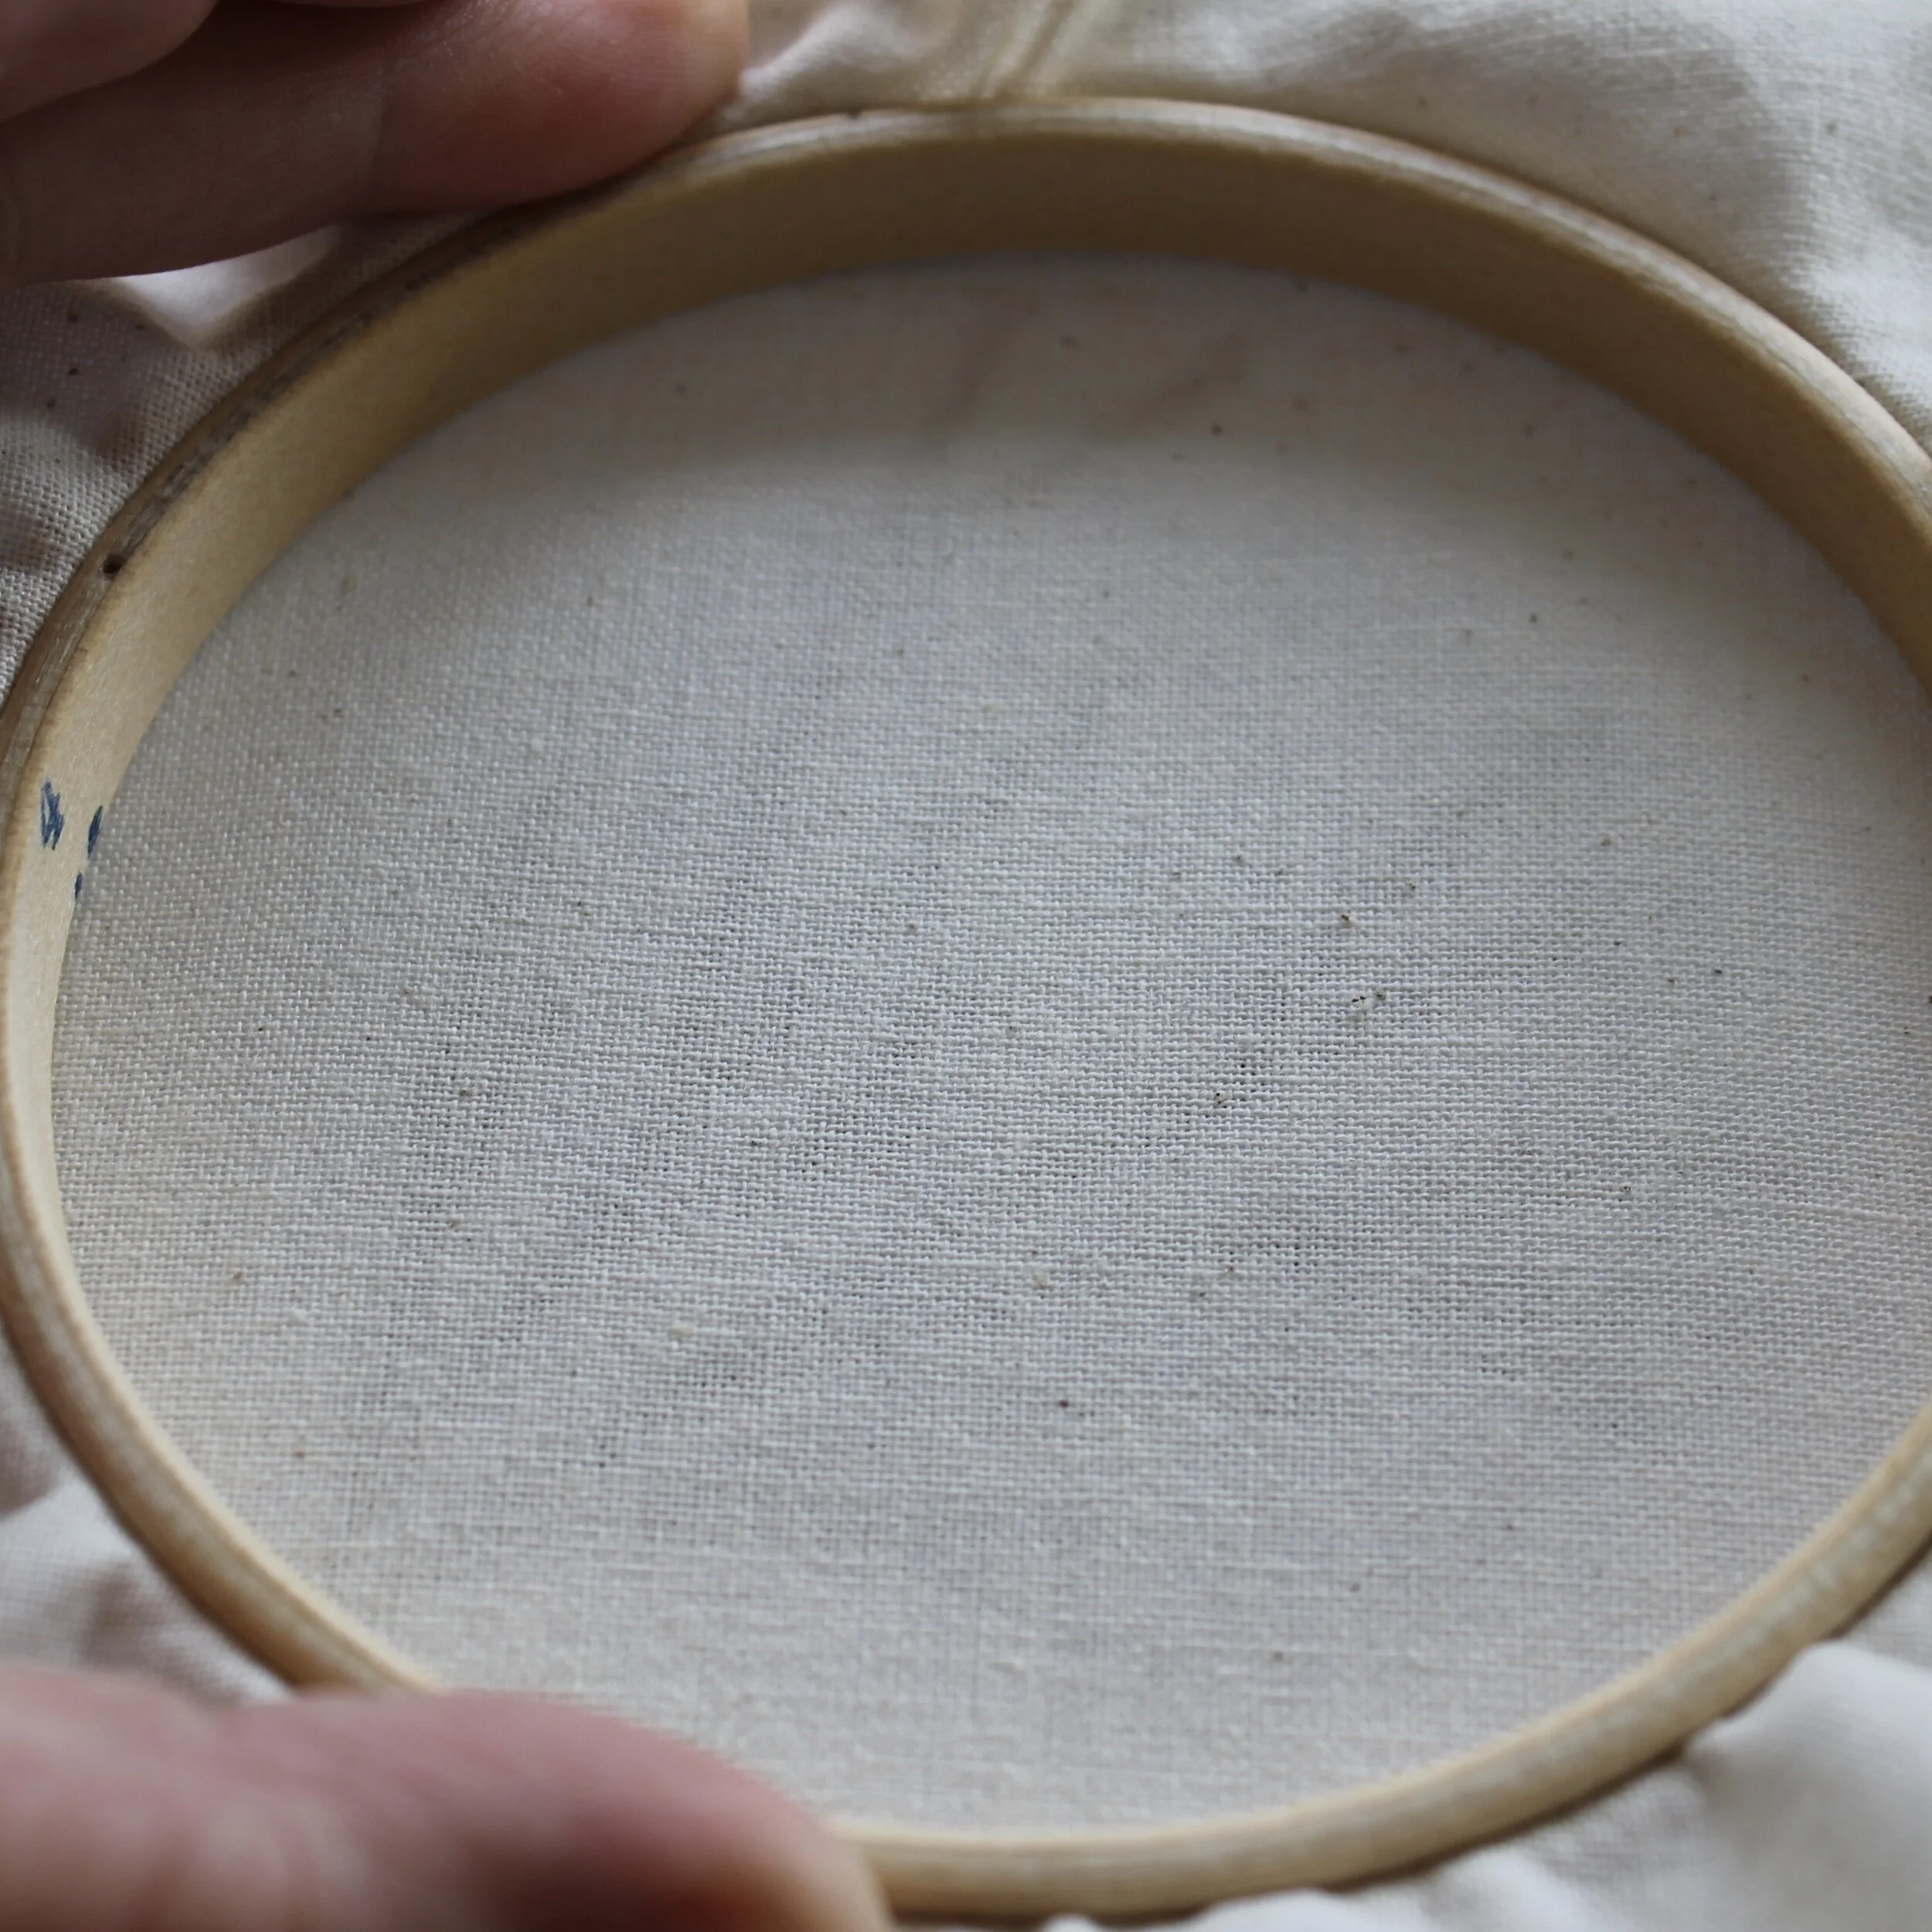
a picture of an embroidery hoop being held over a tablet screen. the embroidery pattern to be traced can be seen faintly through the fabric

Line the hoop up over the screen and press down so the hoop doesn’t move around. You should be able to see the pattern through the fabric. If the fabric is thick or dark then this method probably isn’t going to work.

Using a pencil or air/water/heat erasable pen make smooth rather than sketchy lines as you trace the pattern.

If you need to move the hoop to check that you have traced all parts of the pattern, carefully re-align the hoop before you continue tracing.

Got your own supplies and just need a pattern? I have PDF versions of a selection of my designs in the shop. I also share a free pattern in my newsletter each month - you can sign up here or find past patterns here.

Enjoyed this blog post? I share embroidery tips and a free embroidery pattern in my monthly newsletter. Sign up here to receive the newsletter on the 1st of each the month.
In tips 2 Tags Transfer, Basics
Comment
A picture of a colourful embroidery piece using felt and embroidery. Overlaid is a blue square with white text saying - stitch showcase, woven picot stitch, www.embellishedelephant.co.uk

Stitch Showcase: Woven Picot Stitch

January 20, 2021

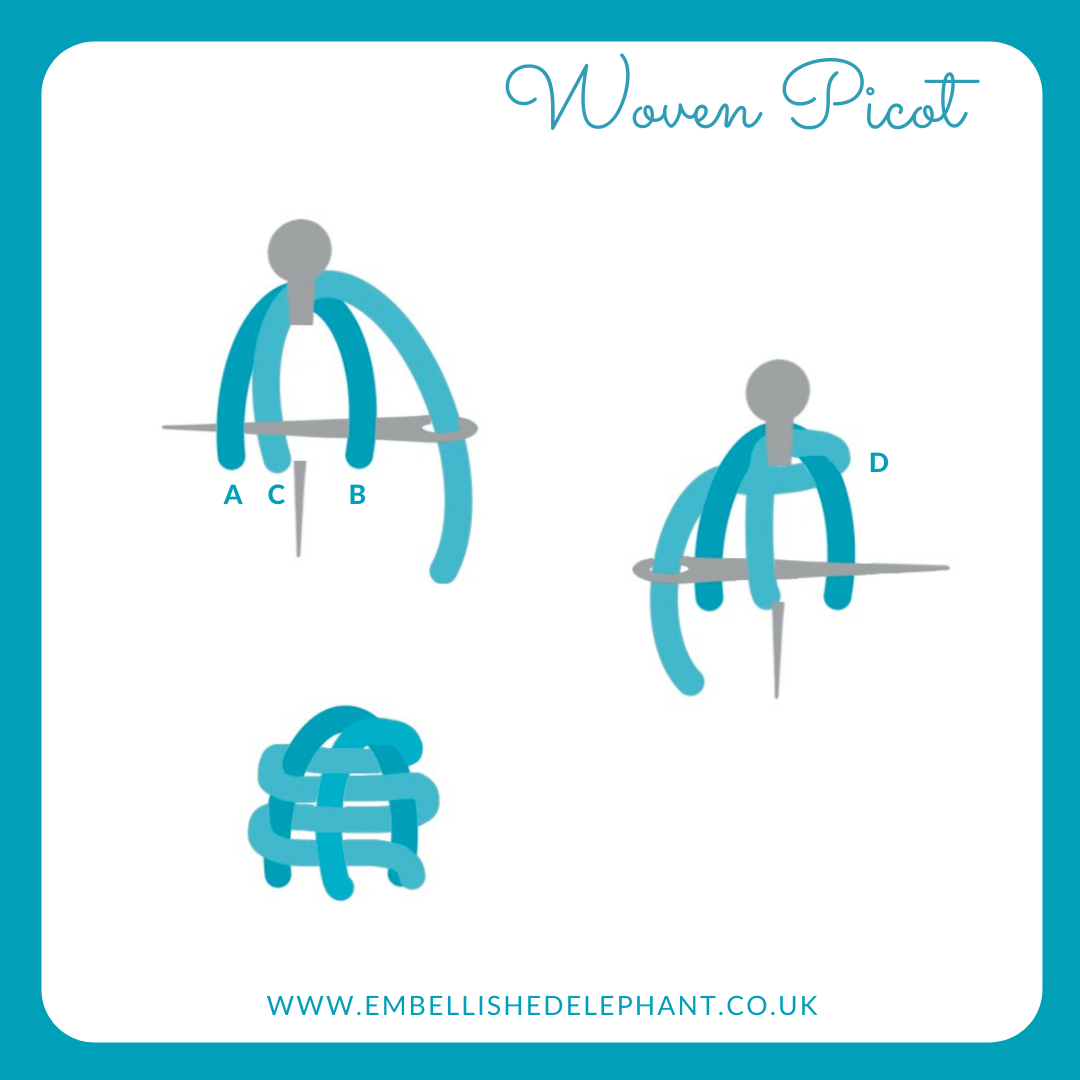
Woven picot stitches give texture and depth to a piece of embroidery and are often used as leaf or petal detail on raised embroidery.

  • A pin is needed to make this stitch - the pin should be placed through the fabric so as where the pin goes through the fabric is where the top of the stitch will be and where it comes back through the fabric is where the base of the stitch will be.

  • I also recommend having a much longer length of thread than normal as making these picot stitches is hungry on the thread.

  • Bring the threaded needle up through the fabric aligned with the lower part of the pin, the distance away from the pin governs the width of the picot.

  • Loop the thread around the top of the pin and pass the needle back through the fabric in line with the lower part of the pin and the same width away from the pin as the other side you should have an inverted V shape.

an illustration of woven picot stitch. the illustration is in blue on a white background and shows step by step stages of creating the stitch
  • Bring the needle back up through the fabric as close to the lower part of the pin (the centre of the V as possible) and loop it around the top of the pin to create a second V.

  • Rather than pass the needle back through the fabric, start the weaving at the point of the V.

  • Pass the needle under the right thread, over the centre thread and under the left thread.

  • Then working back in the other direction over the left thread (to loop round it), under the centre thread and over the right thread.

  • Keep on working under/over/under and over/under/over in opposite directions.

  • Once the weaving has reached the bottom of the picot, pass the needle back through the fabric and secure.

  • Remove the pin to release your finished picot.

If the weaving is too loose, use the needle to push the weaving close together. The fewer strands of thread used for the weaving, the more rows will be needed.

The finished picots can be left loose so they can be moved back and forwards or a tiny stitch can hold them in place.

Want to try this stitch? It’s one of the stitches I suggest for my floral sampler kit.

Enjoyed this blog post? I share embroidery tips and a free embroidery pattern in my monthly newsletter. Sign up here to receive the newsletter on the 1st of each the month.
In stitch showcase 1 Tags Stitch Showcase, Isolated Stitch, Raised Stitch
Comment
a picture of multiple layers of herringbone stitch in different shades of blue on calico fabric. Overlaid is a blue square with white text saying - stitch showcase, herringbone stitch, www.embellishedelephant.co.uk

Stitch Showcase: Herringbone Stitch

January 13, 2021

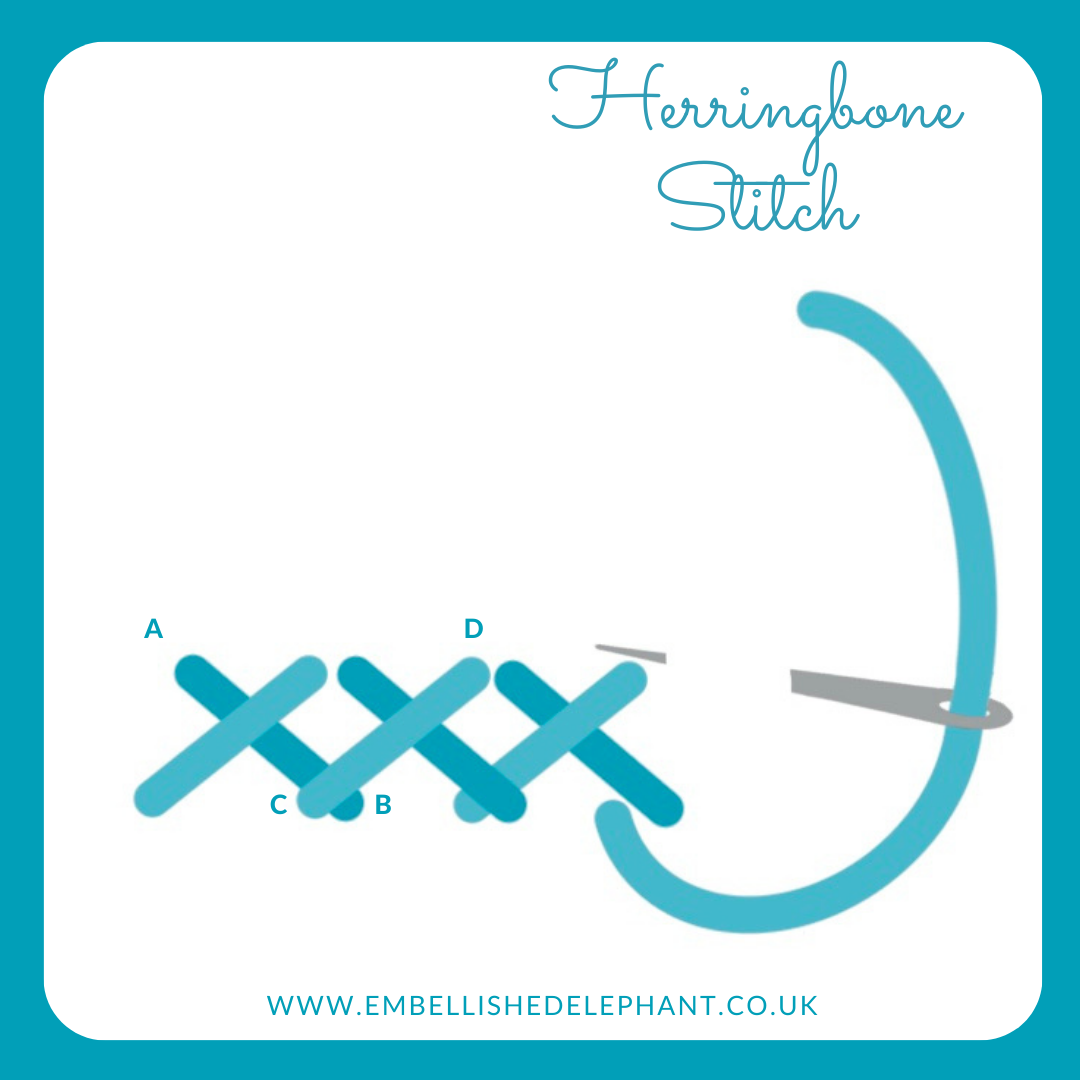
Herringbone stitch is a variation on a cross stitch - the point of the cross is off centre so that there are two long legs and two short legs off the cross ie it’s a cross stitch at a jaunty angle.

  • If you are stitching this as a border then you might want to draw two parallel lines to guide your stitching. If you are using it as an isolated or textural stitch then this is not necessary.

  • Bring the needle up though the fabric and then take it at a diagonal and pass the needle down through the fabric and then up a little further along (you can do this in one motion or up and then down).

  • To complete the stitch take it diagonally down to create a (wonky) cross.

An illustration of herringbone stitch in blue on a white background

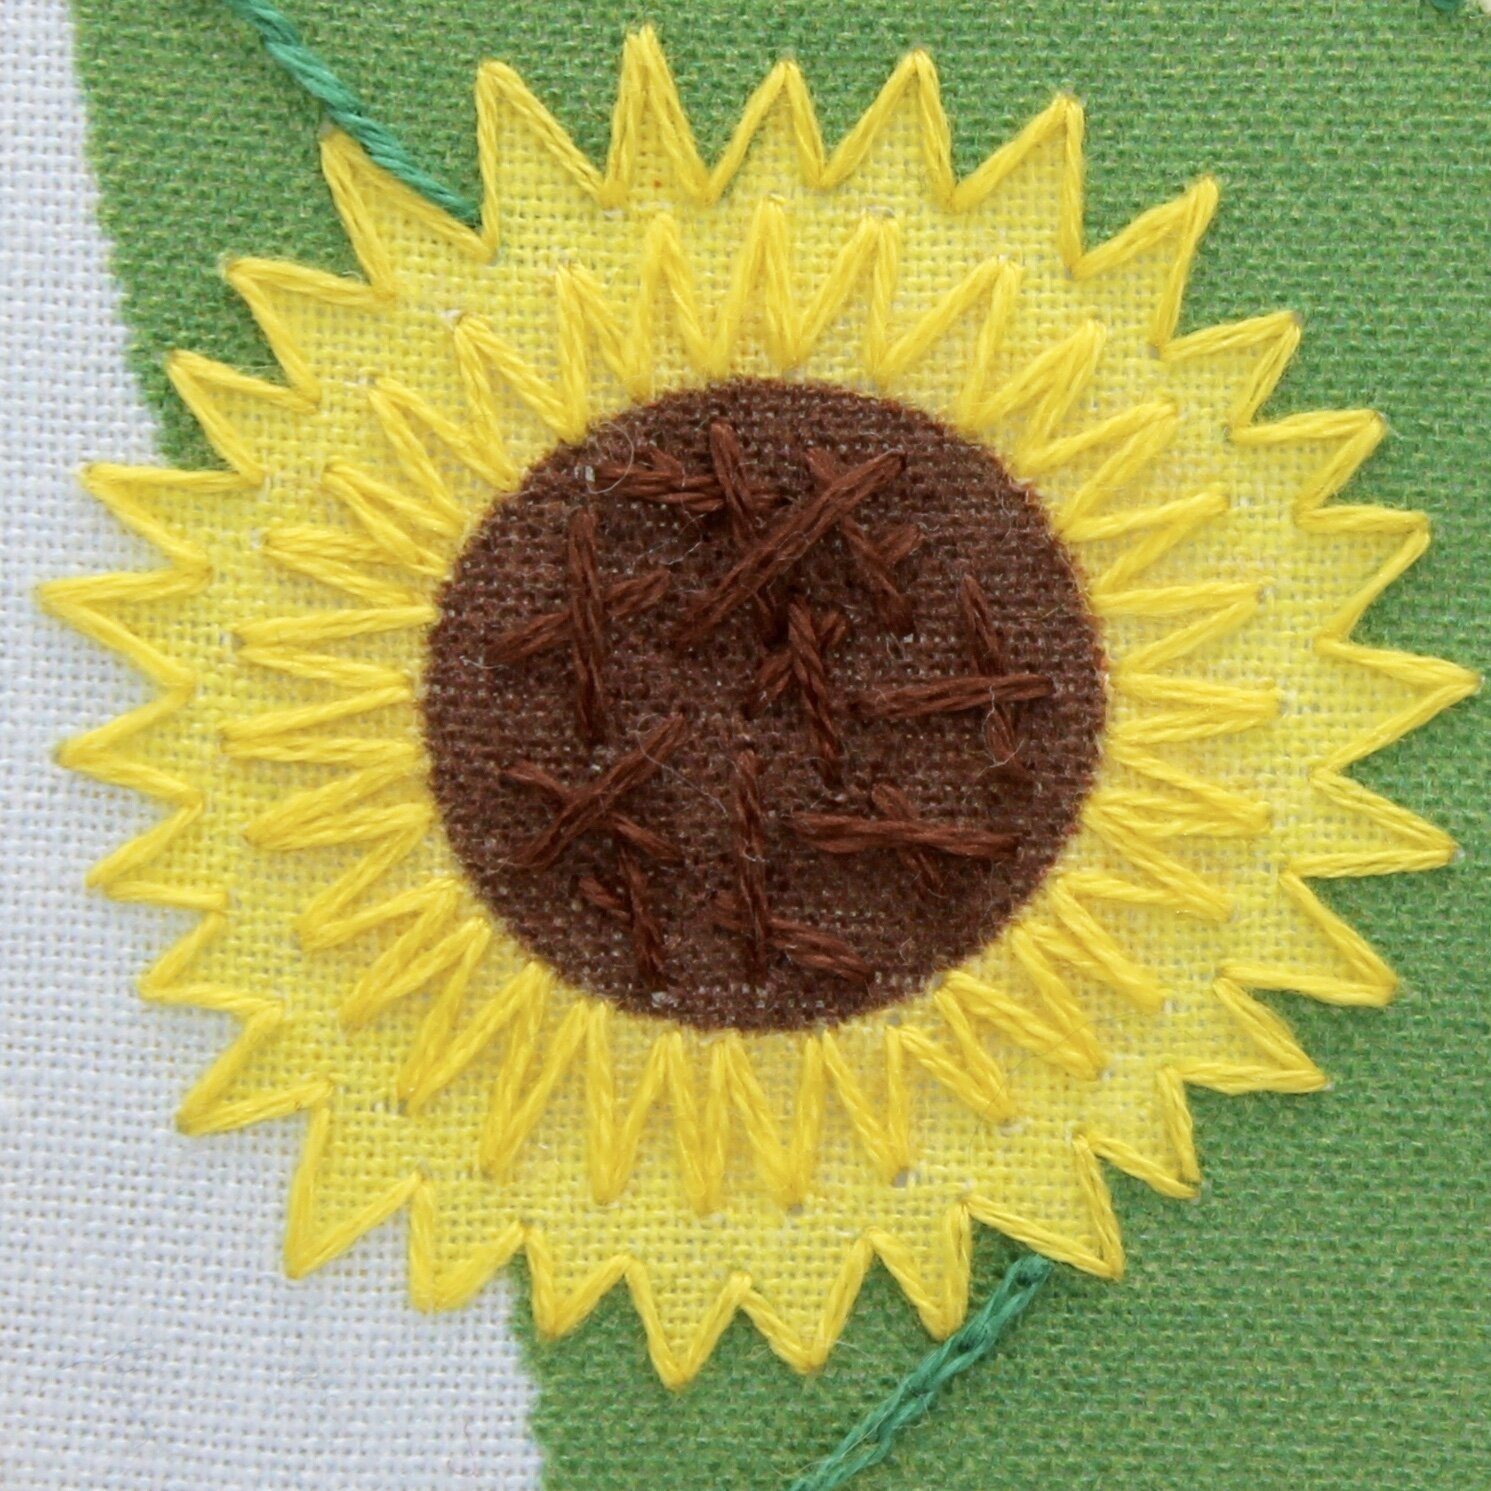
Most commonly you’ll see this stitch worked in a line to create a border, but I prefer to use it as isolated stitches, varying the size and point of cross. Layering the stitches using different thread gives a great textured look.

Want to try this stitch? It’s one of the stitches I suggest in my sunflower sampler kit.

A picture of a sunflower embroidery using herringbone stitch at the centre of the sunflower
A stitch sampler using different types of blue thread and herringbone stitch in an abstract arrangement

Enjoyed this blog post? I share embroidery tips and a free embroidery pattern in my monthly newsletter. Sign up here to receive the newsletter on the 1st of each the month.
In stitch showcase 1 Tags Stitch Showcase, Isolated Stitch
Comment
A picture of an embroidery with blue lines drawn on it with a water erasable pen. Overlaid is a blue square with white text saying  - hand embroidery, five pens for transferring embroidery patterns, www.embellishedelephant.co.uk

Five pens for transferring embroidery patterns

January 9, 2021

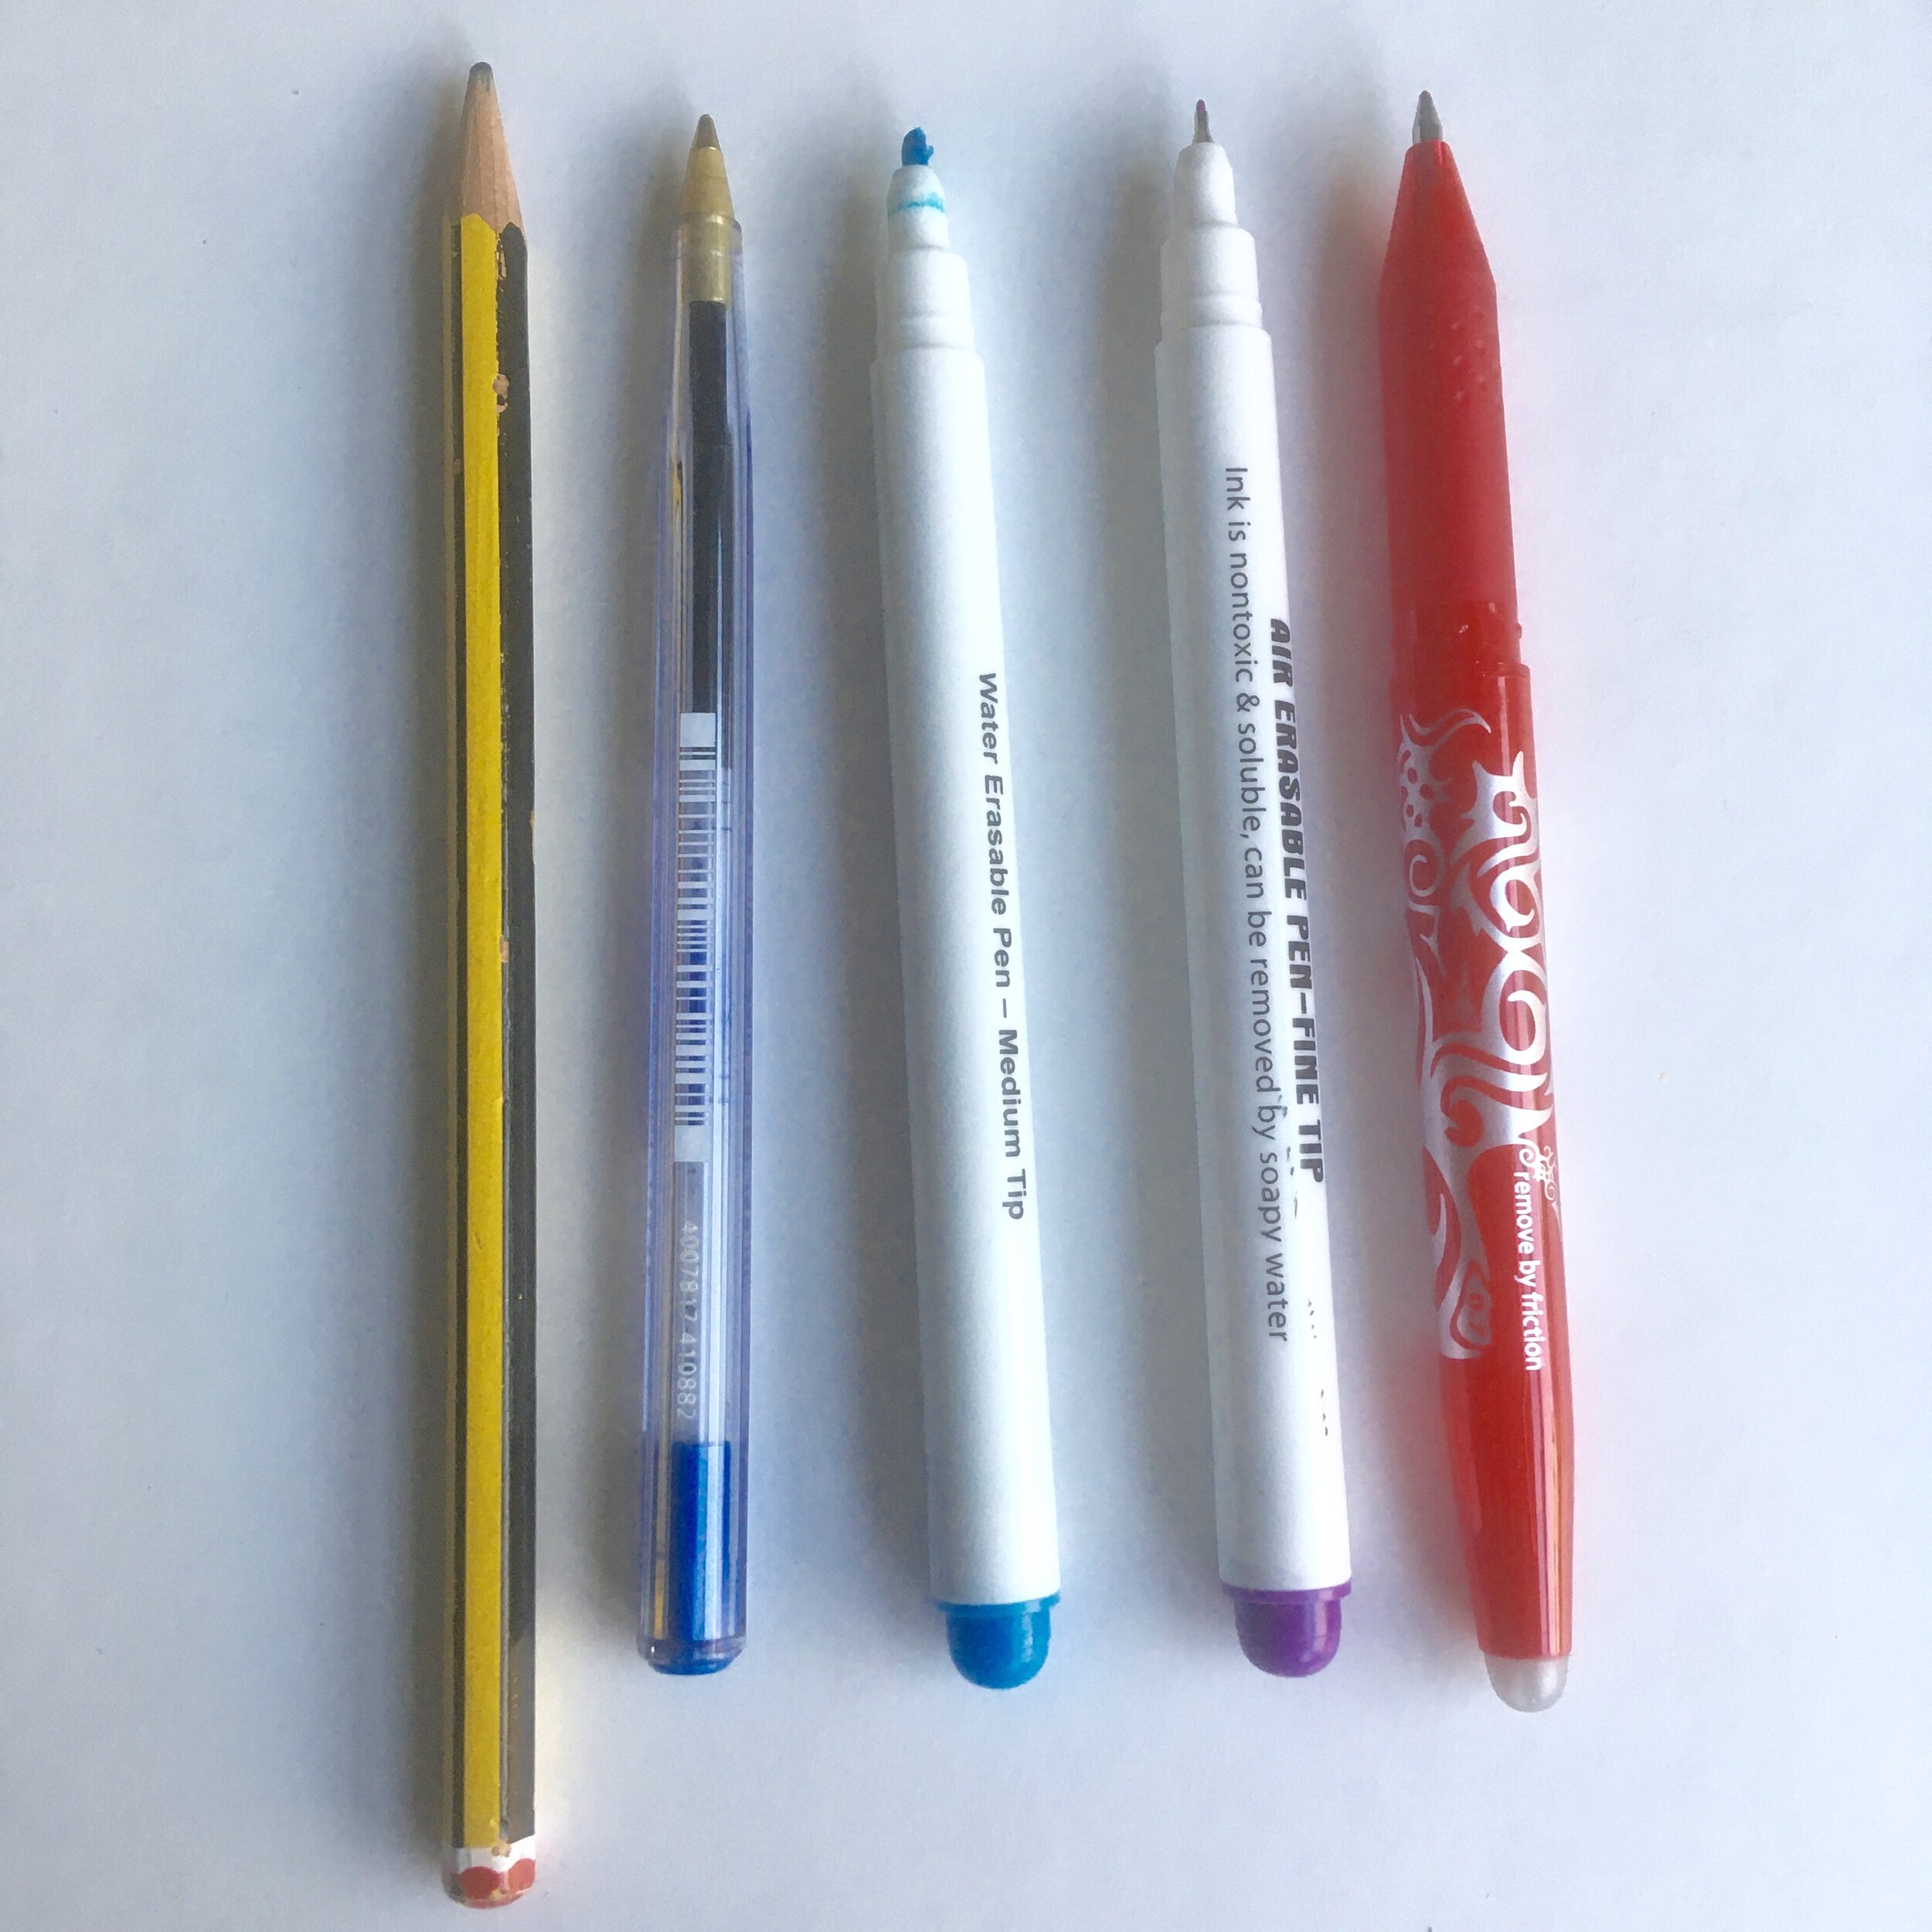
There are more ways than ever for getting patterns transferred onto fabric to stitch on such as pre-printed fabric, carbon paper, water soluble paper. But if you are drawing your own pattern or just want a basic transfer methods then all you need is a pen. There are 5 main pens you can use for transferring embroidery patterns:

  • pencil - whilst not strictly a pen this is a very good option if you are just starting out in embroidery, you just need to draw slow and steady as if you don’t draw accurately you could see the pencil marks show or you have to alter your stitching to cover them up

  • biro - I’ve see some embroiderers use a biro but you have to be brave to go with this option! At least with pencil it can fade/wash out, biro is a commitment. The only time I use biro is when working with felt as it draws really well on this surface

  • water erasable - this was the first type of specialist pen I tried, in general it works well, but you have to wet your embroidery all over to get rid of it, this can mean that there are wrinkles in the fabric when it all dries. I’ve also found that some pens require more than one wash to remove

  • air erasable - the one I bought had a really fine tip which was great for drawing embroideries, however you have to work quickly! The one I had was meant to last 48 hours but the drawing started disappearing in minutes - not helpful

  • heat erasable - I’d seen a few embroiderers on Instagram recommend this so I purchased some and I’m really impressed. I just run my hairdryer over the fabric once I’ve finished and the pen marks disappear. I did have once incident when I managed to erase a tracing by accident as it was stuck to another piece I was using the hairdryer on but that was user error rather than the pen!

a picture of a pencil, biro and water, air and heat erasable pens lined up on a light blue background

Overall I’d recommend either a pencil or a heat erasable pen (Pilot frixon is the make I use ) for transferring embroideries.

Enjoyed this blog post? I share embroidery tips and a free embroidery pattern in my monthly newsletter. Sign up here to receive the newsletter on the 1st of each the month.
In tips 2 Tags Transfer, Basics
Comment
A picture of bullion knots in black threads on a calico background. Overlaid is a blue square with white text saying - stitch showcase, bullion knot, www.embellishedelephant.co.uk

Stitch Showcase: Bullion Knot

January 6, 2021

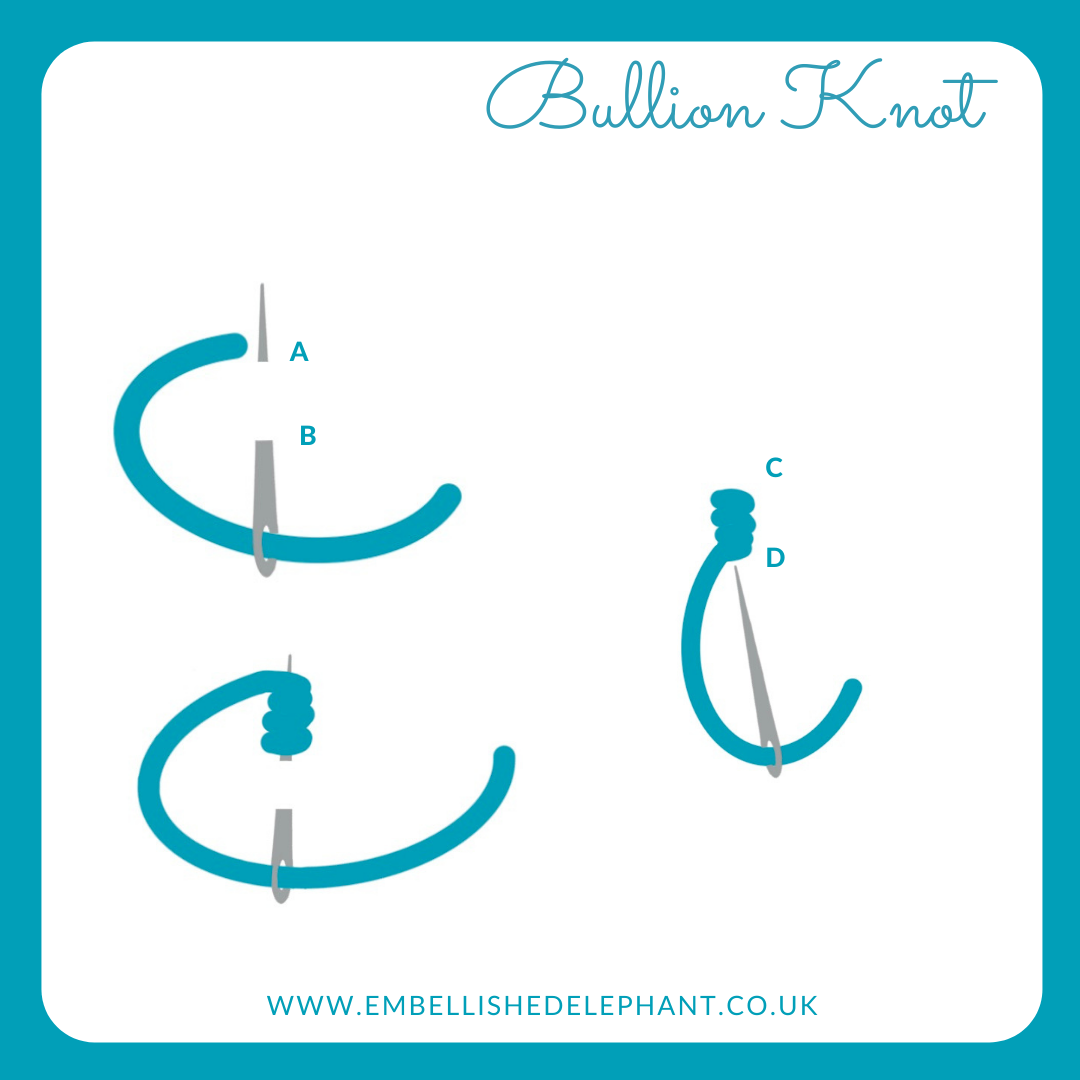
This is one of the trickiest stitches in embroidery but I’ve been stitching it as much as I can lately as, much like the French knot, practice really helps.

There are two methods for creating a bullion knot. The method I prefer isn’t the one that you’ll find in most stitch tutorials. I like it as I with the traditional method my knots are often thicker at one end than the other, but give them both a try and see which works for you

Traditional method

  • Create a straight stitch but leave a loop when you complete the stitch, then poke the needle through the fabric at the start of the stitch, but don't push it all the way through.

  • Using the loop, wrap the loop around the needle enough times to match the length of the stitch.

  • Carefully pull the rest of the loop so the needle lies flat, then push the needle through (holding onto the wraps) and finally complete the stitch.

An illustration with step by step guidance on how to create bullion knots. The illustration is in blue on a white background

My method

  • Bring the needle up through the fabric at the point you want the knot to start, then pass it back through the fabric where you want the stitch to end, don't pull the thread all the way through.

  • Push the needle back up through the fabric at the starting point of the stitch, but don't push it all the way through. Wrap the thread around the needle enough times so the wraps are the same length as the stitch will be, you can flip the needle down to check.

  • Using your thumb to hold the wraps in place, pull the needle back slightly so you can push the tip of the needle through the fabric at the end point. Pull the excess thread on the top of the fabric through to the back then pull the needle through carefully to complete the stitch.


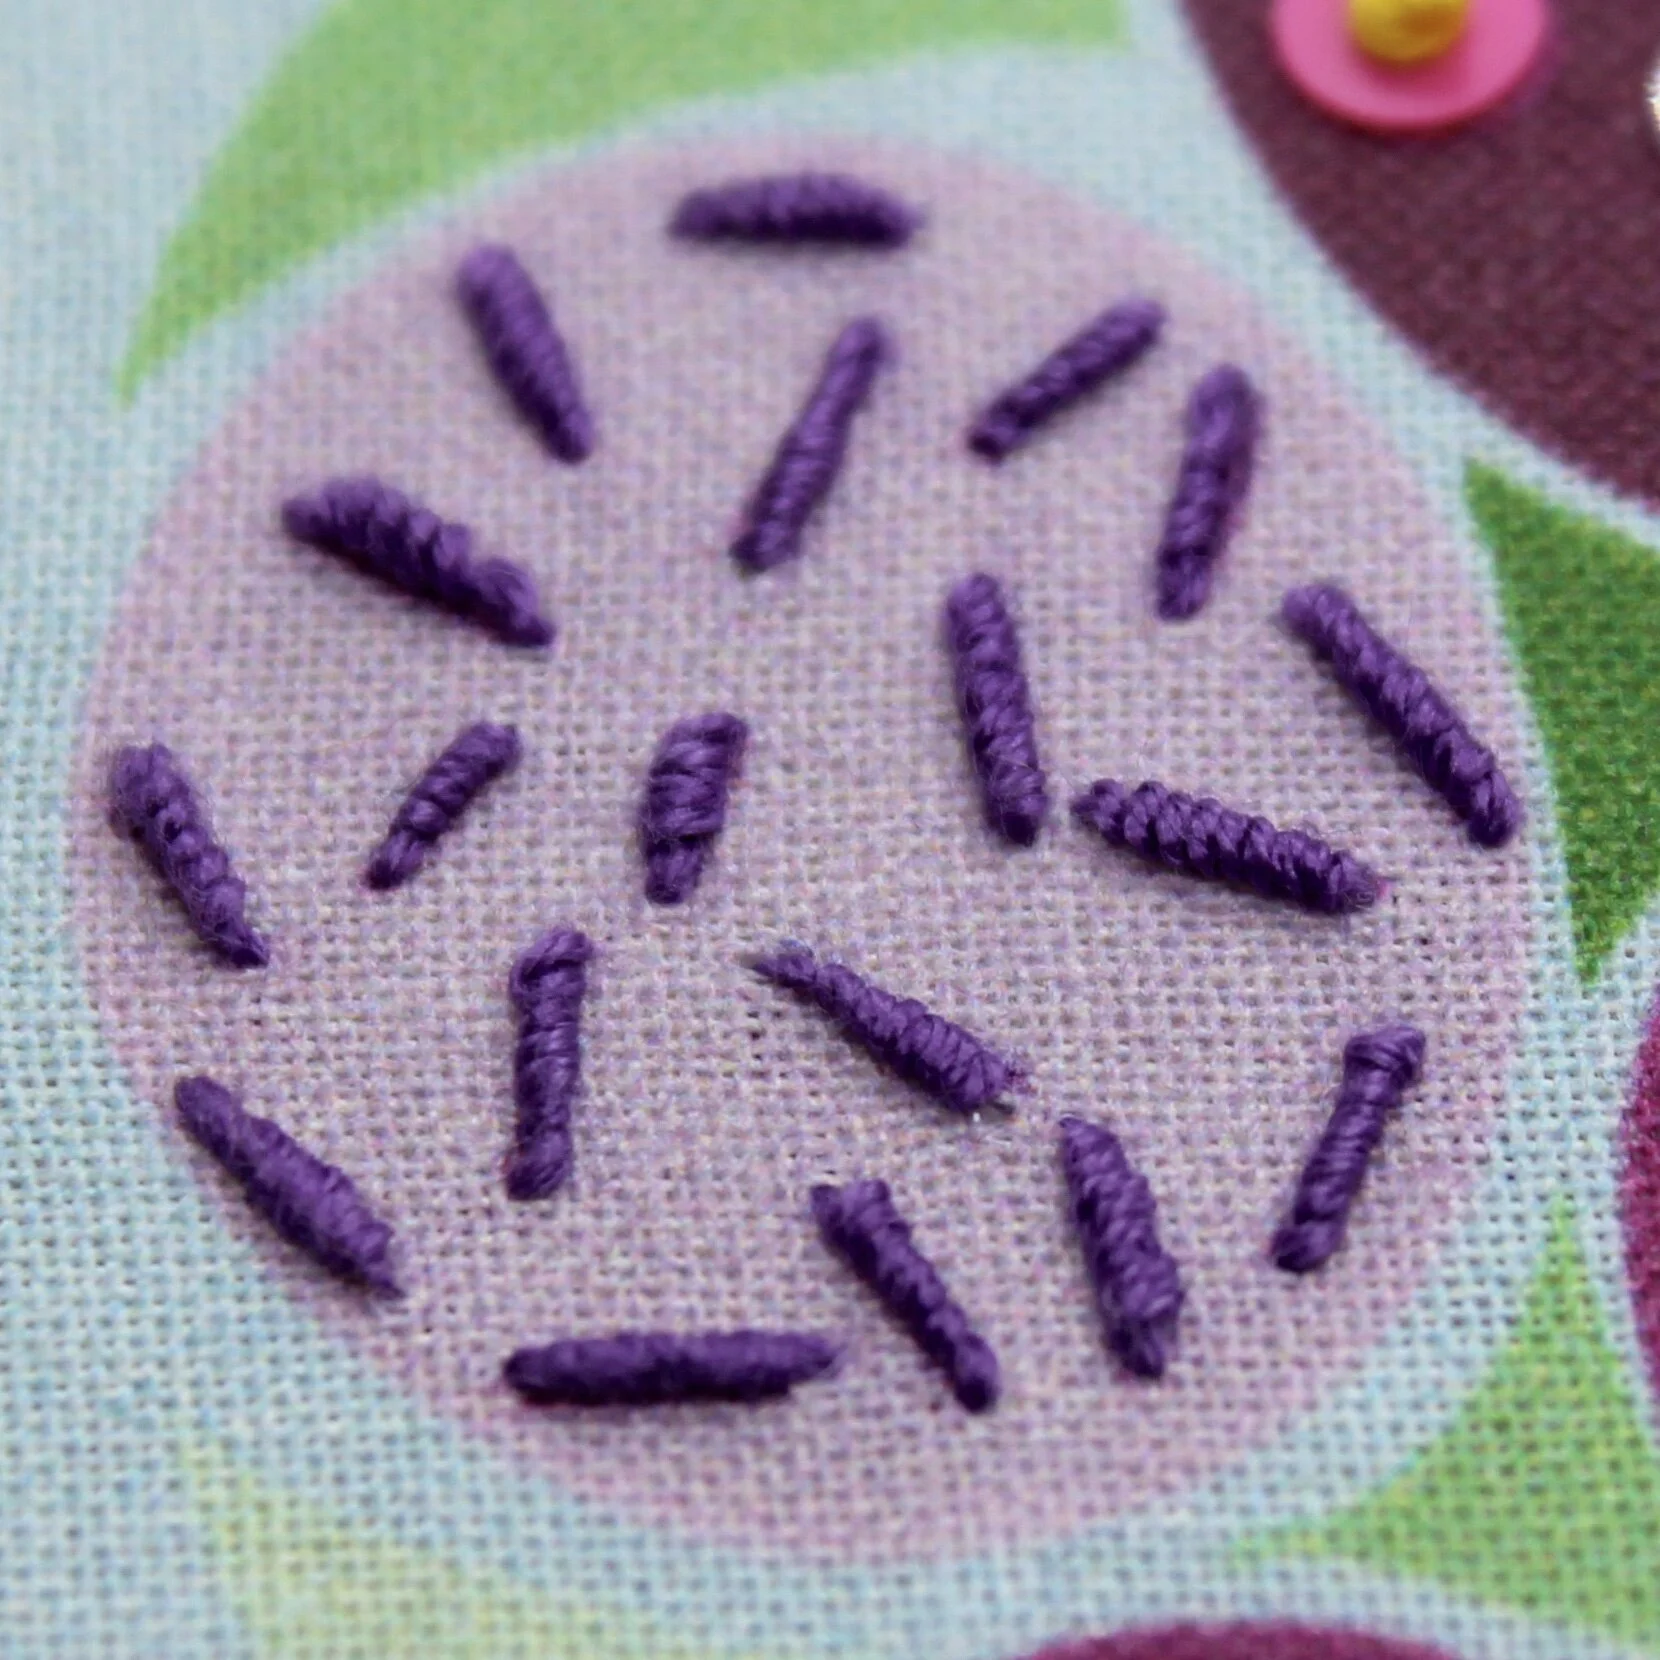
In both these examples below, the bullion knot has been used as an isolated stitch - in combination with other stitches and on its own.

Want to try this stitch? It’s one of the stitches I suggest in my heart stitch sampler kit and my floral stitch sampler kit.

A picture of lots of individual stitches scattered across calico fabric. The stitches are in different shades of pink and using a range of different embroidery stitches
A close up of a pink circle with purple bullion knot stitches scattered within the circle

Enjoyed this blog post? I share embroidery tips and a free embroidery pattern in my monthly newsletter. Sign up here to receive the newsletter on the 1st of each the month.
In stitch showcase 1 Tags Stitch Showcase, Isolated Stitch
Comment
An image of jacobean couching stitch on sand coloured felt with sand and mustard threads. Overlaid is a blue square with white text saying - stitch showcase, jacobean couching, www.embellishedelephant.co.uk

Stitch Showcase: Jacobean Couching

December 30, 2020

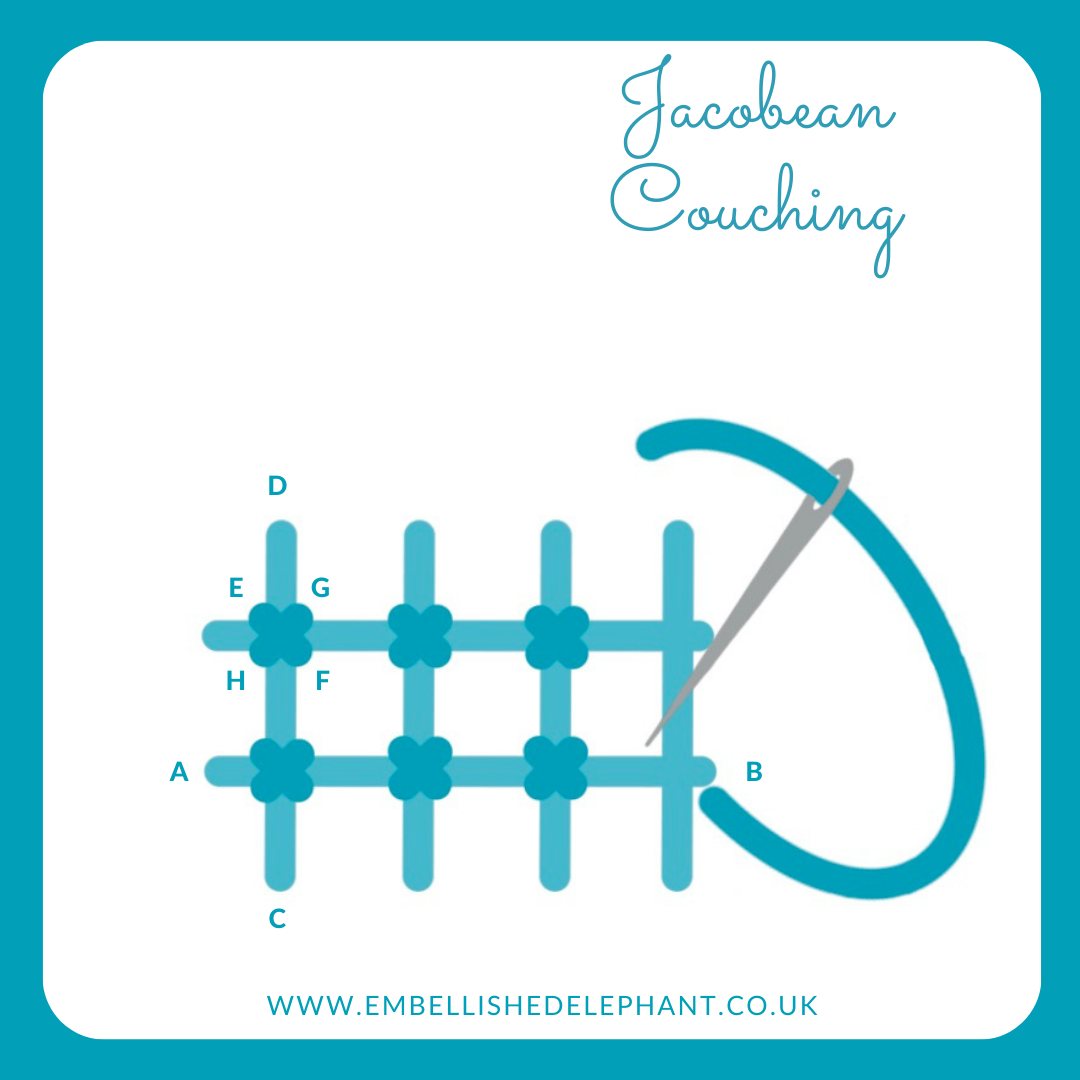
Jacobean couching is a stitch that originated in the 17th Century and requires precision and time to get both the laid down threads and the cross stitches that couch them down lying evenly.

  • Start off by laying down the vertical threads evenly spaced across the area. (The closer together the threads the more couching you'll need to do.)

  • To help get each stitch straight lie the thread on top of the felt and get the correct angle before you complete the stitch.

  • Now repeat the same process for laying down horizontal threads. The effect looks best if these are spaced out at the same distance as the vertical threads but play around with the spacing for different effects.

An illustration of how to create the embroidery stitch called jacobean couching. The illustration is in shades of blue and grey on a white background
  • The intersection of each vertical and horizontal thread is where a small cross stitch will be added to secure or couch the threads.

  • To add these, start by bringing the needle up at the top left of the intersection and then taking it down over the threads at the bottom right to complete a half cross stitch. To complete the cross, work from top right to bottom left.

  • My preference is to complete all the half crosses first and then go back and complete the rest of the cross, but you can complete each cross before moving on. I'd suggest you always work the first part of the cross in the same direction for the best finish.

  • You can work methodically from one side to another. Alternatively work every few stitches on each row to tack the threads in place which helps maintain the even spacing, before going back and filling in the gaps.

This is a great stitch to experiment with different thread thicknesses and colour combinations. The sample below is stitched with one strand of embroidery floss and a single strand of metallic sewing thread.

Want to try this stitch? It’s one that I suggest using in my monstera kit.

Enjoyed this blog post? I share embroidery tips and a free embroidery pattern in my monthly newsletter. Sign up here to receive the newsletter on the 1st of each the month.
In stitch showcase 1 Tags Stitch Showcase, Couching Stitch
Comment
A picture of some sequins attached to fabric. Overlaid is a blue square with white text saying - hand embroidery, six ways to embellish with sequins, www.embllishedelephant.co.ukfor

Six techniques for embellishing with sequins

December 26, 2020

Sequins are great for adding a bit of sparkle to a project but how is best to attach them?

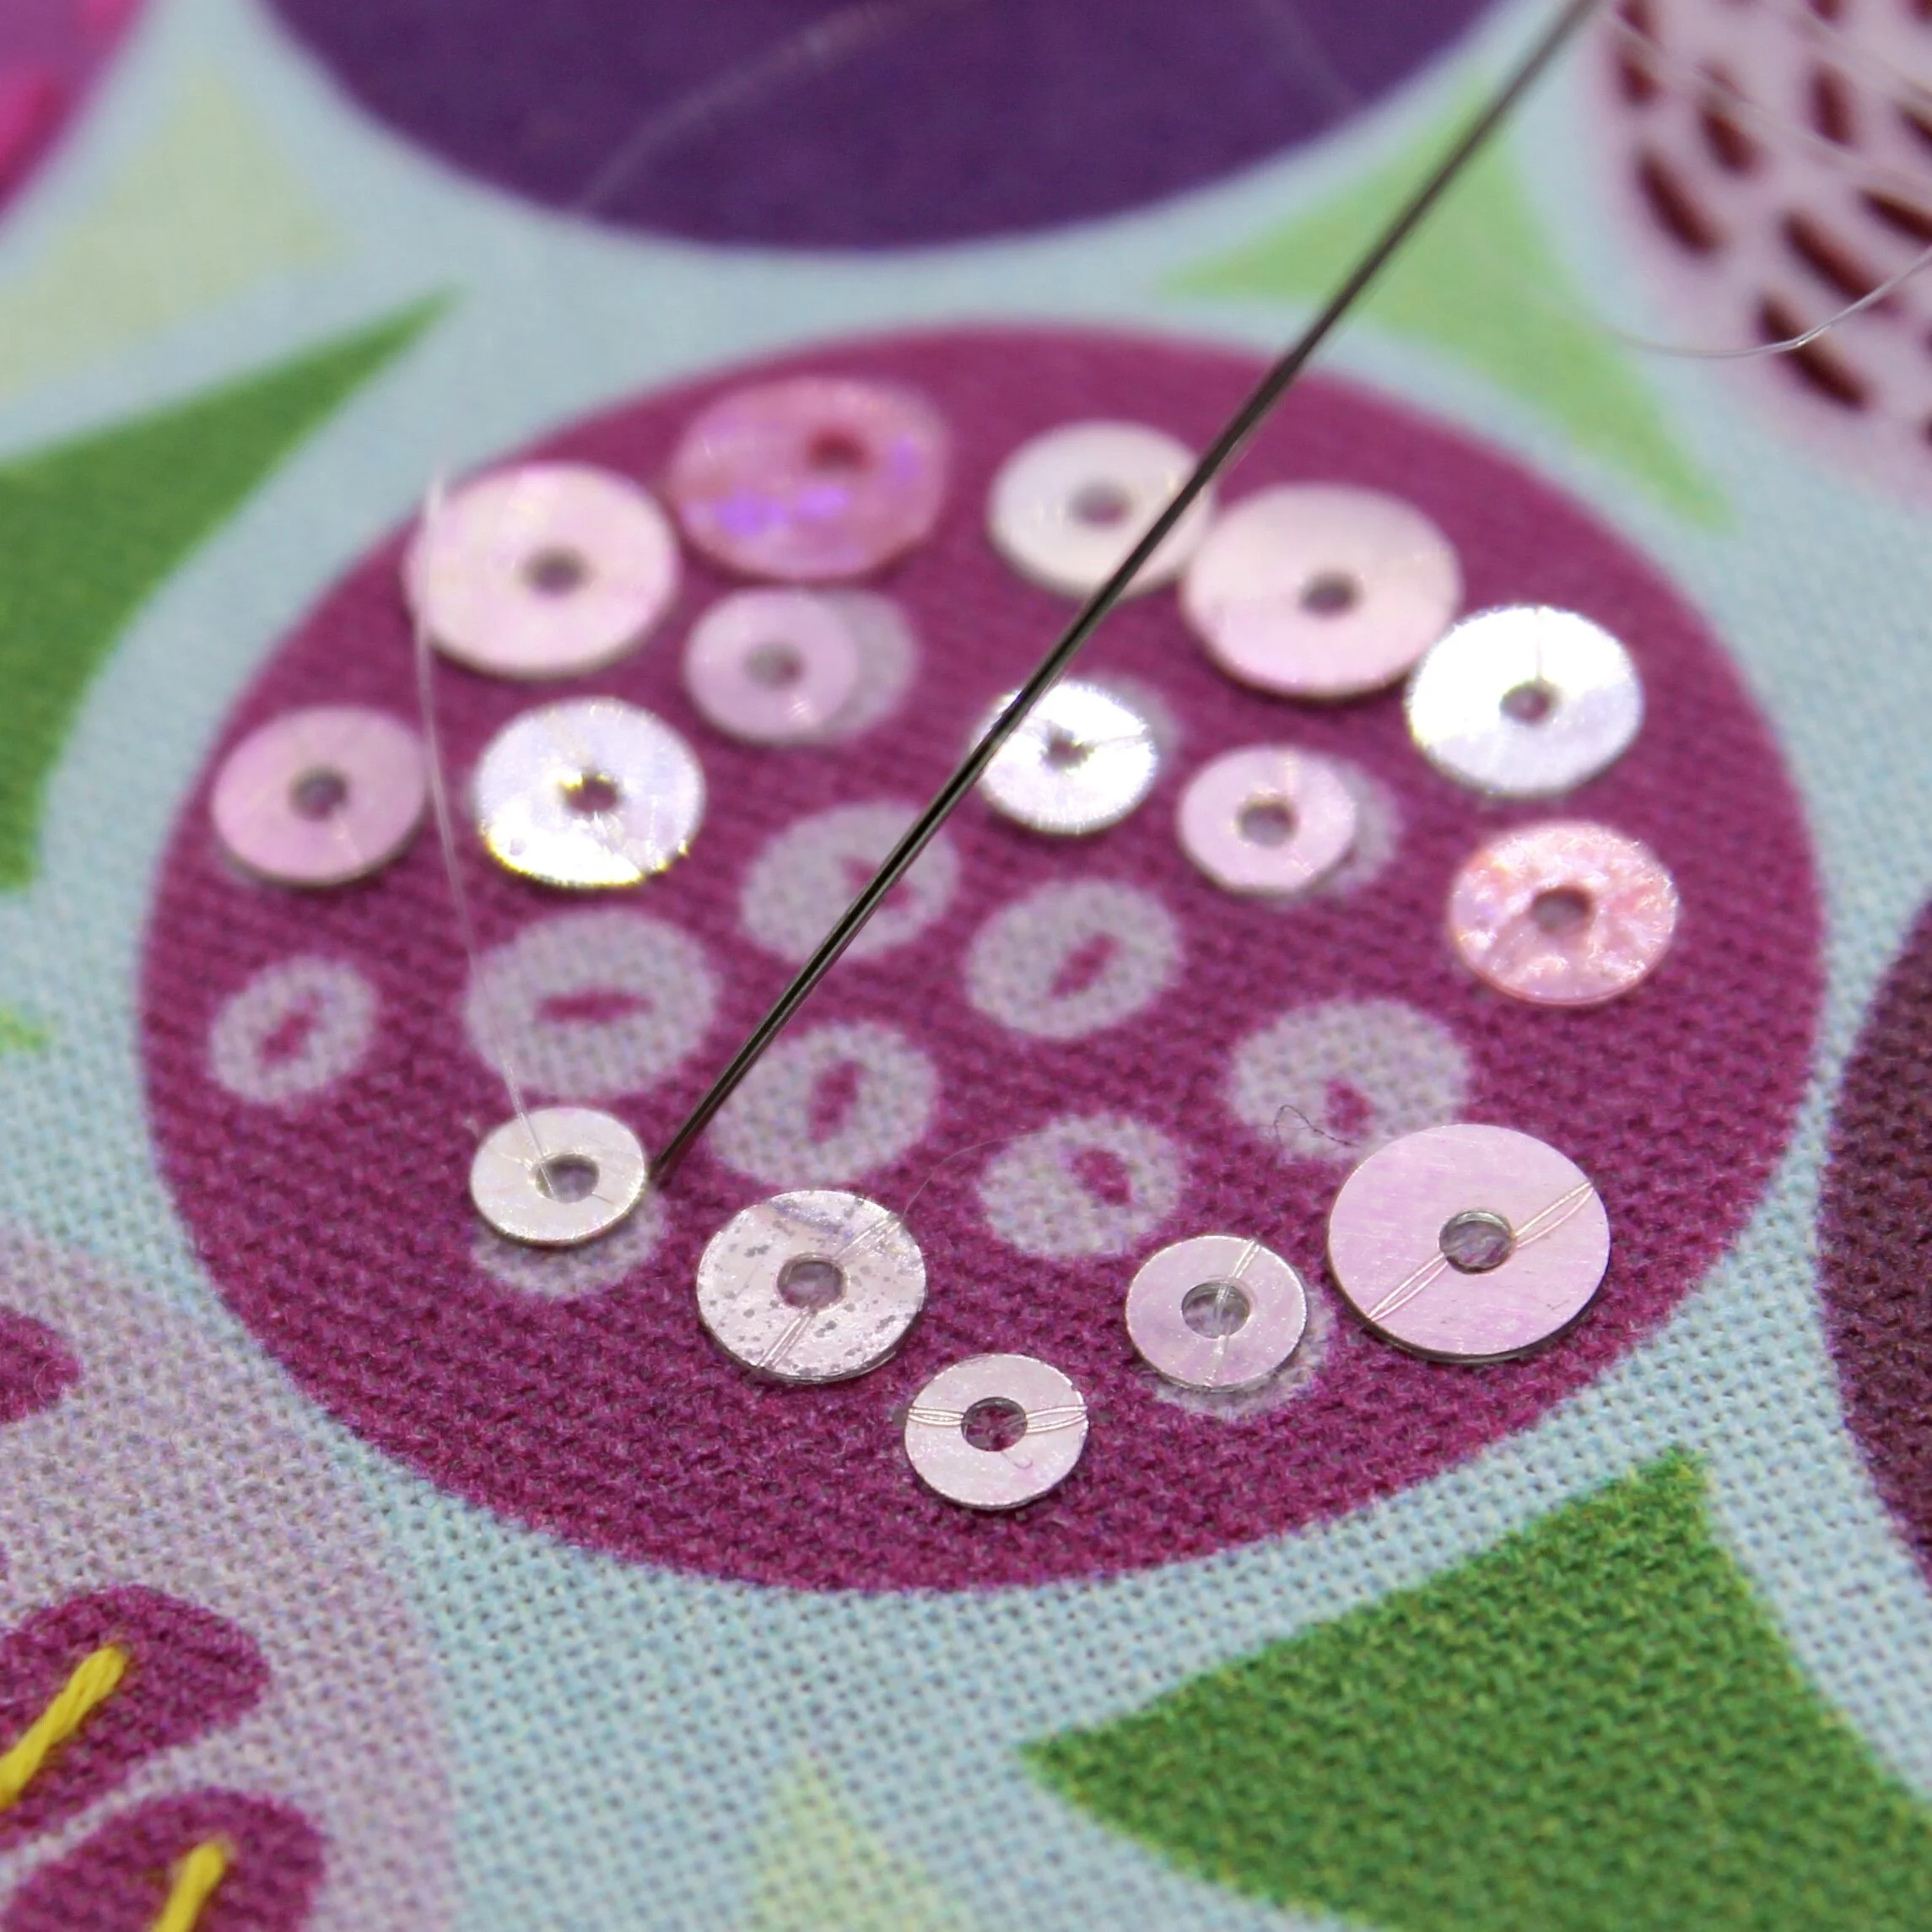
A picture showing how sequins can be attached using a single stitch

1. Single stitch

A single through the centre to one edge is the easiest way to attach a sequin. It works well whether you are using invisible thread, matching thread or contrasting thread. It’s also a great technique to use if you are overlapping sequins. But it’s not the best technique to use if your piece will be rubbing against something else as the sequins can flip or bend.

A picture of attaching sequins with multiple stitches

2. Multiple stitches

These give a much more secure finish. Most commonly I’d just use two stitches at 180 degrees to give the look of a continual line but you could use three, four or more stitches in a more decorative fashion - the more stitches the more secure the sequin. I tend to use invisible beading thread for this technique as I want the focus to be on the sequin rather than the thread.

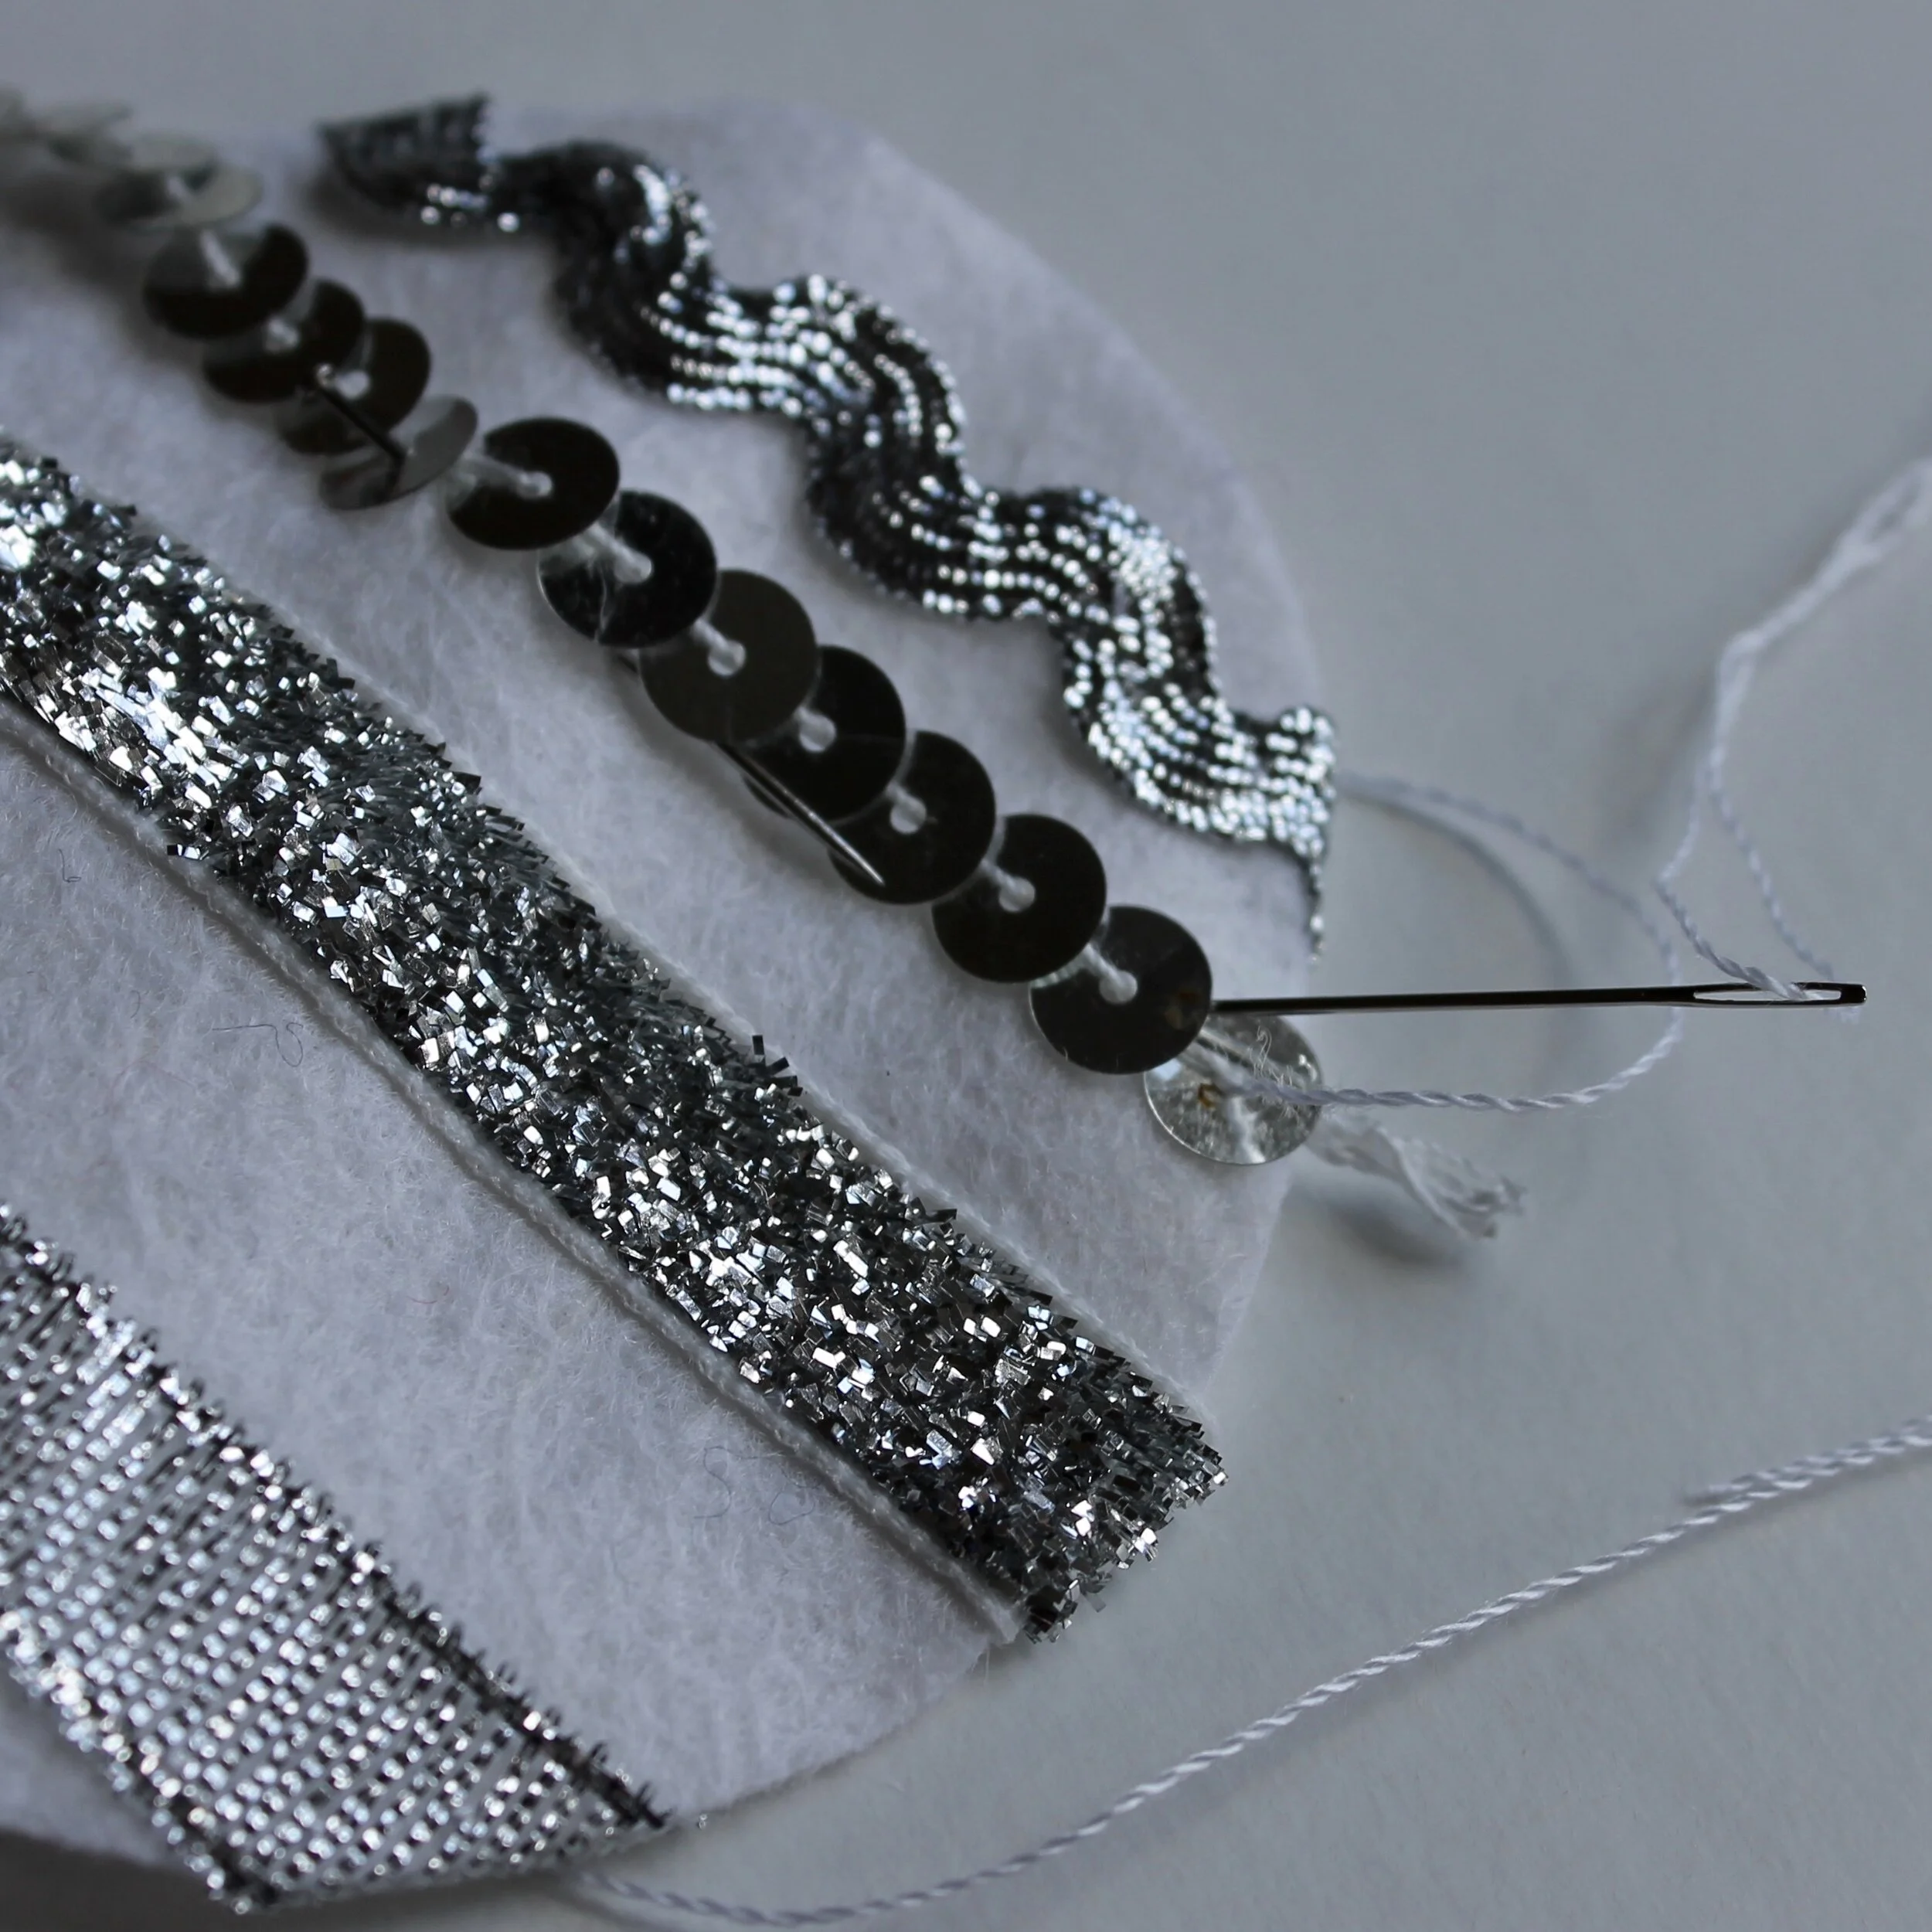
A picture showing silver sequin trim being attached to white felt bauble

3. Sequin trims

Trims are great for adding a line of sequins quickly. Sequin trims come ready stitched onto thread so to attach these you just need to couch the thread or stitch through the sequins using small straight stitches. When working with sequin trim you need to plan how you secure the start and edge of the trim. You can slip a couple of sequins off the trim and then fold the thread under and couch this in place. Alternatively slip off a few more and then sew the end of the trim through to the wrong side and secure there.

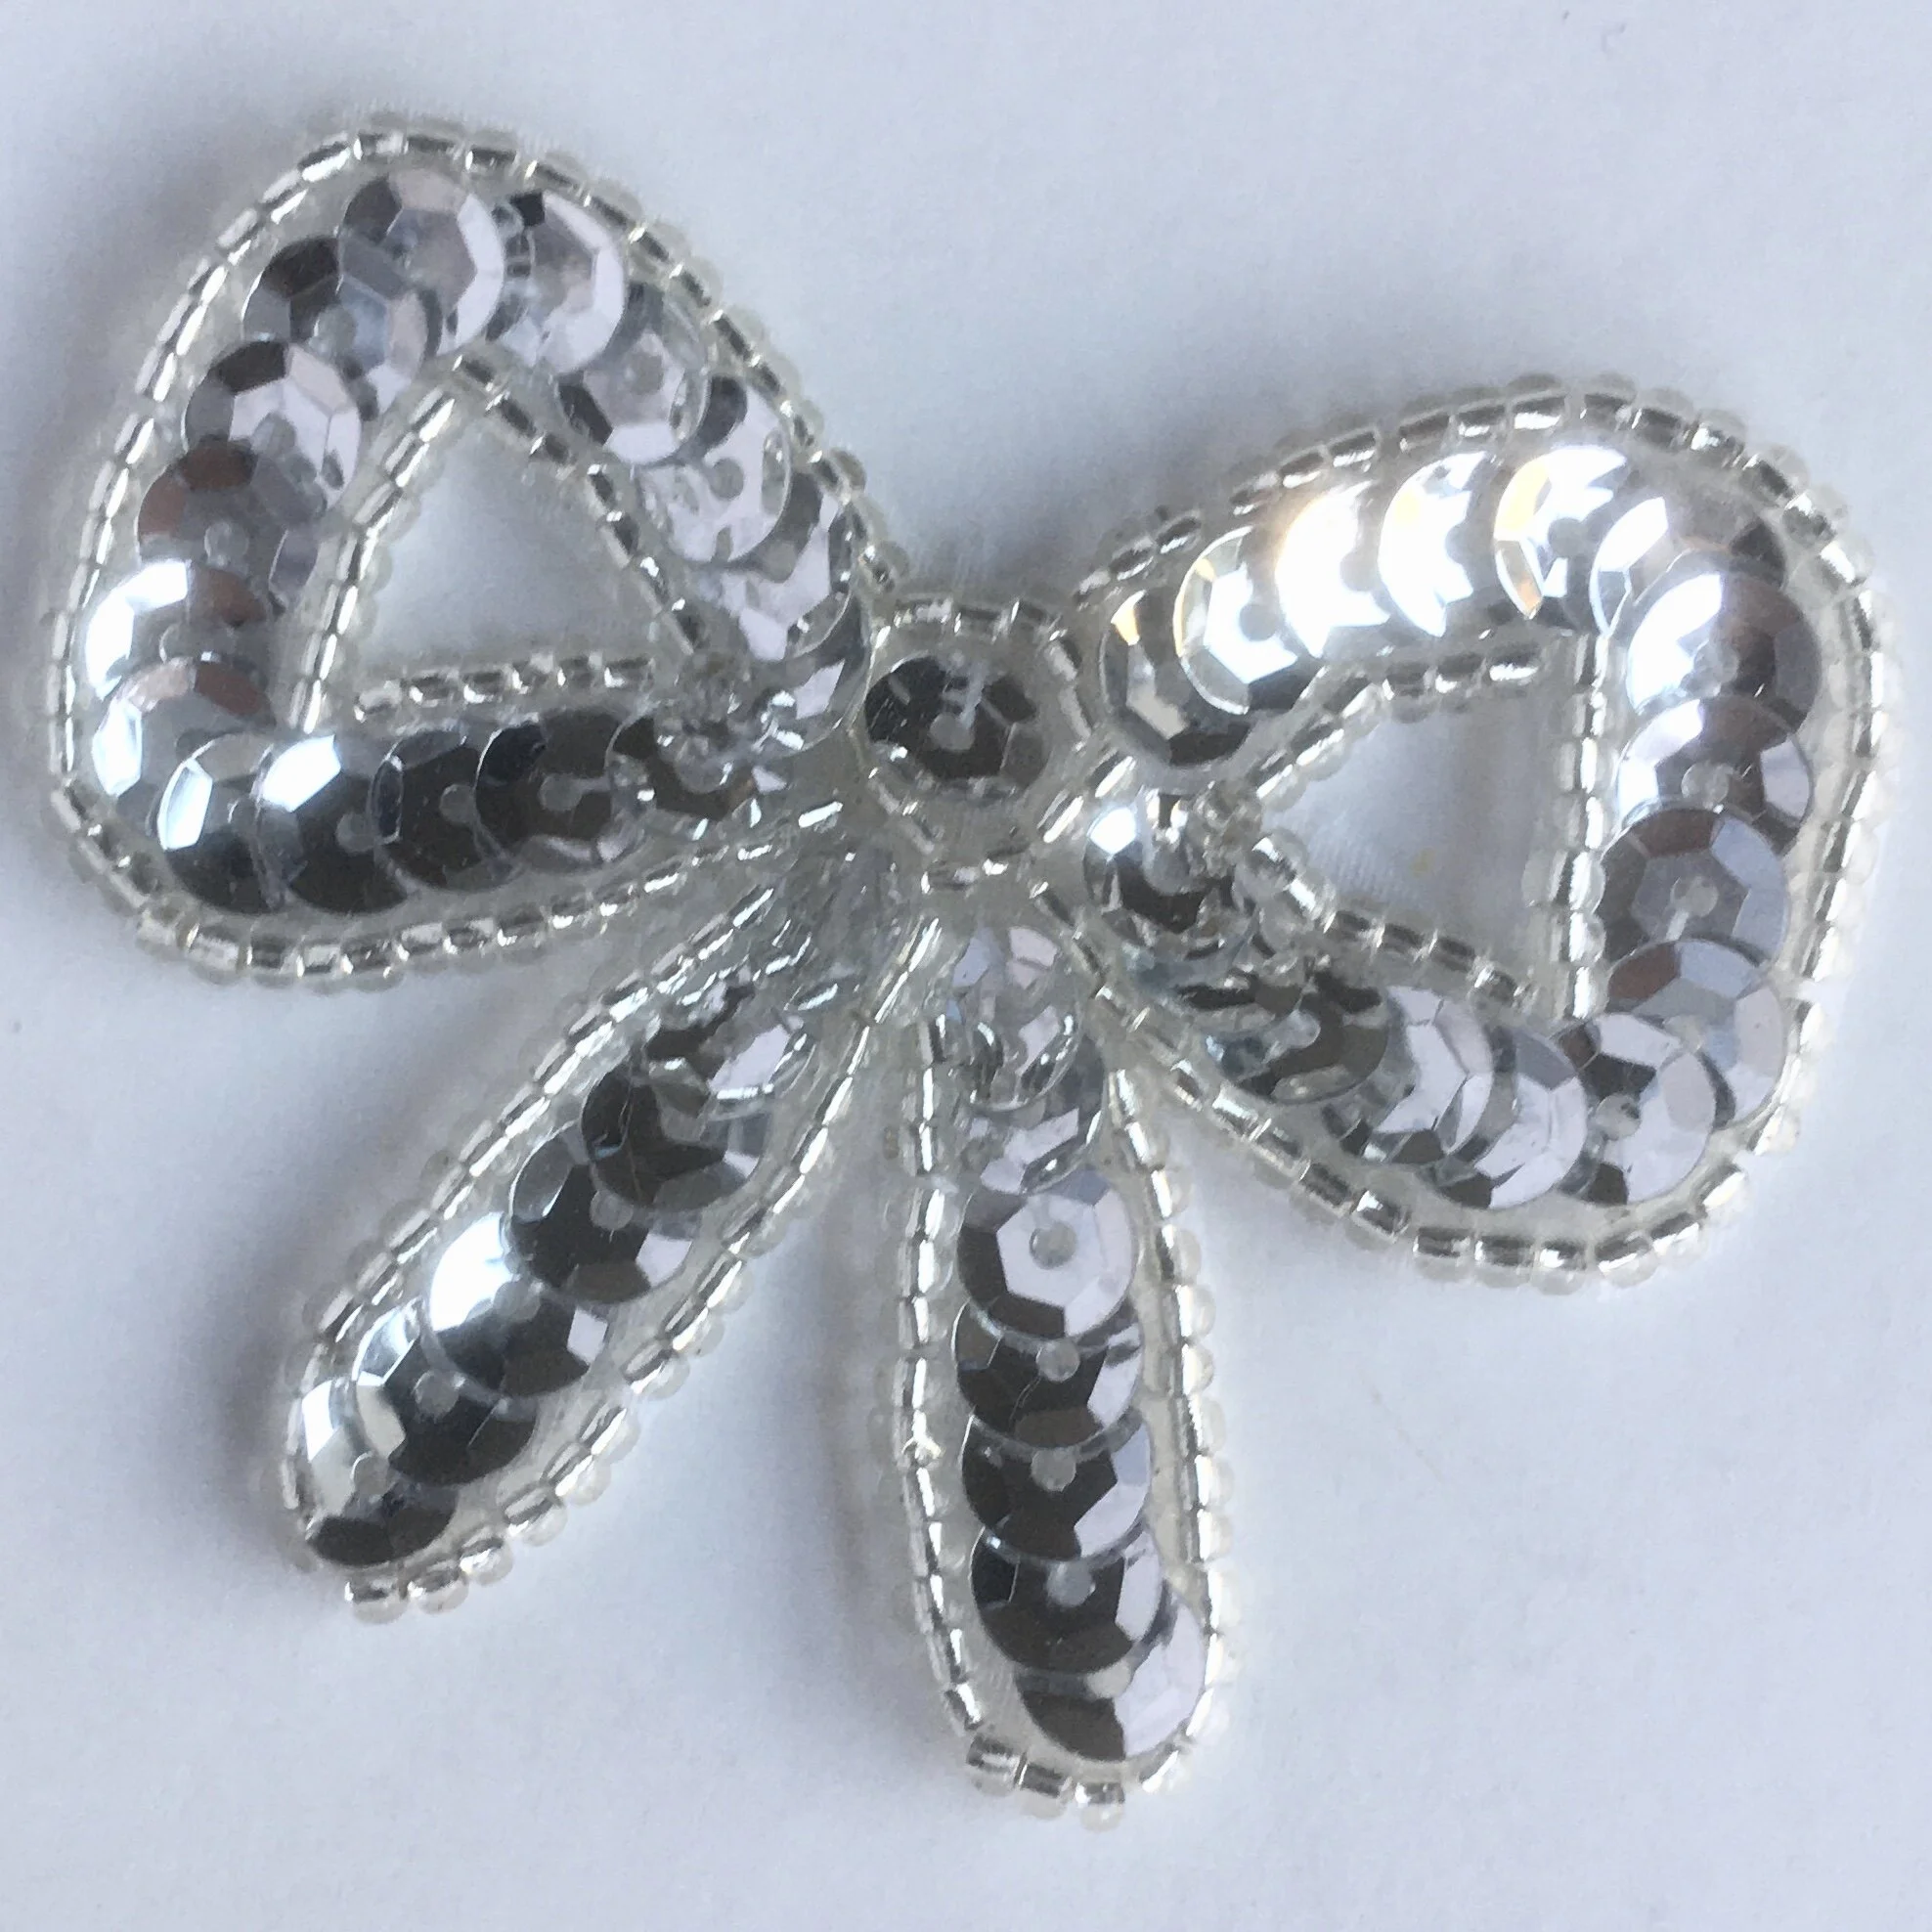
A picture of a sequin patch with silver sequins, the patch is the shape of a bow

4. Sequin patches

There are some amazing sequin patches available and these are the easiest way to add sequins to a large area or in a particular pattern with minimal effort. You just need to so some small straight stitches to secure the patch. The only thing to consider when using patches is that you get the right size as these can be difficult to trim to the right size without all the sequins falling off!

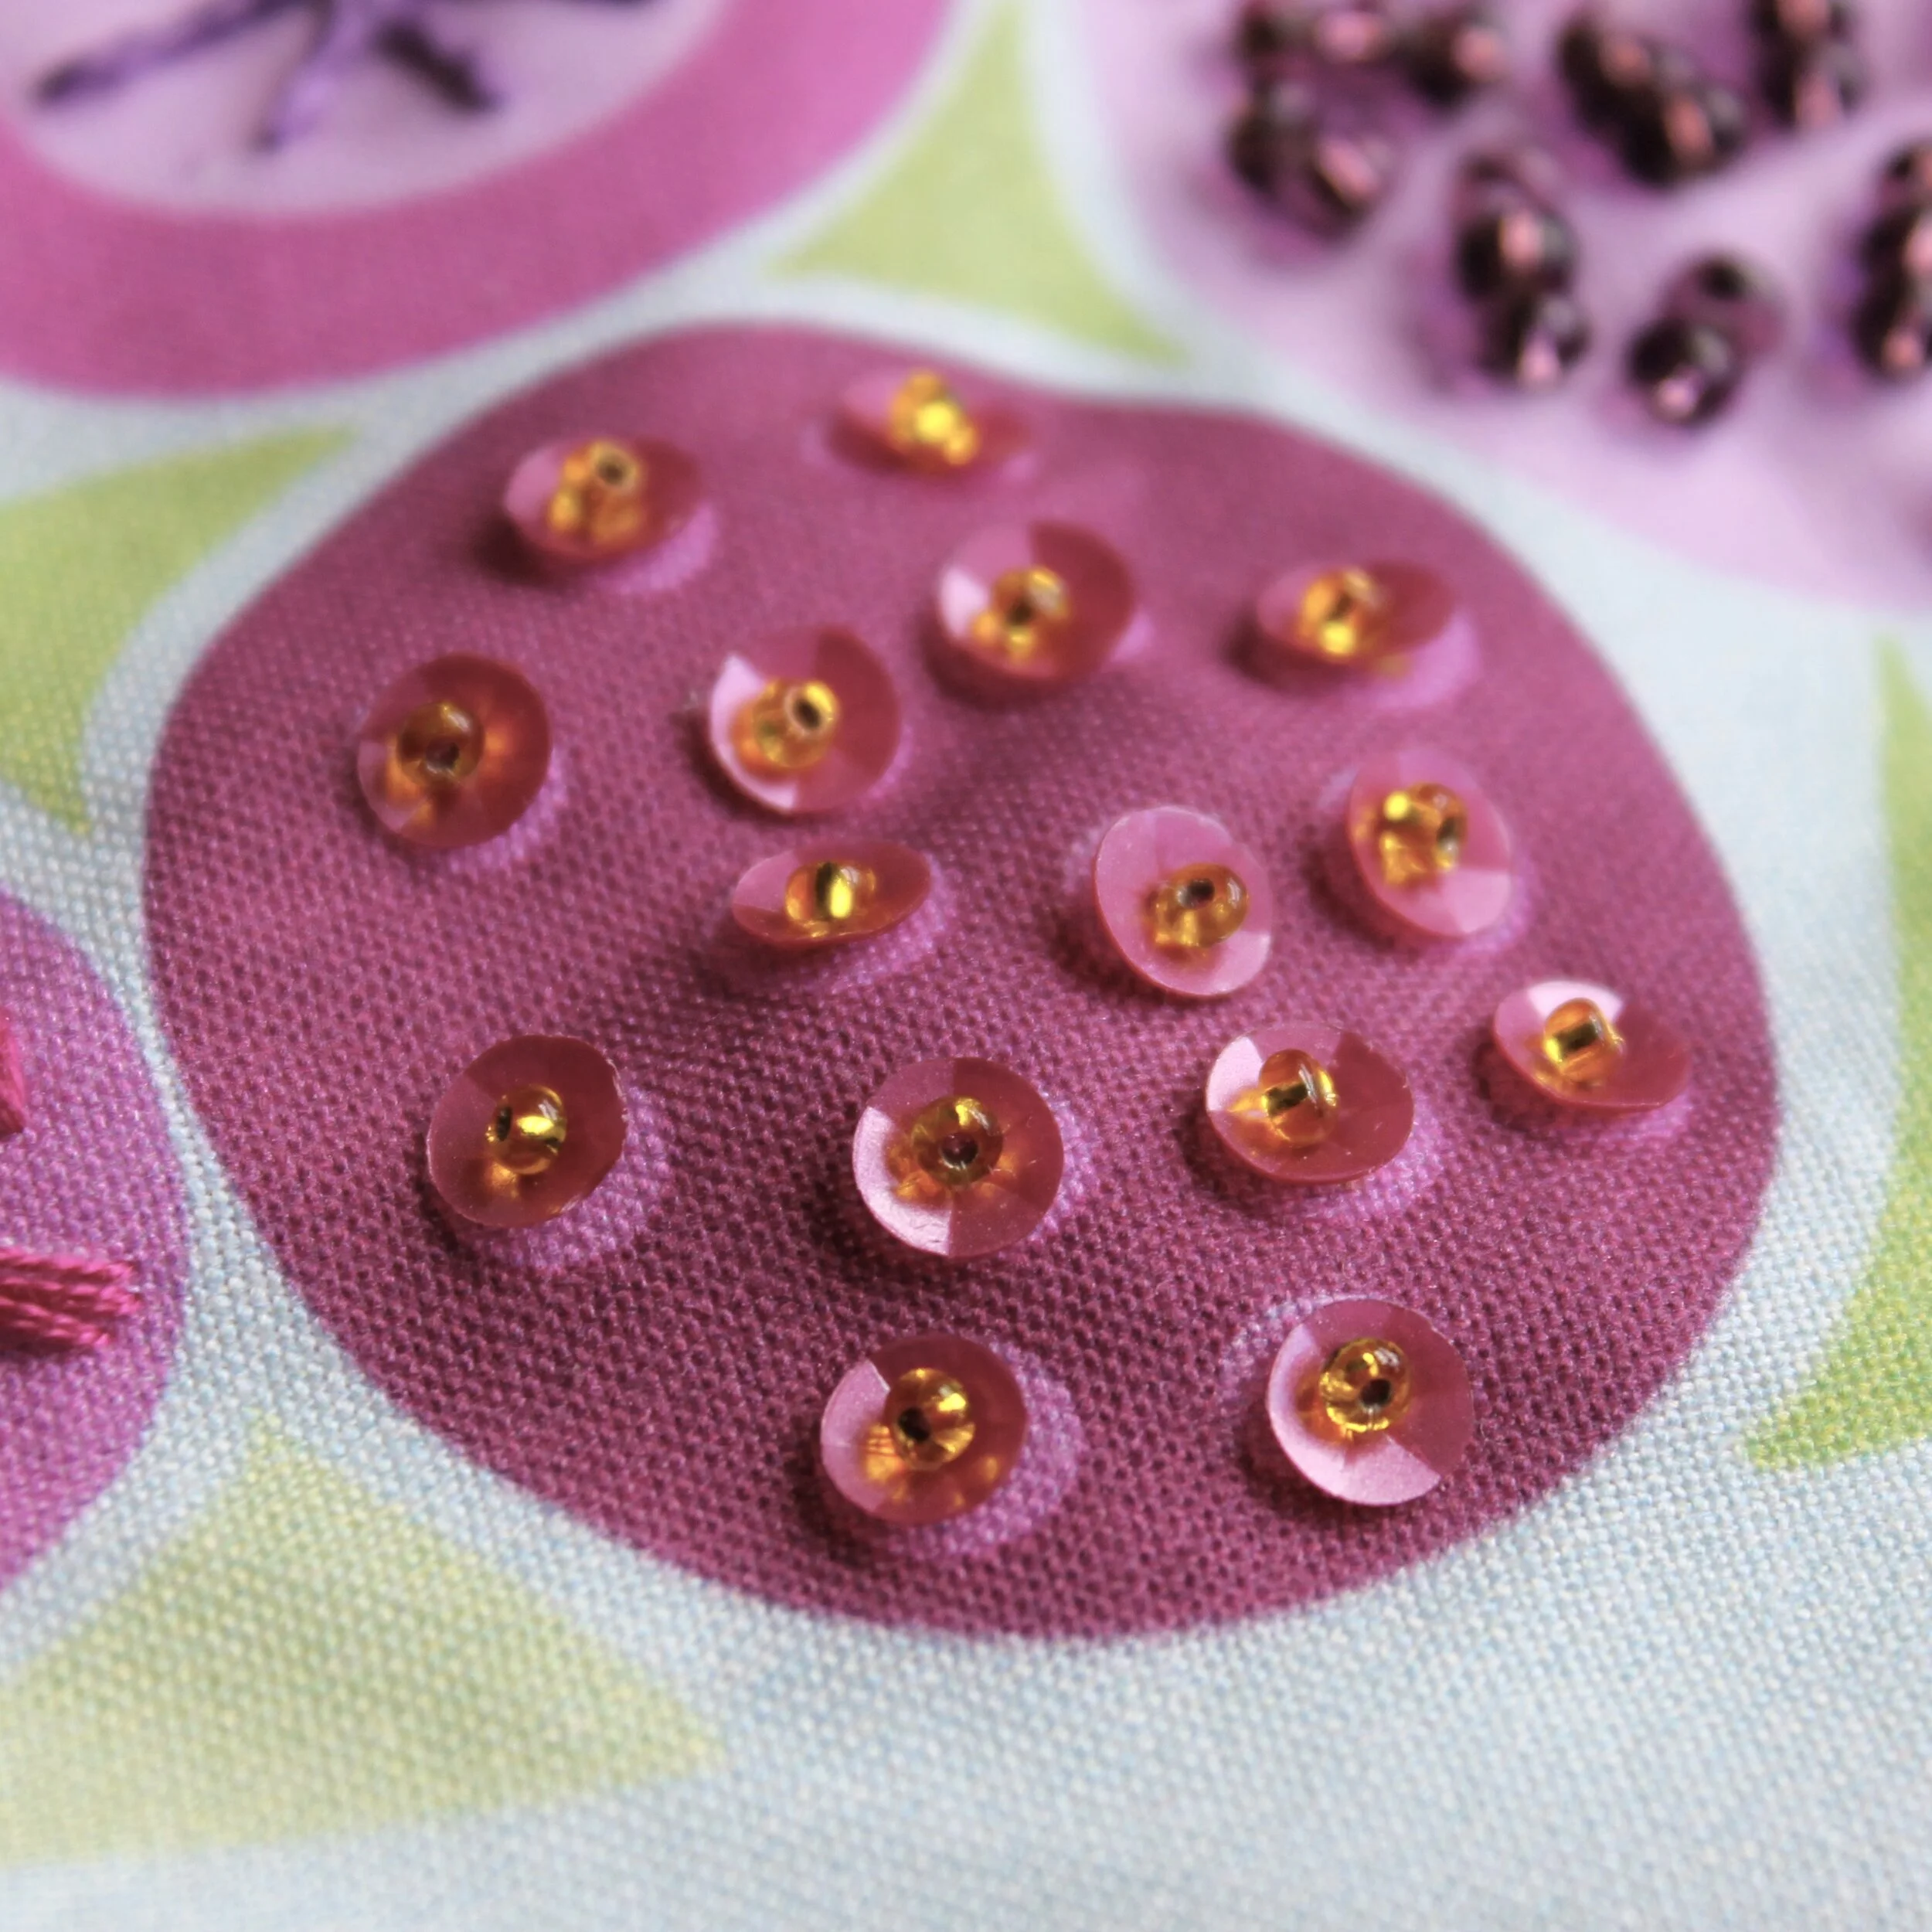
A picture of sequins attached to fabric using beads to attach the sequins

5. Beads

I love combining the sparkle of sequins with even more shininess by using a seed bead to secure sequins. Just bring the needle up through the centre hole, thread on a bead and then take the needle back down the centre hole. Because the bead is bigger than the hole it keeps the sequin nice and snug.

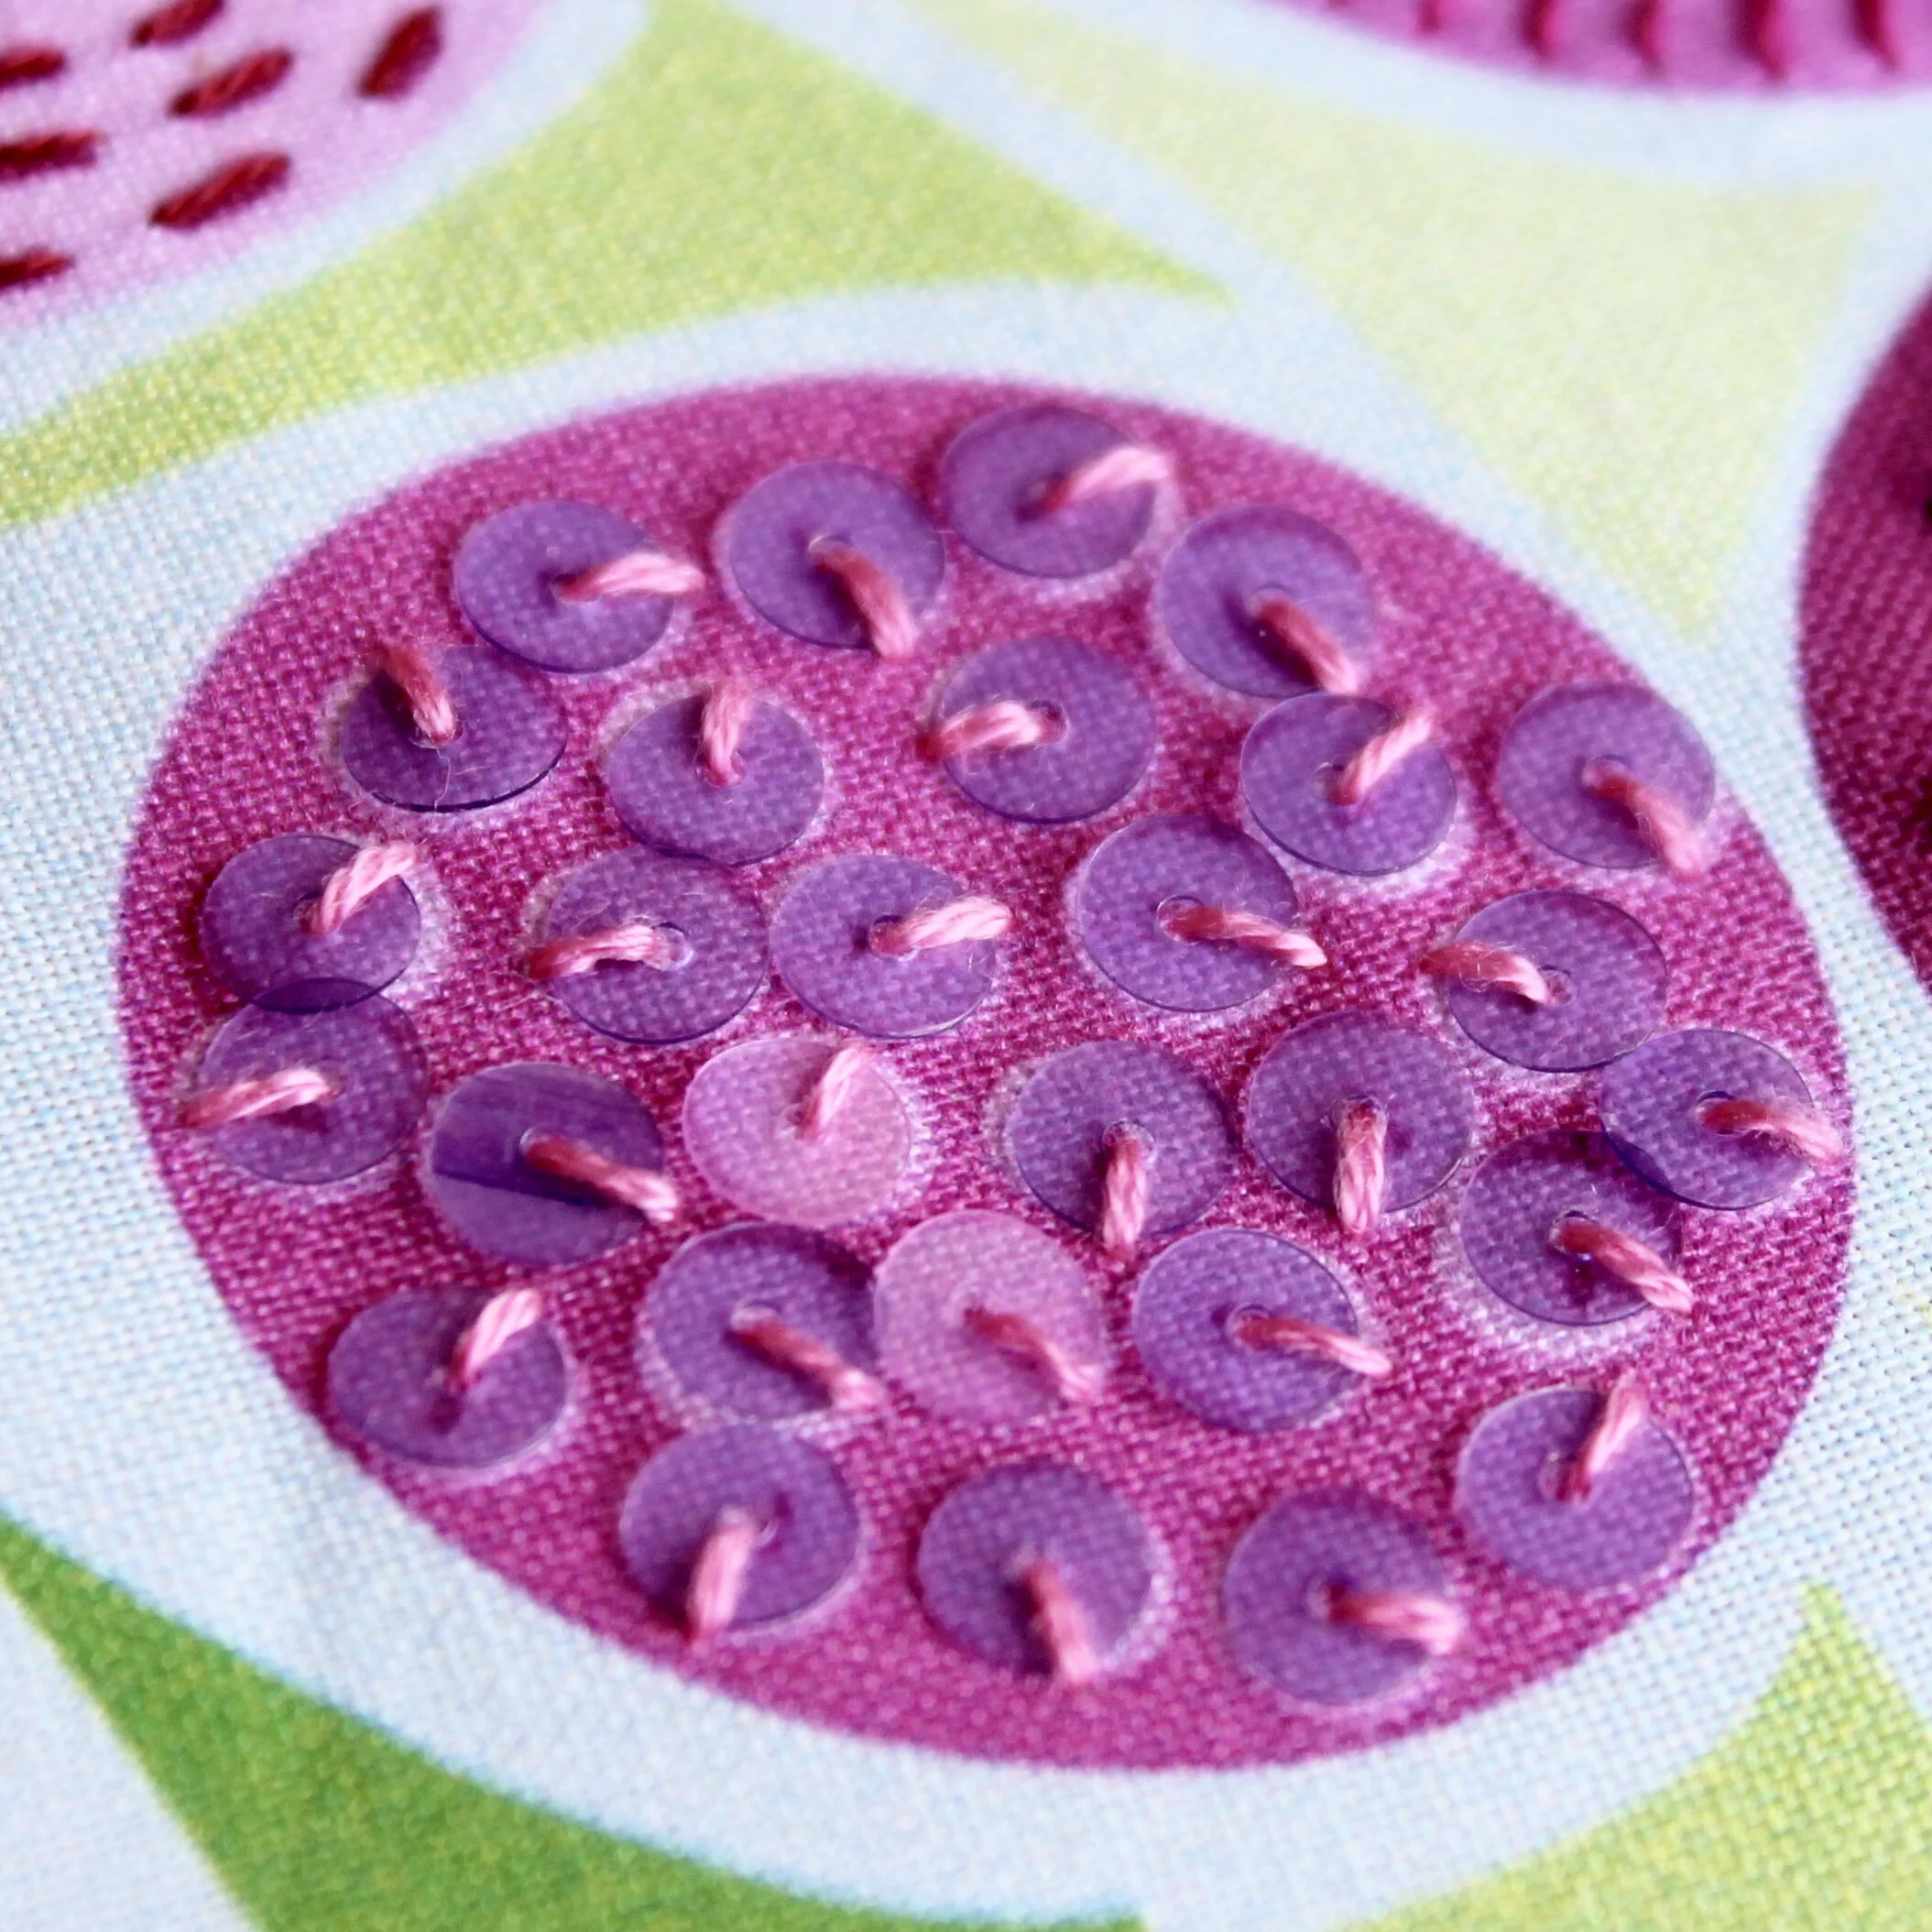
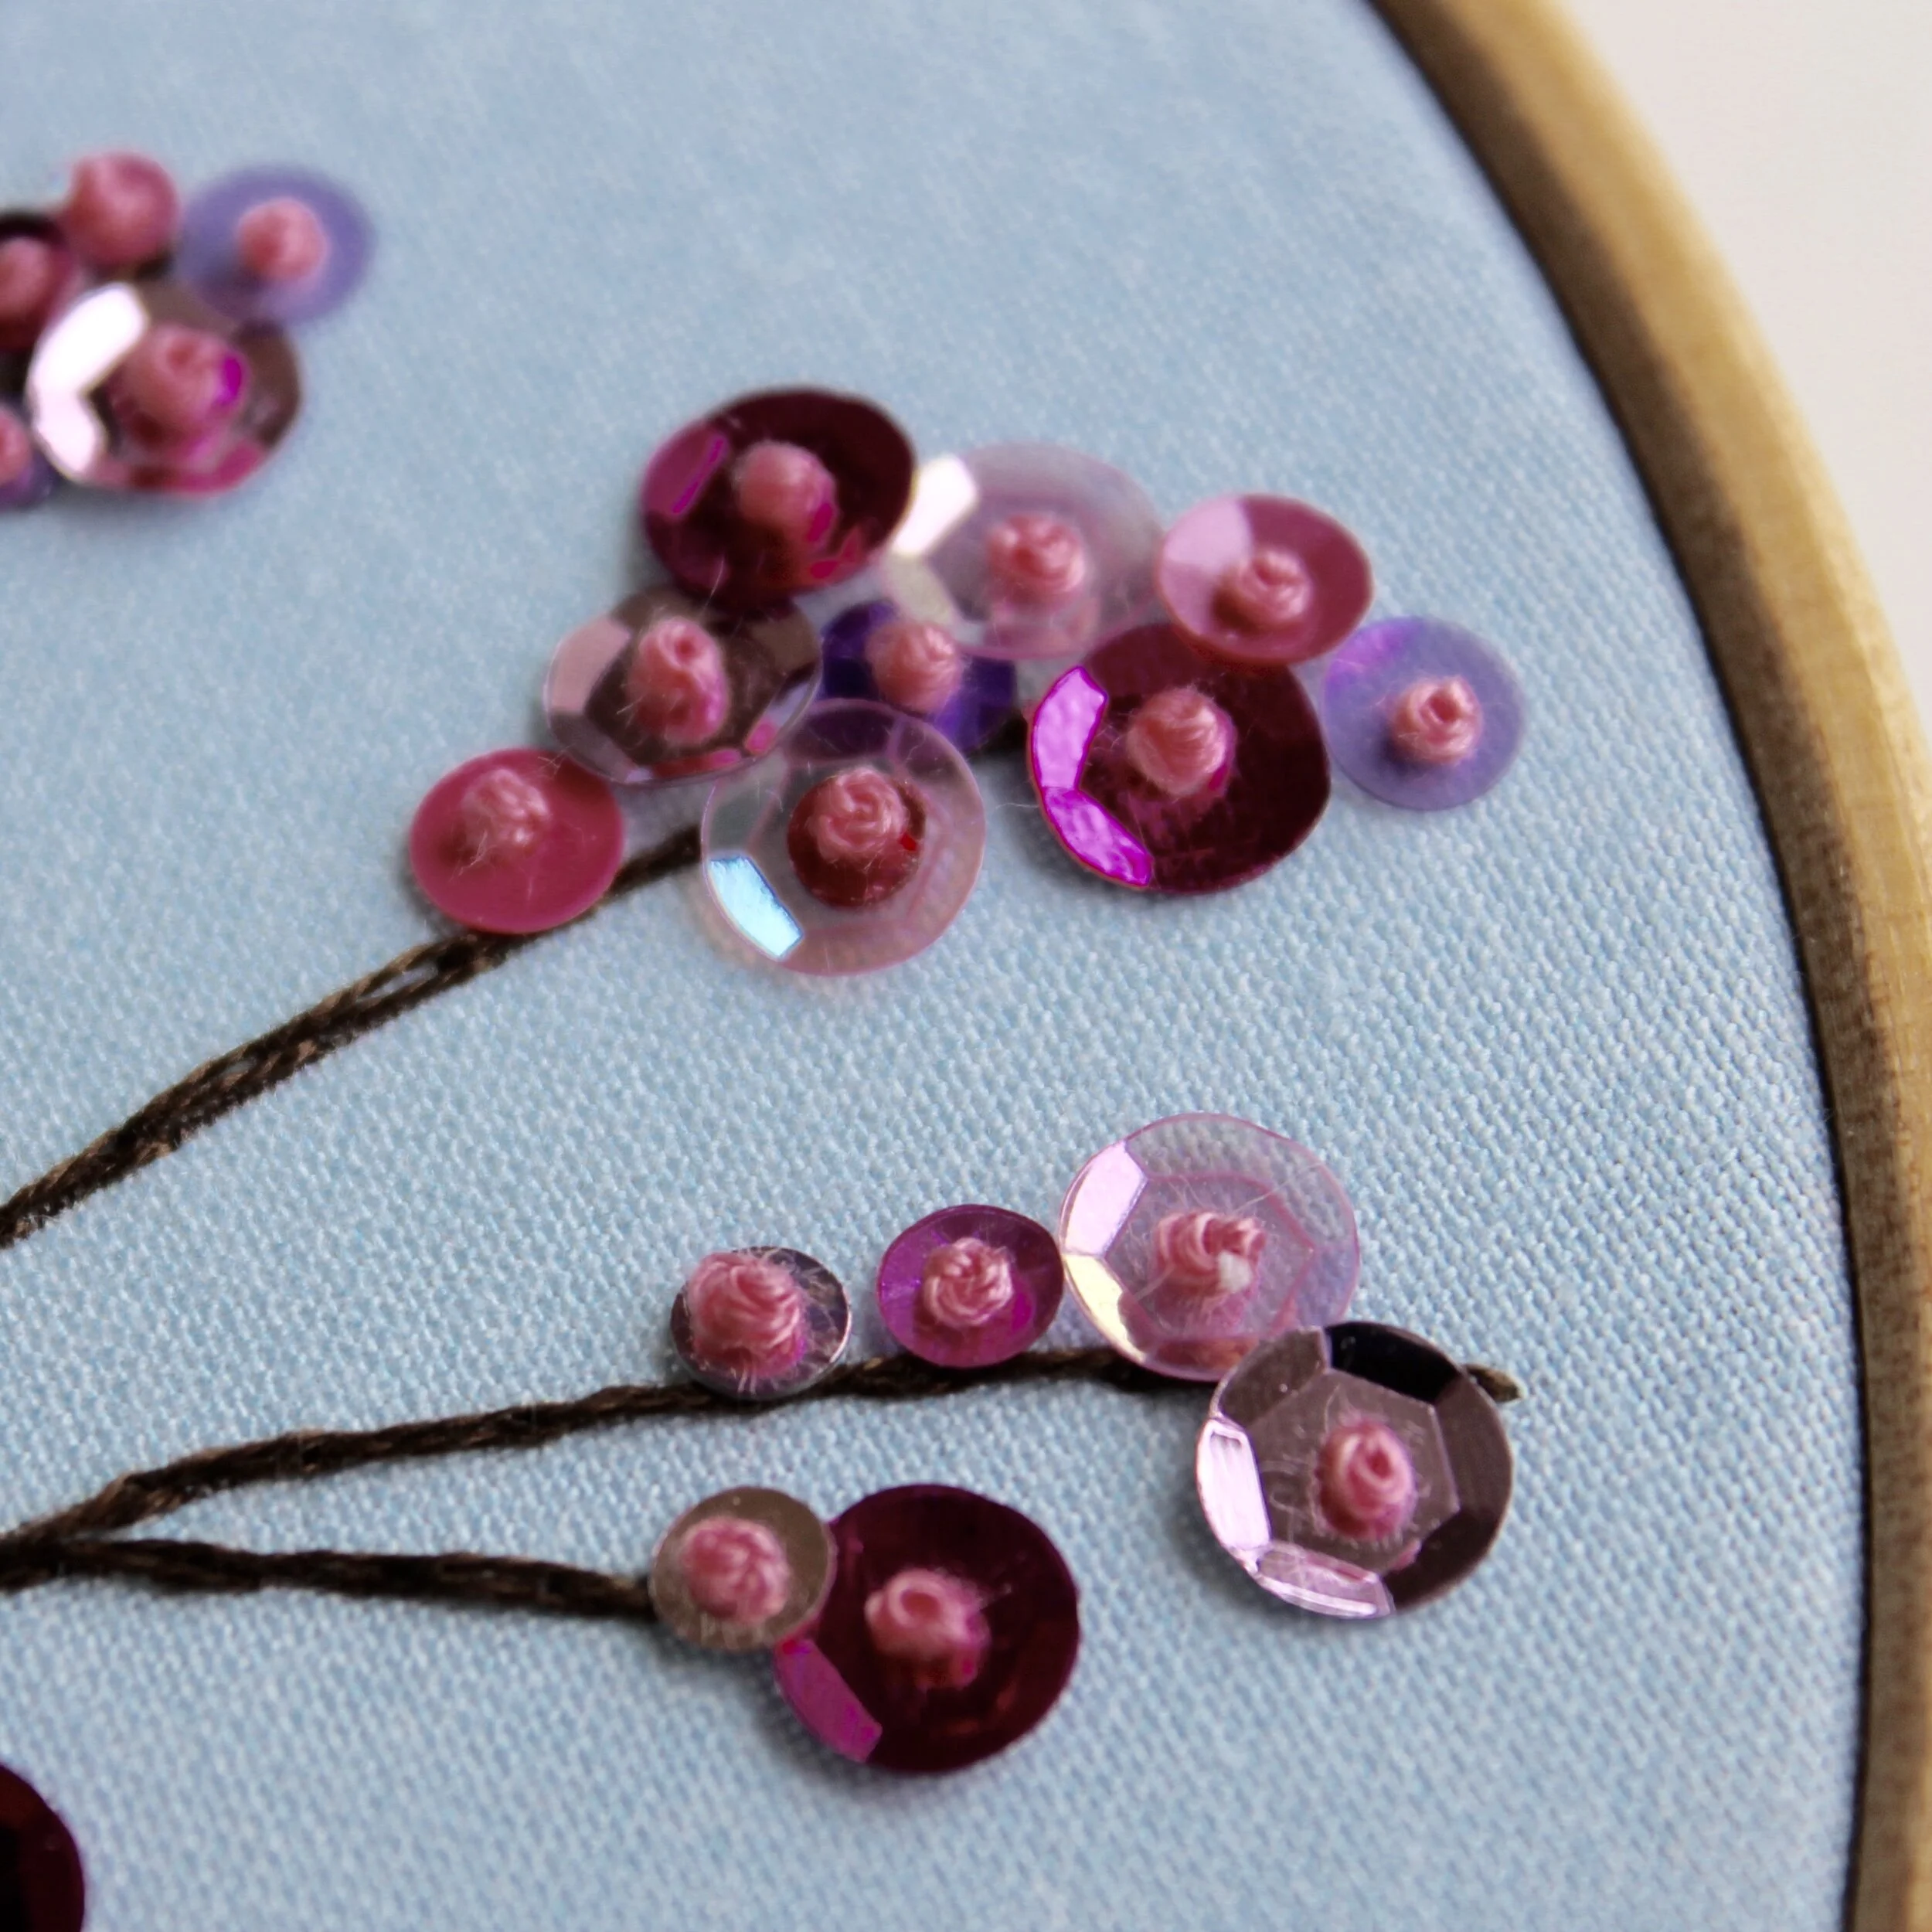
A picture showing pink sequins attached to blue fabric using pink french knots

6. French knots

These can work in a similar way to beads to secure a sequin, rather than sewing on a bead, you just use one or more French knots to hold the sequin in place. The one thing you do need to make sure is that the finished knot or group of knots is much bigger than the hole, if they are just slightly bigger then the sequin could pop off the knot if rubbed the wrong way. It is best not to use this technique for sequins that will have regular rubbing/contact for this reason.

Want to try embellishing some sequins? I include sequins in my floral stitch sampler kit and my spring blossom kit.

Enjoyed this blog post? I share embroidery tips and a free embroidery pattern in my monthly newsletter. Sign up here to receive the newsletter on the 1st of each the month.
In tips 2 Tags Embellished, Basics
Comment
An image of a grid of cross stitch in blue thread on white background. Overlaid is a blue square with white text saying - stitch showcase, cross stitch, www.embellishedelephant.co.uk

Stitch Showcase: Cross Stitch

December 23, 2020

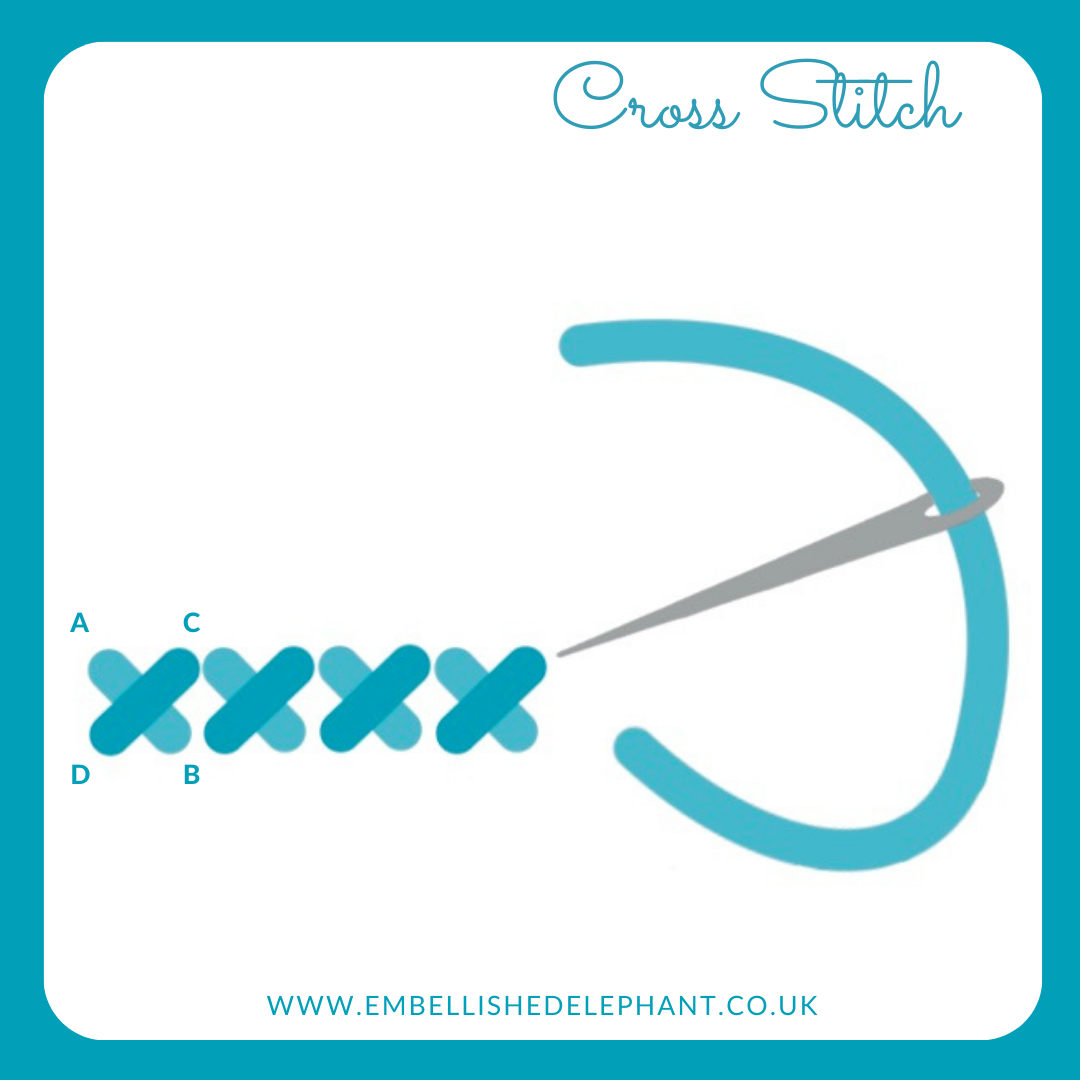
Cross stitch is most commonly worked on Aida or even weave fabric which has an regular number of weft and warp threads to allow the creation of even sized stitching, however it can also be used in free form embroidery as well.

  • Bring the needle up at the top left of the stitch (A)

  • Make a stitch diagonally to the bottom right corner (B)

  • Bring the needle up at the top right (C)

  • Take it down through the fabric at the bottom left corner (D)

  • If you are stitching a panel of cross stitches you can stitch the first half of the stitch (A to B) for the whole area then work back over the area completing the crosses (C to D)

  • However you stitch make sure that you always work the first part of the stitch the same way to create a nice even finish.

A illustration of how to create cross stitch embroidery stitch. The illustration is in shades of blue and grey on a white background.

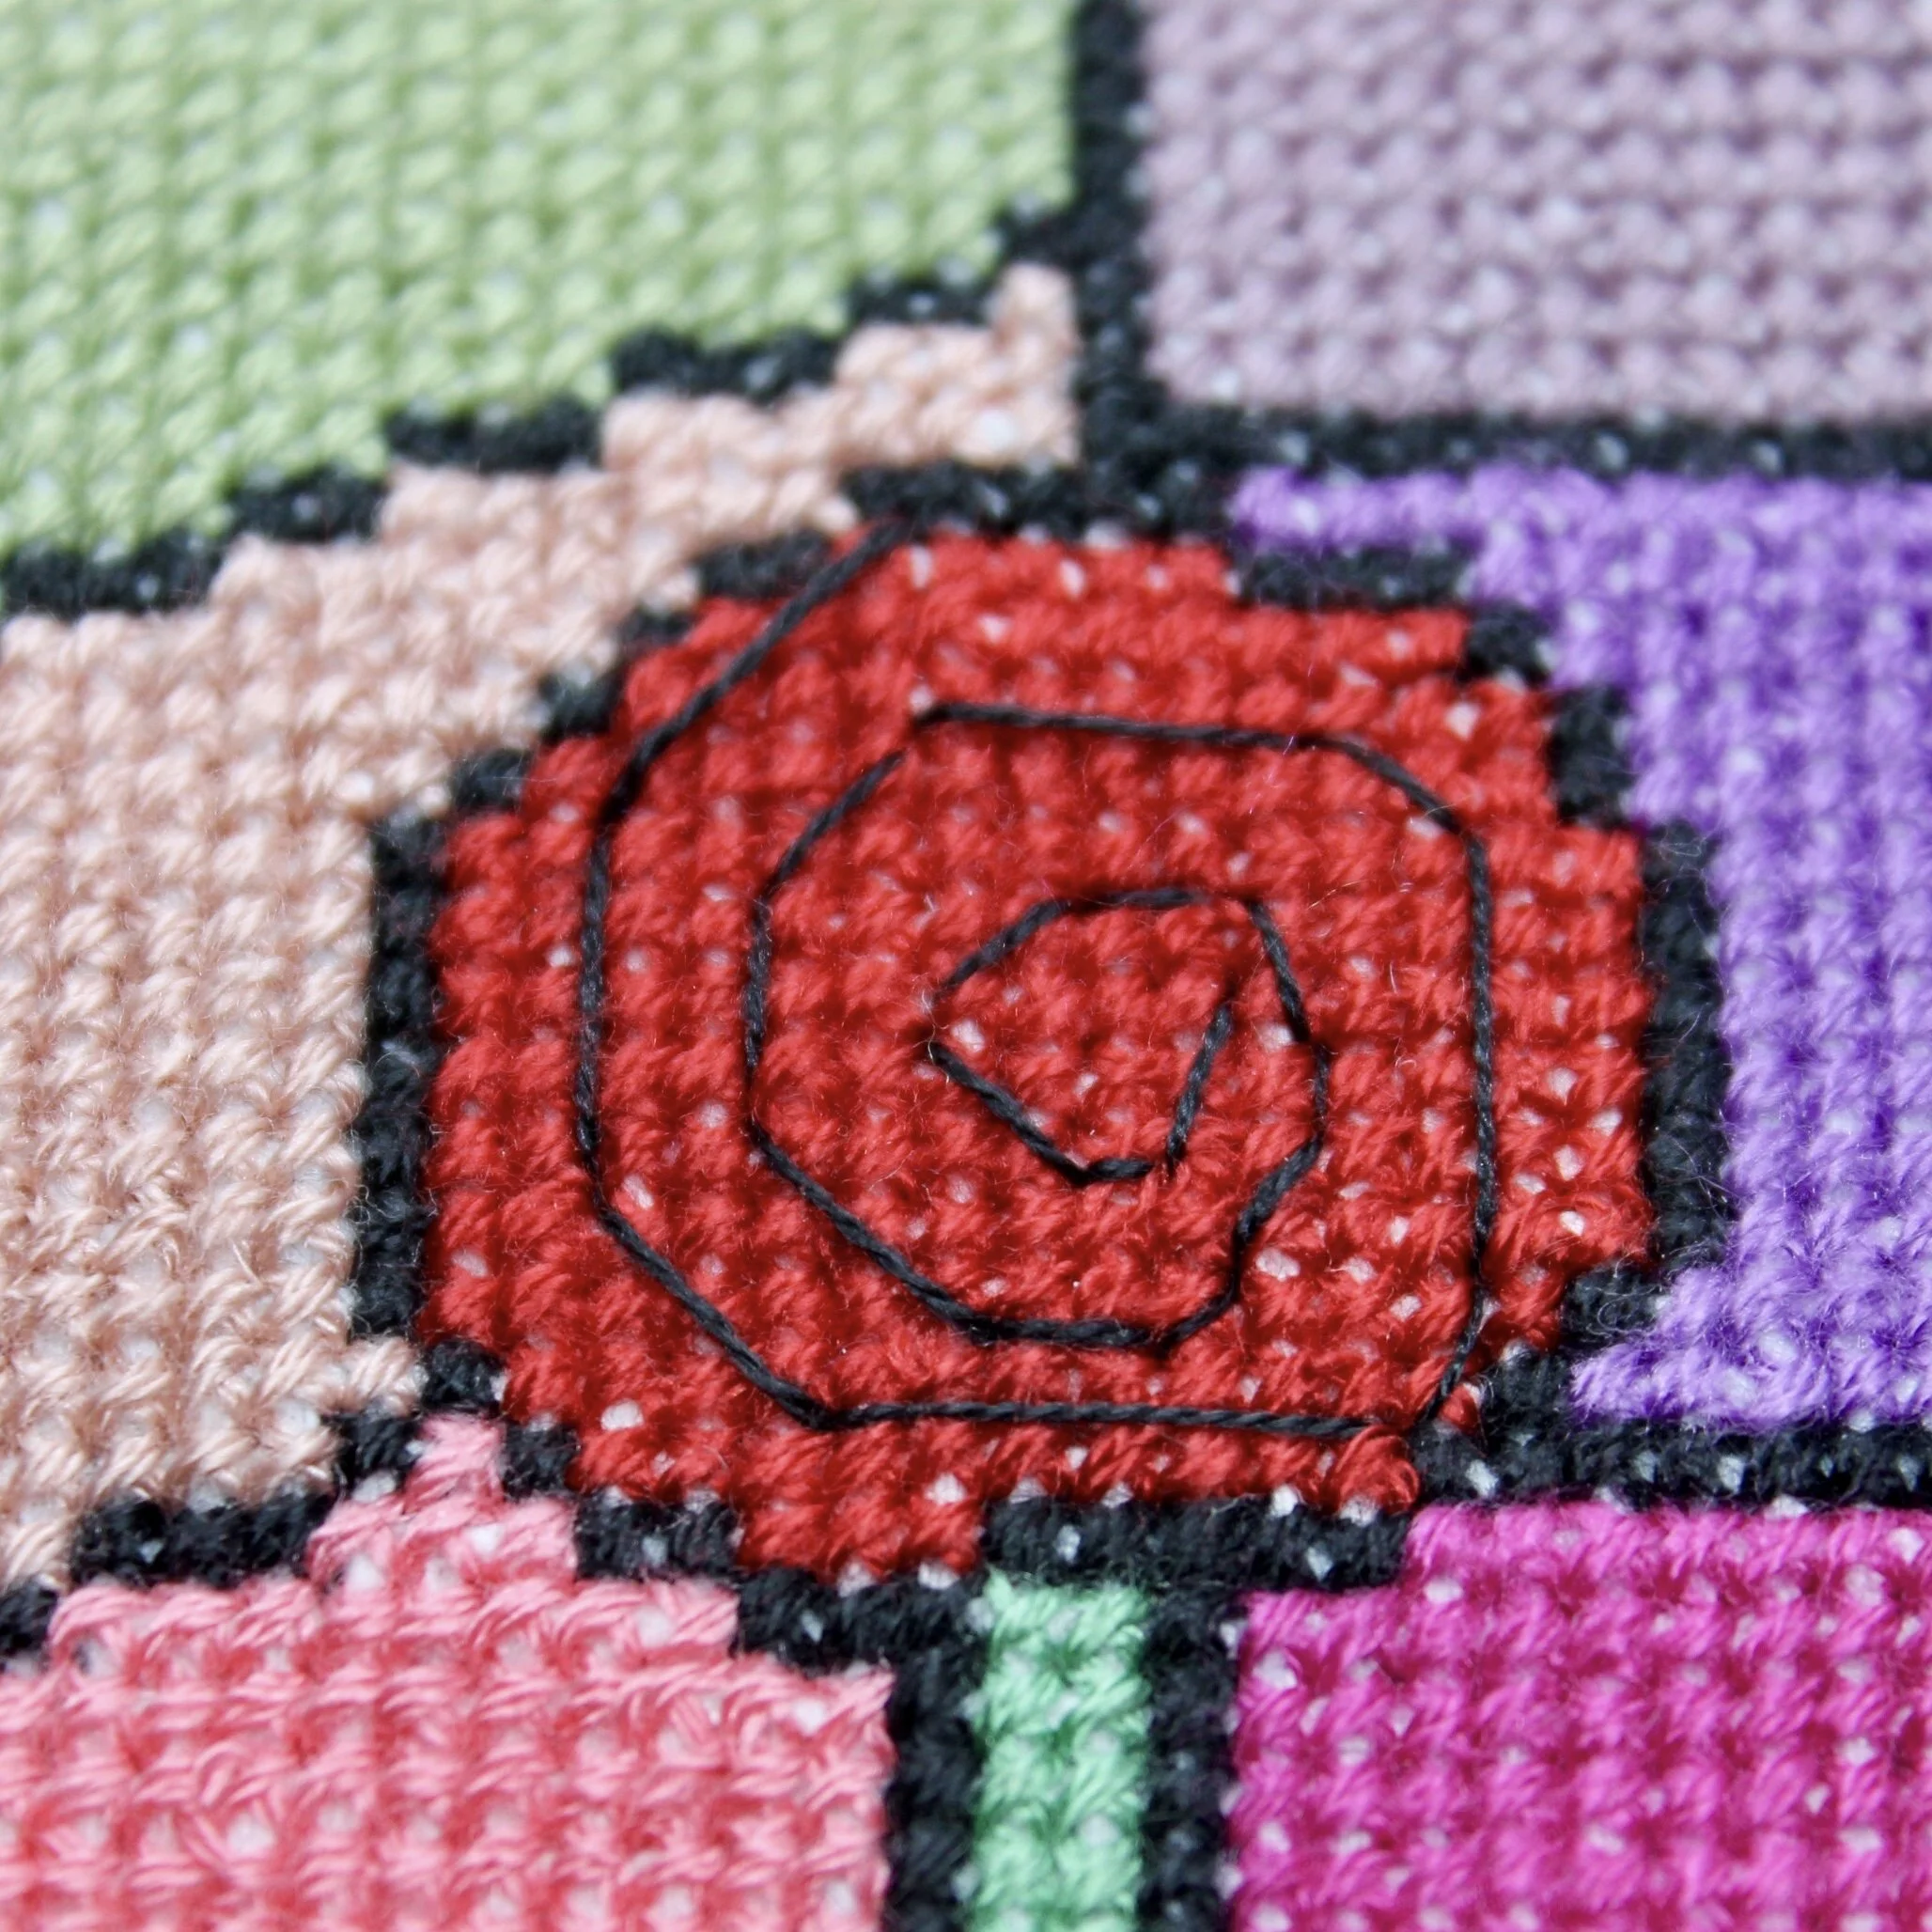
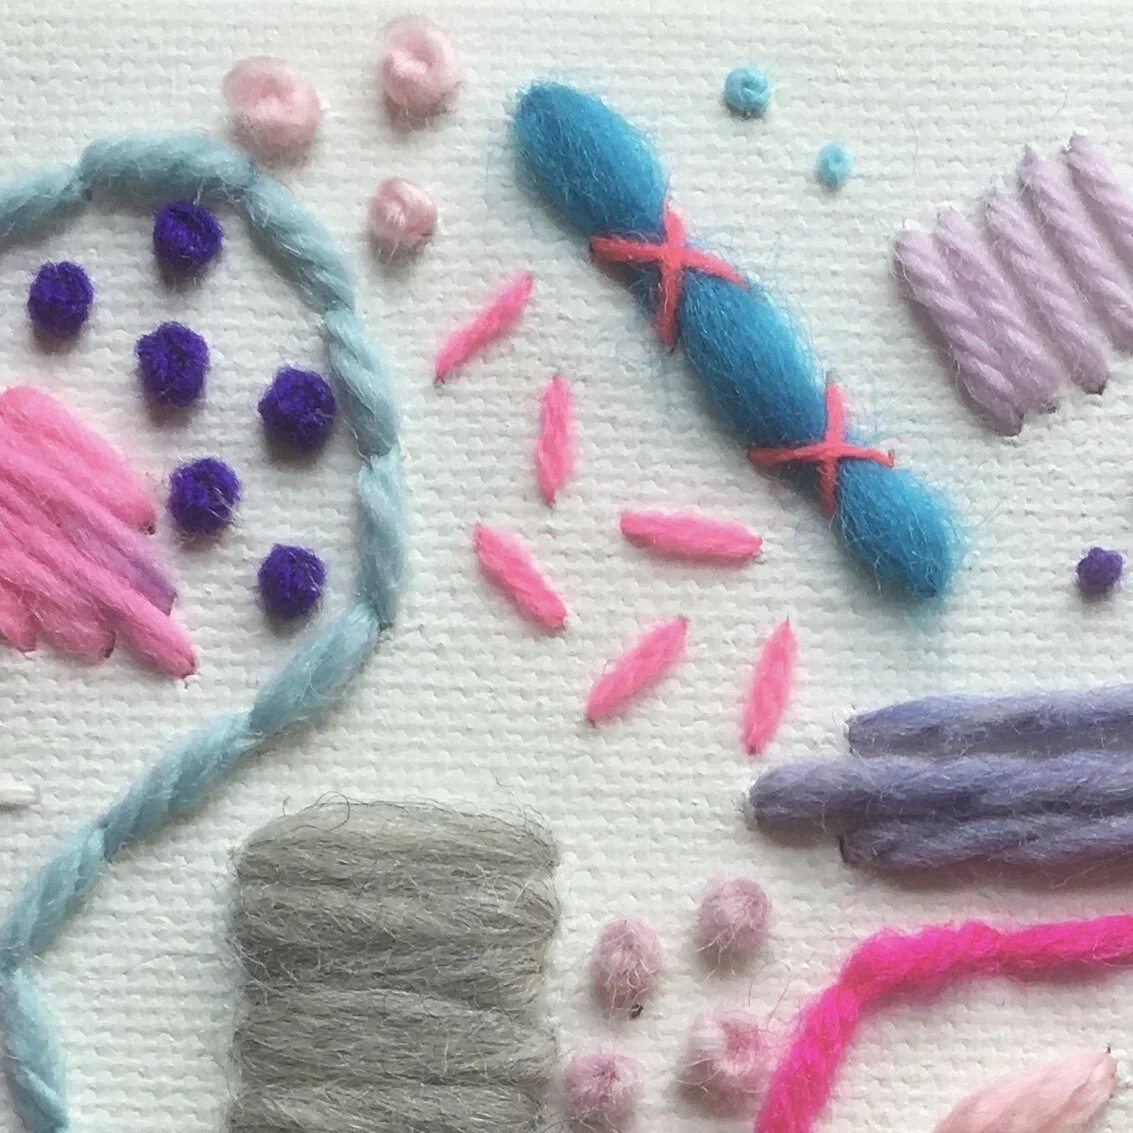
The first picture shows a traditional use of cross stitch - it fills an area and is worked on Aida. The second picture shows that as well as being used to fill areas, it can also be used as a single isolated stitch to couch other threads.

An image of a cross stitch rose surrounded by solid panels of colour with black outlines and details.
A modern embroidery showing how cross stitch can be used in other approaches such as in couching. The modern embroidery is on a white background with the stitches in shades of blue, pink and purple

Enjoyed this blog post? I share embroidery tips and a free embroidery pattern in my monthly newsletter. Sign up here to receive the newsletter on the 1st of each the month.
In stitch showcase 1 Tags Stitch Showcase, Filling Stitch
Comment
An image of pink felt with a wavy line of stitches embroidered in pink thread. Overlaid is a blue square with white text saying - stitch showcase, whipped running stitch, www.embellishedelephant.co.uk

Stitch showcase: Whipped Running Stitch

December 23, 2020

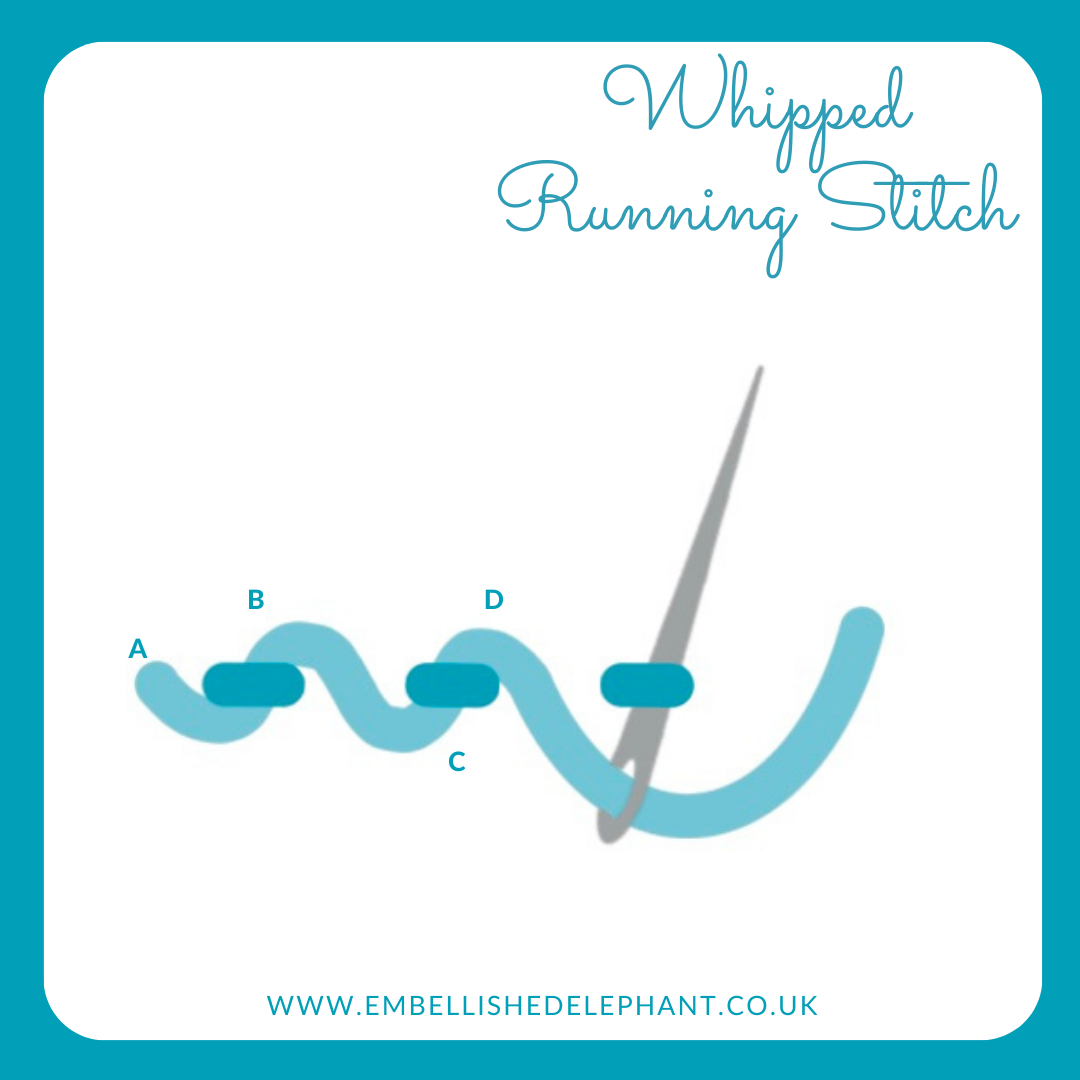
This stitch uses running stitch as a foundation and then weaves thread in and out of the running stitches on the surface of the fabric. Double whipped running stitch creates a fabulous looped chain-like effect.

  • Start by stitching running stitch along the full length of the line

  • To add the ‘whipped’ detail, bring the needle up at the end of the last running stitch (A)

  • Pass the needle under the first stitch (B)

  • Repeat this process making sure that the 'whipping’ thread always moves in the same direction eg always from (C) to (D)

  • This will give a great wave pattern which can be pulled tight or left looser.

An illustration showing how to create whipped running embroidery stitch. The illustration is in shades of blue and grey on a white background

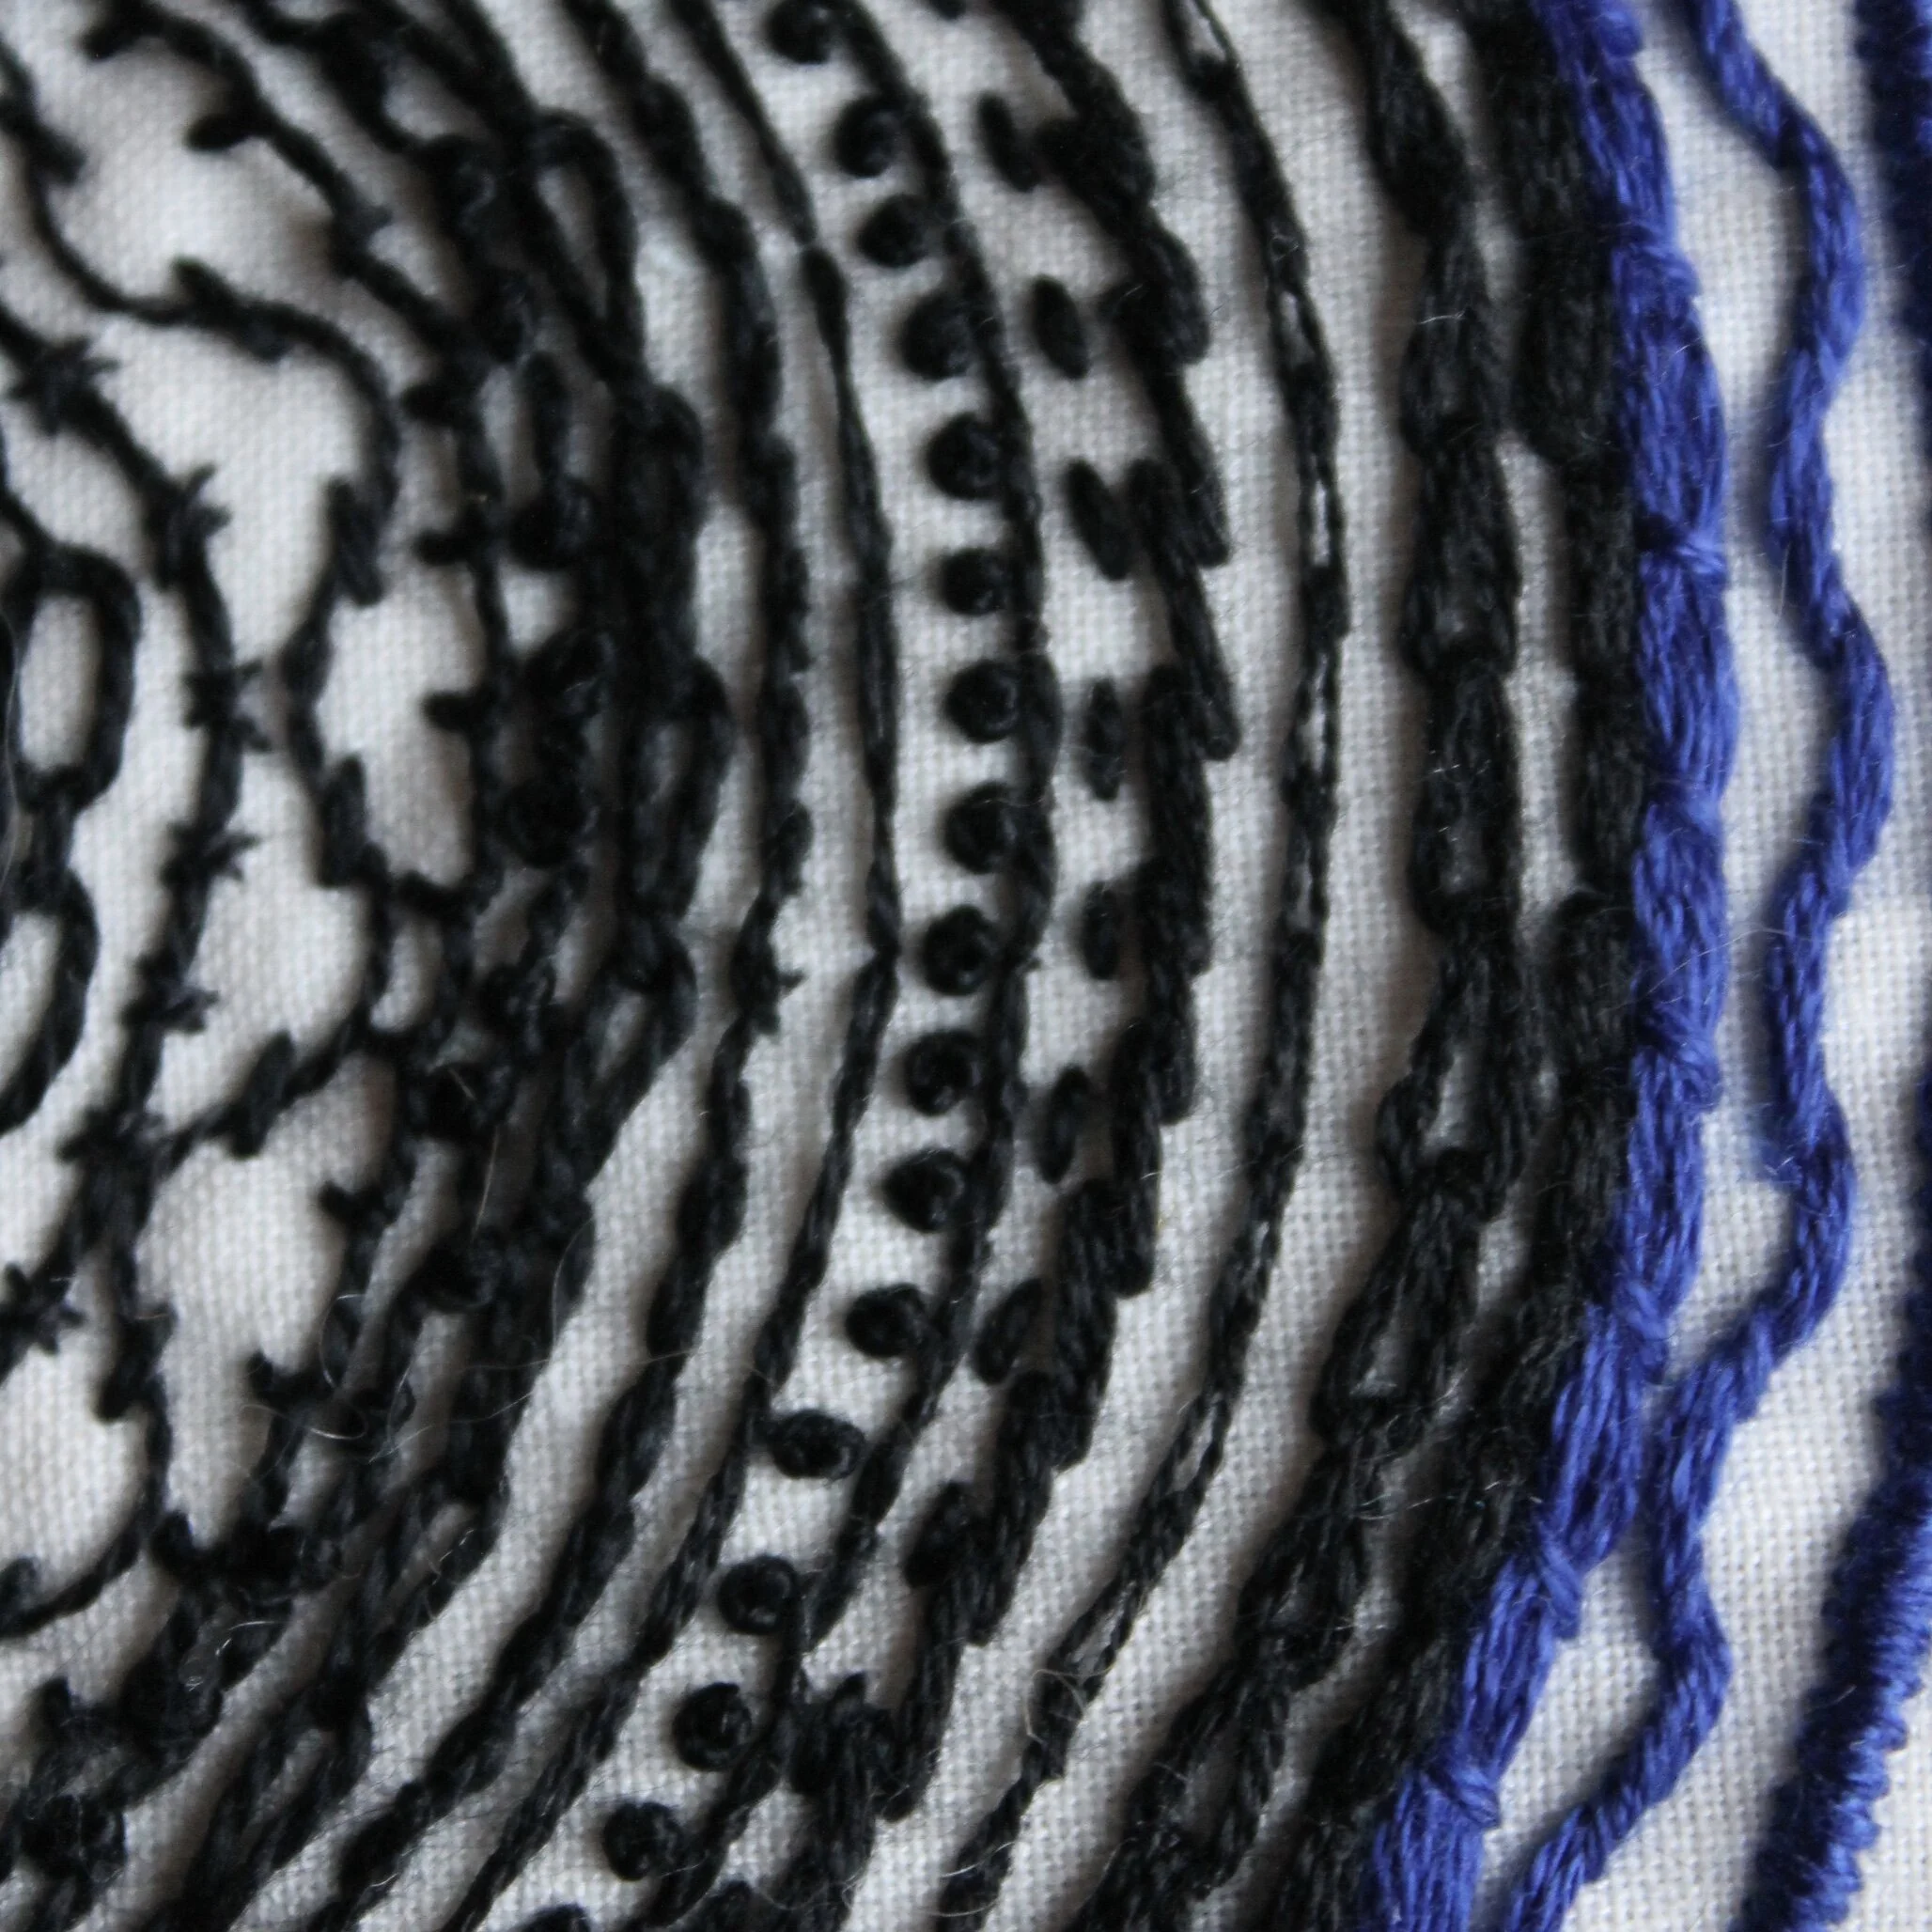
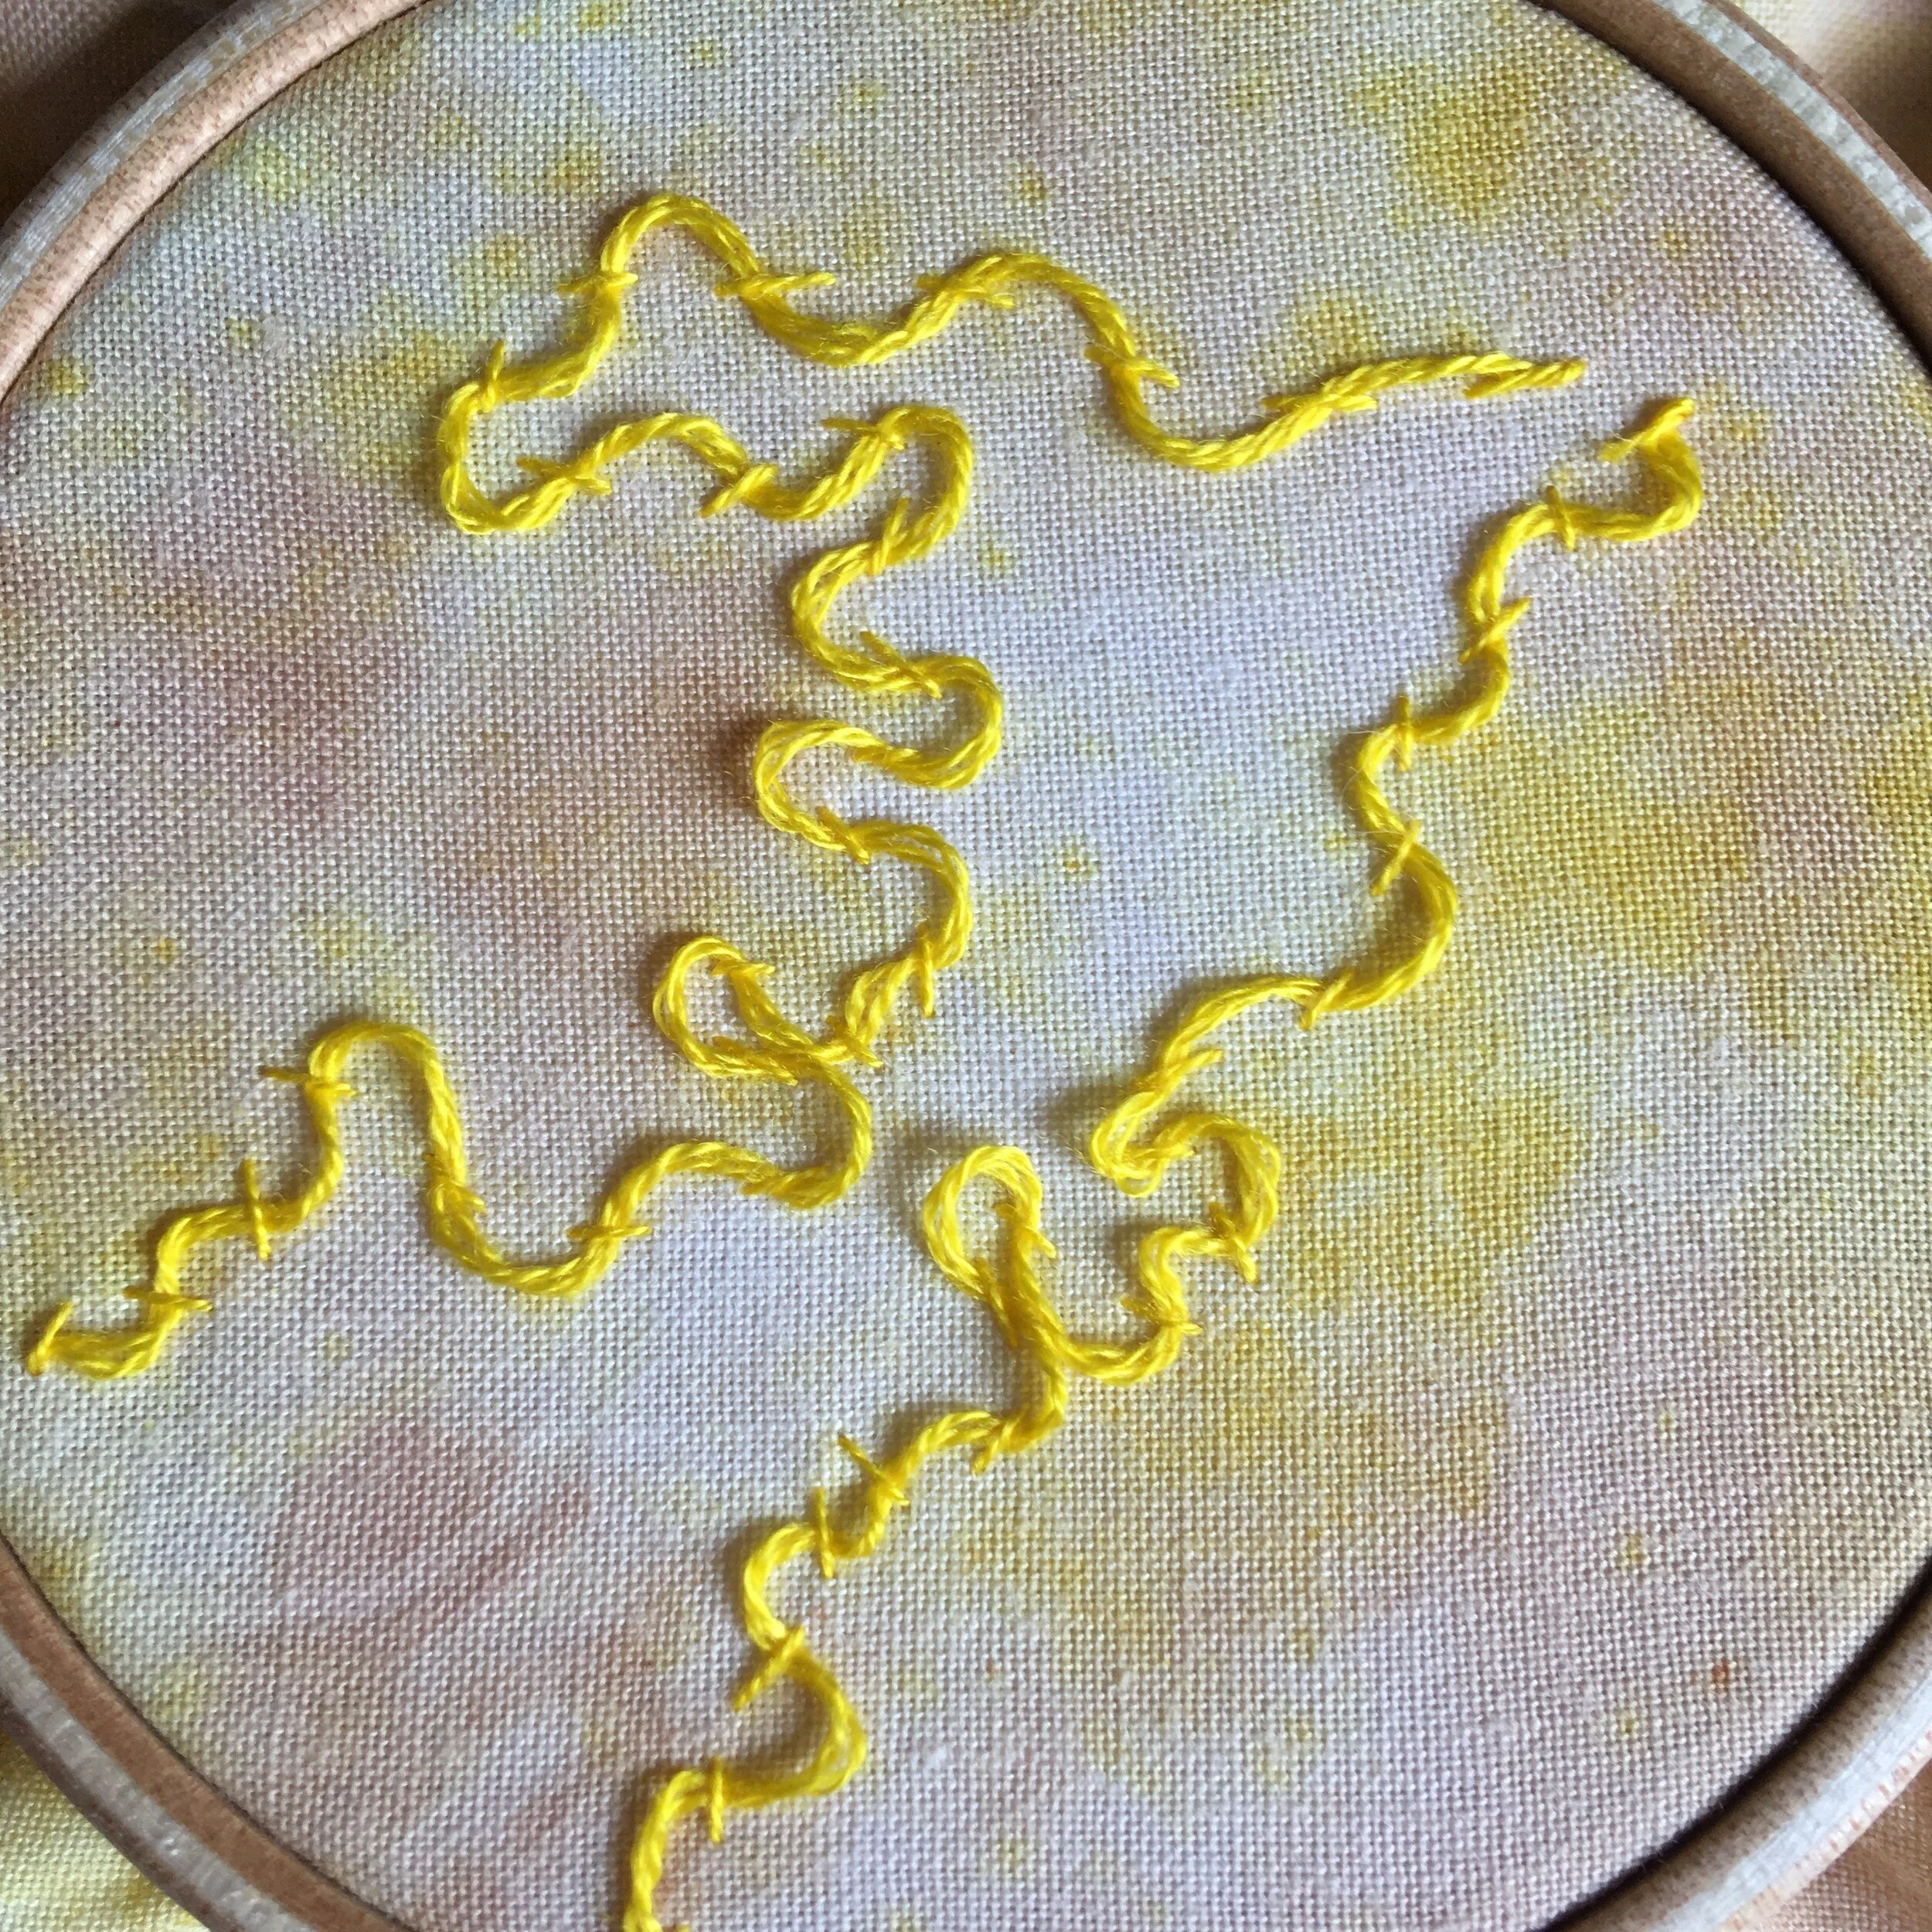
On the first sample below there are two examples of whipped running stitch. On the right hand side you can see the effect of using a thicker thread for the ‘whipping’ stitch compared to the base running stitch. On the left hand side you can see a much more open wave created by the distance between the individual running stitches.

For the second sample below and in the pink sample at the top of the page you can see the wave of this stitch really clearly. I’ve left the wrapped thread looser to create this wave effect. Sometimes a tiny couching stitch is needed to hold the wave down closer to the fabric.

An image of a embroidery sampler of line stitches in shades of black and blue
A picture of an embroidery hoop with hand dyed yellow fabric. Embroidered on the fabric is a yellow line of stitching using whipped running stitch

Enjoyed this blog post? I share embroidery tips and a free embroidery pattern in my monthly newsletter. Sign up here to receive the newsletter on the 1st of each the month.
In stitch showcase 1 Tags Stitch Showcase, Line Stitch
Comment
An image of rows of black embroidery line stitches on calico fabric. Overlaid is a blue square with white text saying - stitch showcase, double whipped running stitch, www.embellishedelephant.co.uk

Stitch Showcase: Double Whipped Running Stitch

December 16, 2020

This stitch uses running stitch as the foundation, then two threads are woven in and out of the foundation to create a chain-like effect.

  • Start by stitching running stitch along the full length of the line you want to embroider

  • To add the ‘whipped’ detail, bring the needle up at the end of the last running stitch (A)

  • Pass the needle under the first stitch (B)

  • Pass it under the next running stitch in the same direction as the first

  • Repeat this process until you get to the end of the row of running stitches

  • Then work on creating the second ‘whipped’ thread starting in the same point (A)

  • For the second pass the thread will be passed under the running stitch in the opposite direction to the first eg if the first thread went from B to C the second thread will go from C to B

  • Each thread will create a wave pattern - the whipped threads can be pulled tighter or left looser as a wave.

4.png

In the example below the final row of stitching is double whipped running stitch, you can see the two ‘whipped’ strands cross over just under the running stitch, it is this that gives the appearance of a chain.

Want to try this stitch? It’s one I suggest in my embellished bauble kit, which is released each Christmas.

IMG_6450.jpg

Enjoyed this blog post? I share embroidery tips and a free embroidery pattern in my monthly newsletter. Sign up here to receive the newsletter on the 1st of each the month.
In stitch showcase 1 Tags Stitch Showcase, Line Stitch
Comment
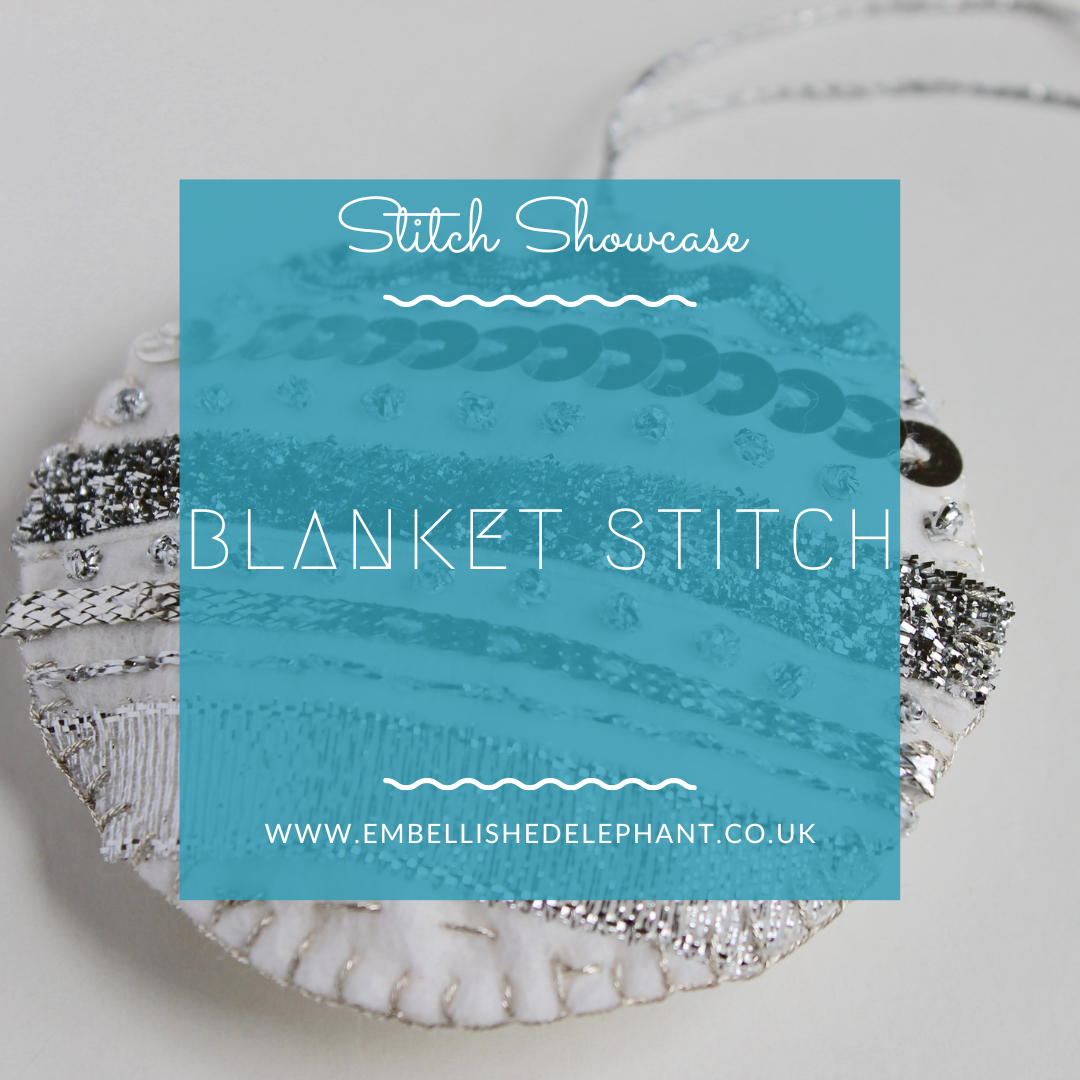
An image of an embroidered bauble in white and silver. Overlaid is a blue square with white text saying - stitch showcase, blanket stitch, www.embellishedelephant.co.uk

Stitch Showcase: Blanket Stitch

December 16, 2020

Blanket stitch is most frequently used as an edging stitch because when stitched carefully it can look identical on both the right and wrong side. It is normally used on fabrics that don’t fray very much such as felt or blankets. As an edging stitch it can be the foundation for a further decoration such as a crochet border. It can also be worked flat as a decorative stitch.

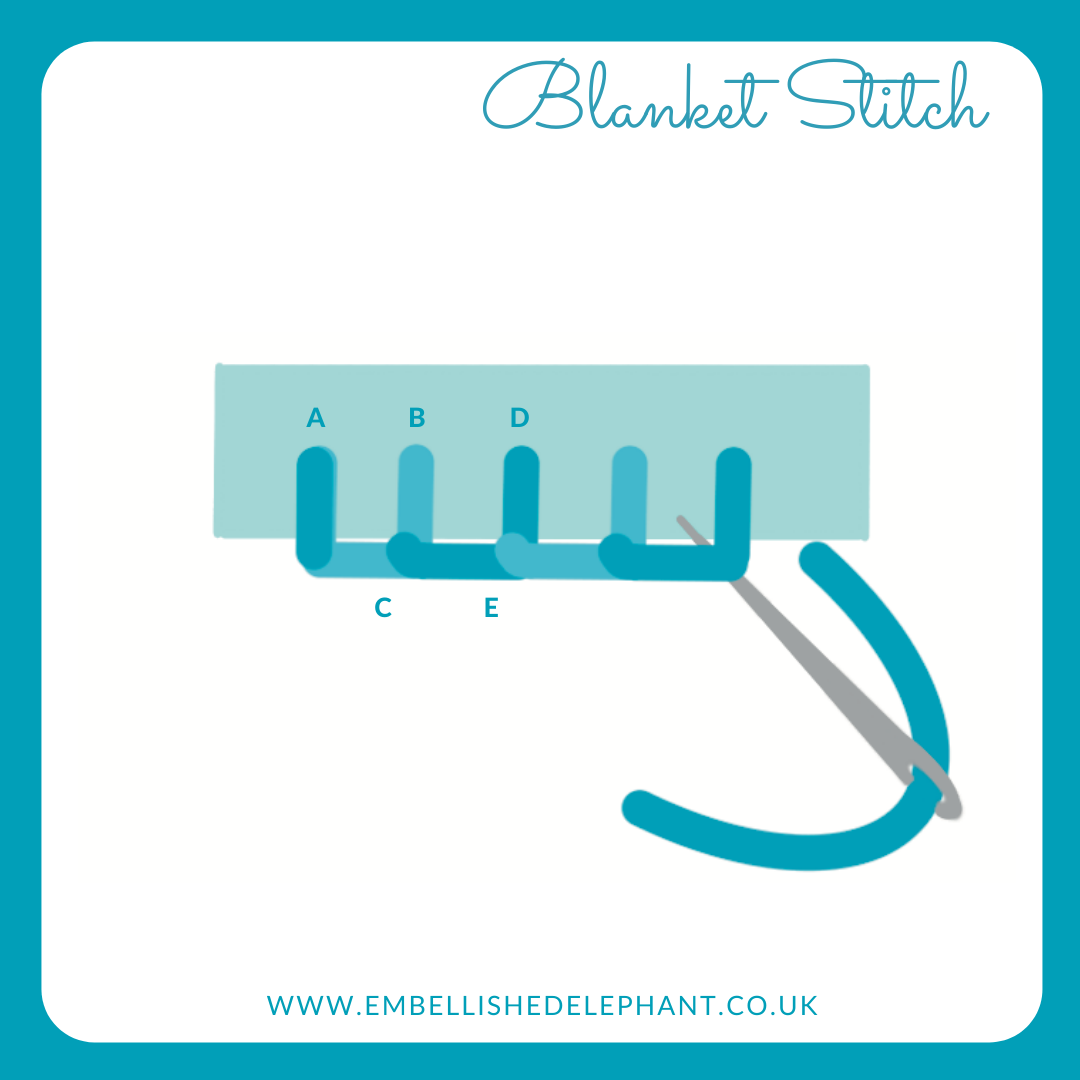
  • Start by pushing the needle from the back to the front of the fabric, then bring the needle over the top of the edge and through the fabric from back to front again (A)

  • Bring the needle through the same hole (A) from back to front. Pass the needle under the thread from the first stitch

  • Bring the needle through the fabric (B) from back to front.

  • There will be a little loop lying on the top edge of the fabric. Pass the needle under this loop (C)

  • Repeat the action of taking the needle over the top of the edge and push from back to front, catching the loop each time. You will start to see a bar of thread over the edge.

  • For the neatest blanket stitch look at where you are pushing the needle through from the back as well as where it appears at the front.

An illustration of how to create blanket stitch in shades of blues and grey on a white background

As well as a flat edge, blanket stitch can also be used on a soft sculpture to join different pieces. To get the neatest finish I find that stitching the stitches the same distance apart as depth from the edge eg 2mm down from the edge and stitches 2mm apart.

Want to try this stitch? It’s suggested as part of the embellished bauble kit that is available at Christmas.

Enjoyed this blog post? I share embroidery tips and a free embroidery pattern in my monthly newsletter. Sign up here to receive the newsletter on the 1st of each the month.
In stitch showcase 1 Tags Stitch Showcase, Line Stitch
Comment
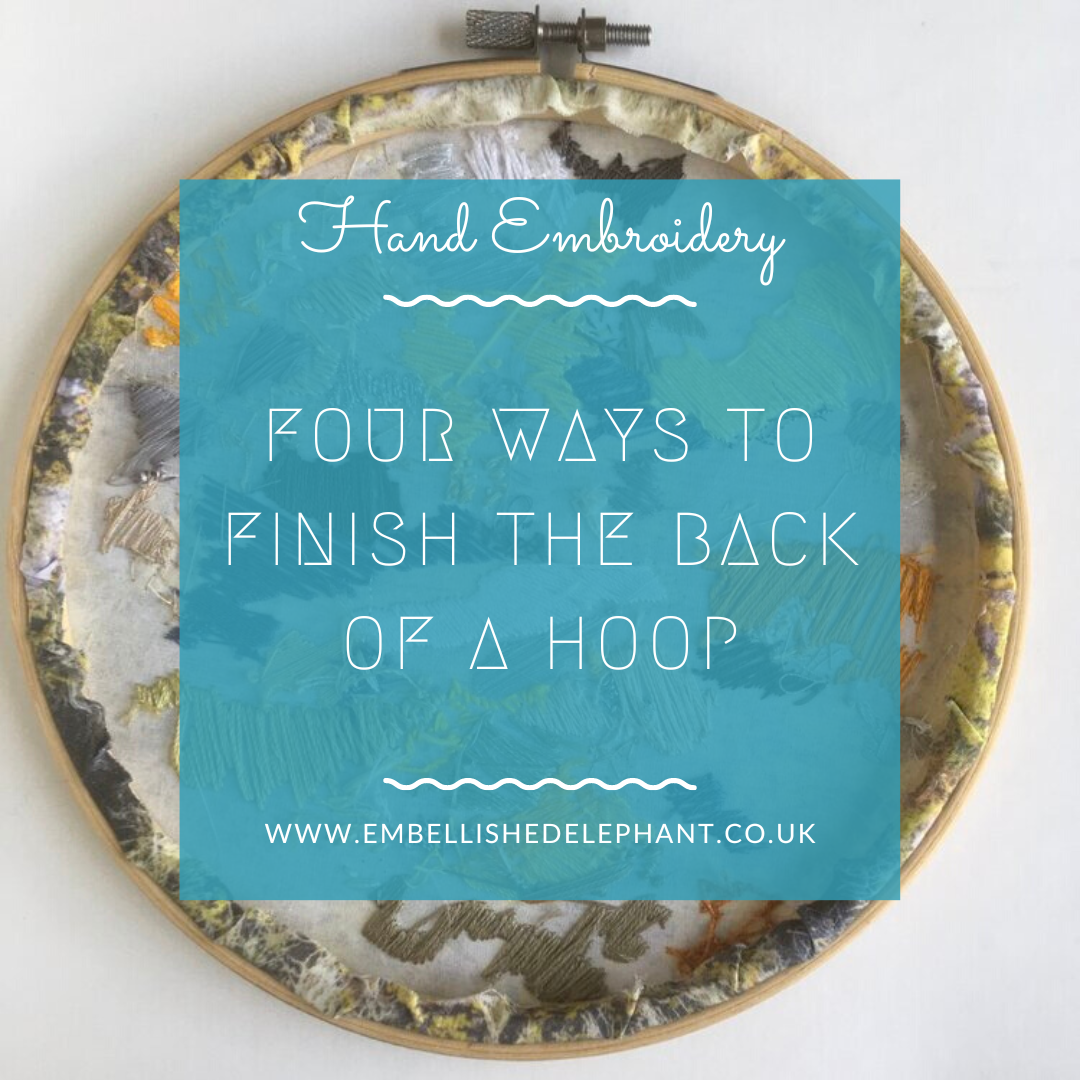
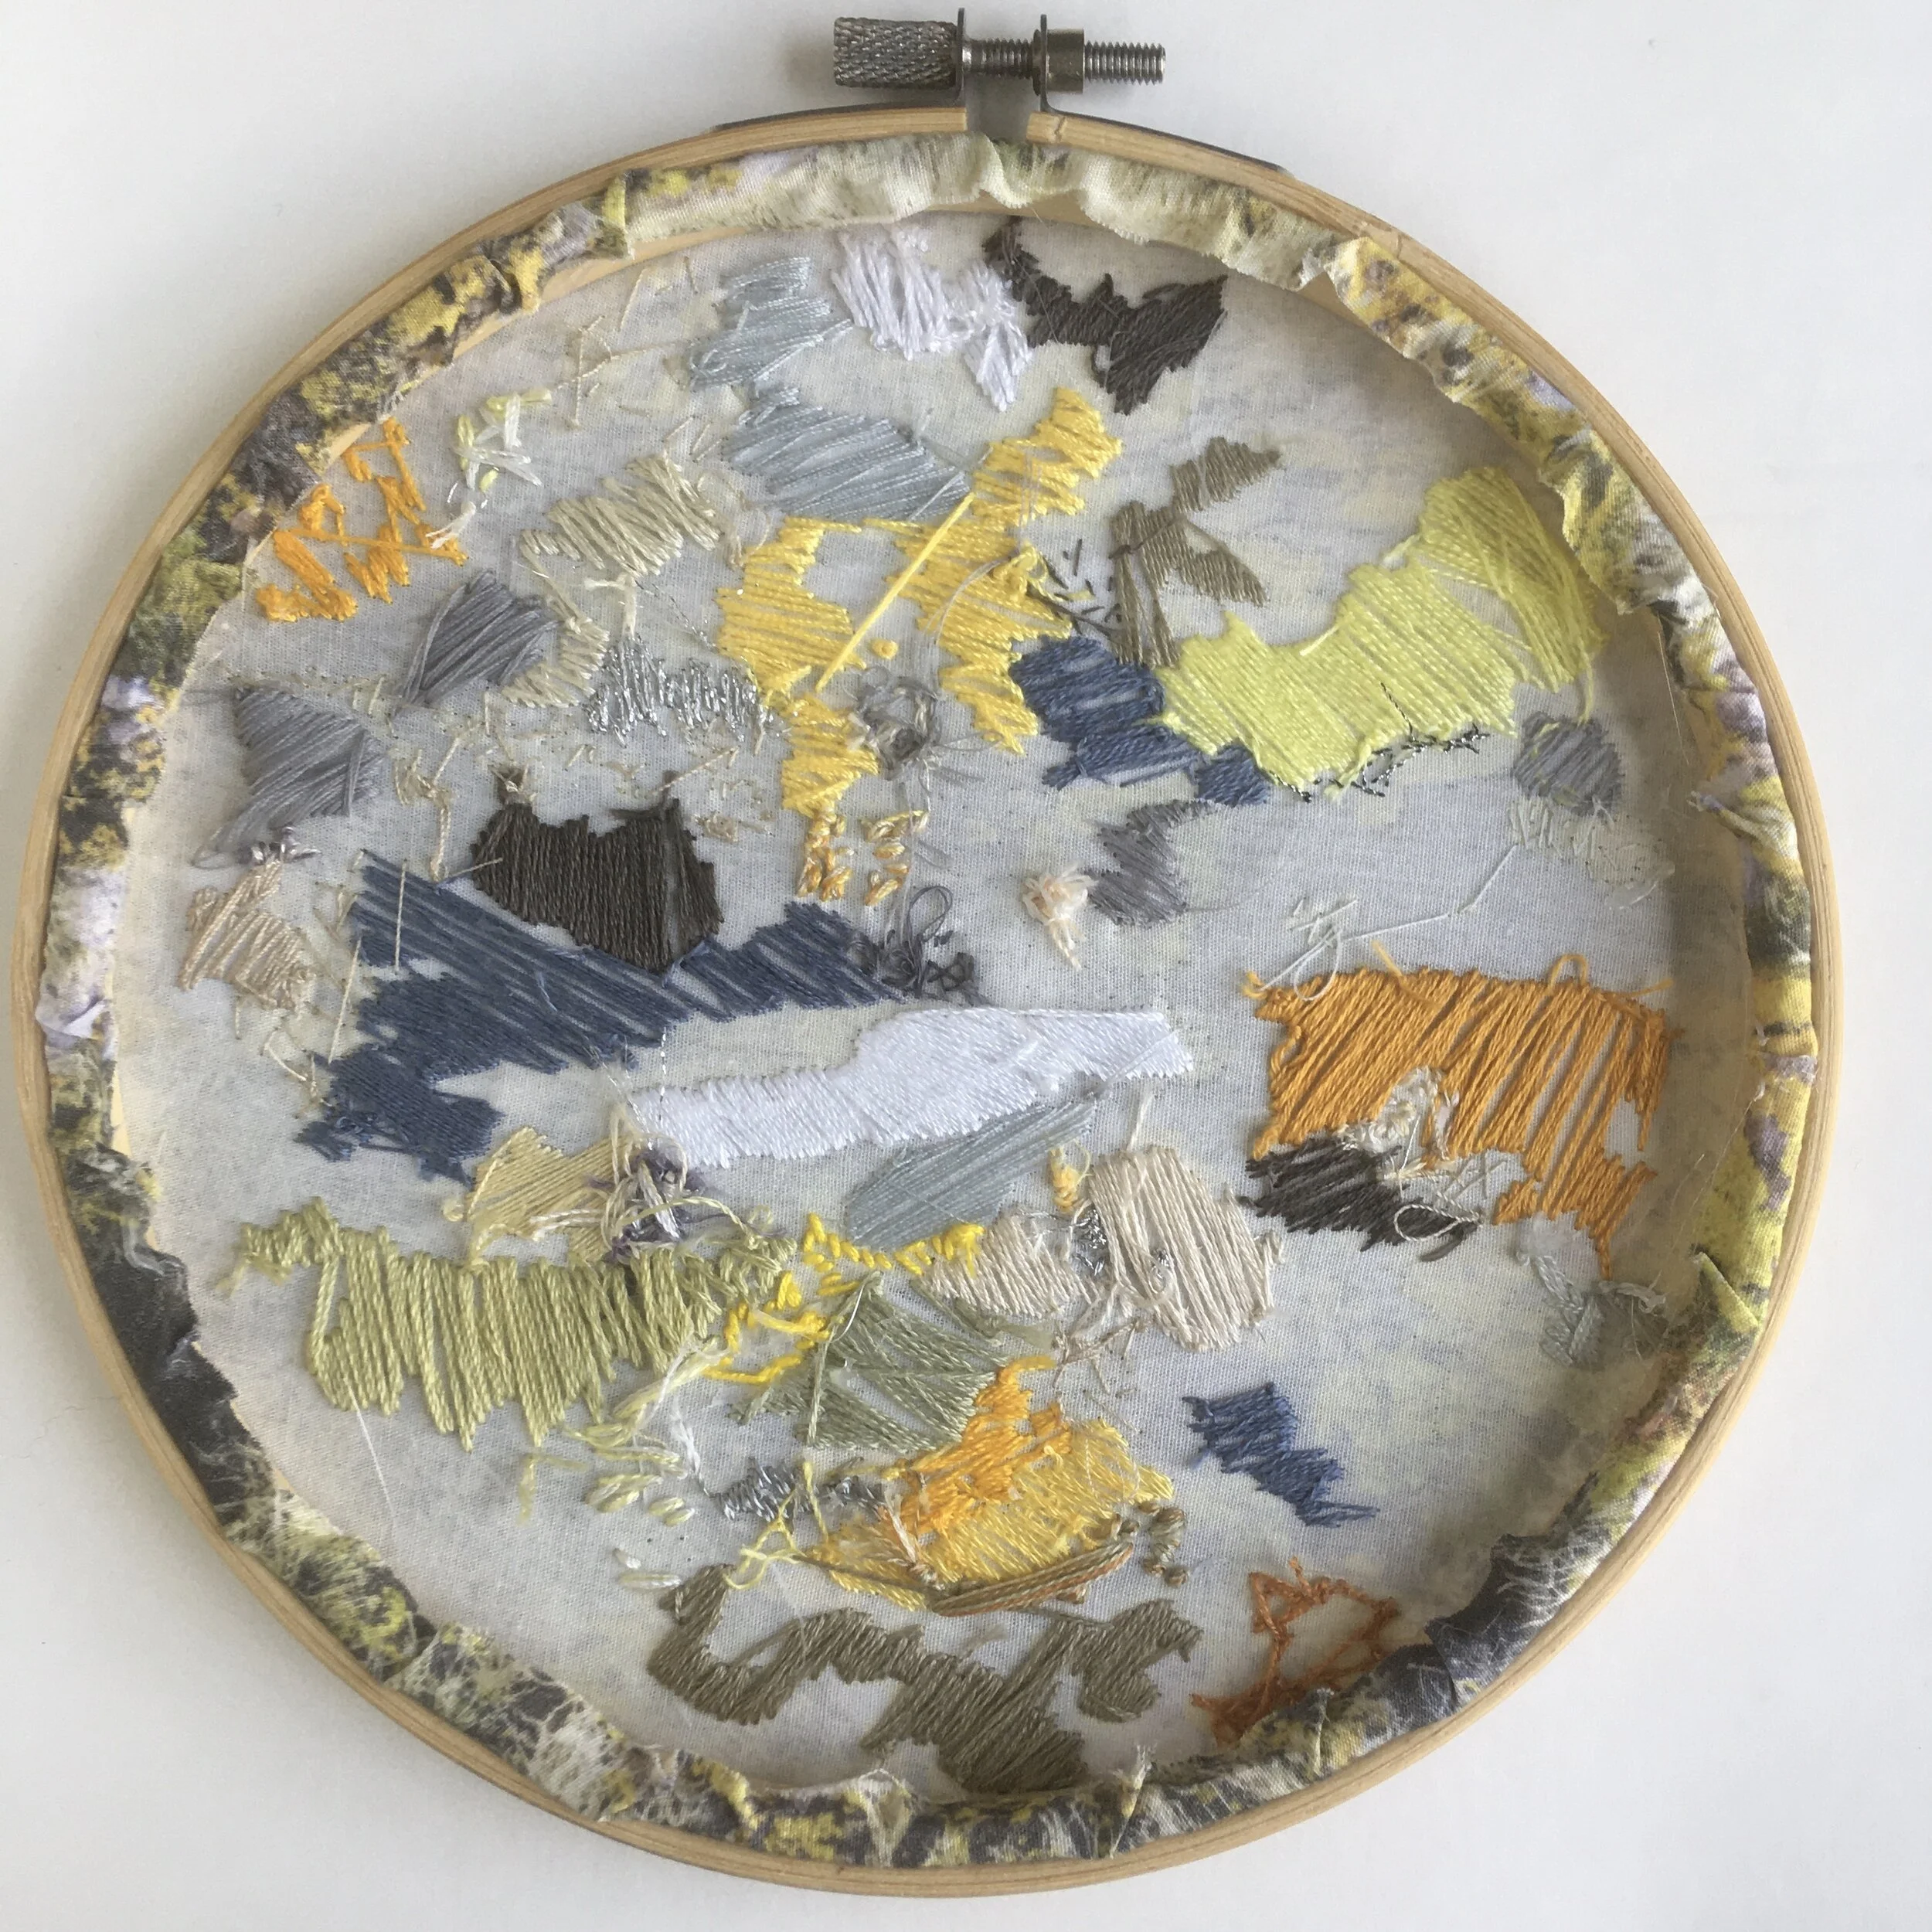
A picture of the back of an embroidery hoop where the fabric has been glued to the hoop. Overlaid is a blue square with white text saying - hand embroidery, four ways to finish the back of a hoop, www.embellishedelephant.co.uk

4 ways to finish the back of embroidery hoops

December 12, 2020

You’ve stitched your piece and you want to proudly hang it in a hoop on the wall. But for it to lie flat on the wall you need to finish off the back of the hoop.

There are several different ways to do this:

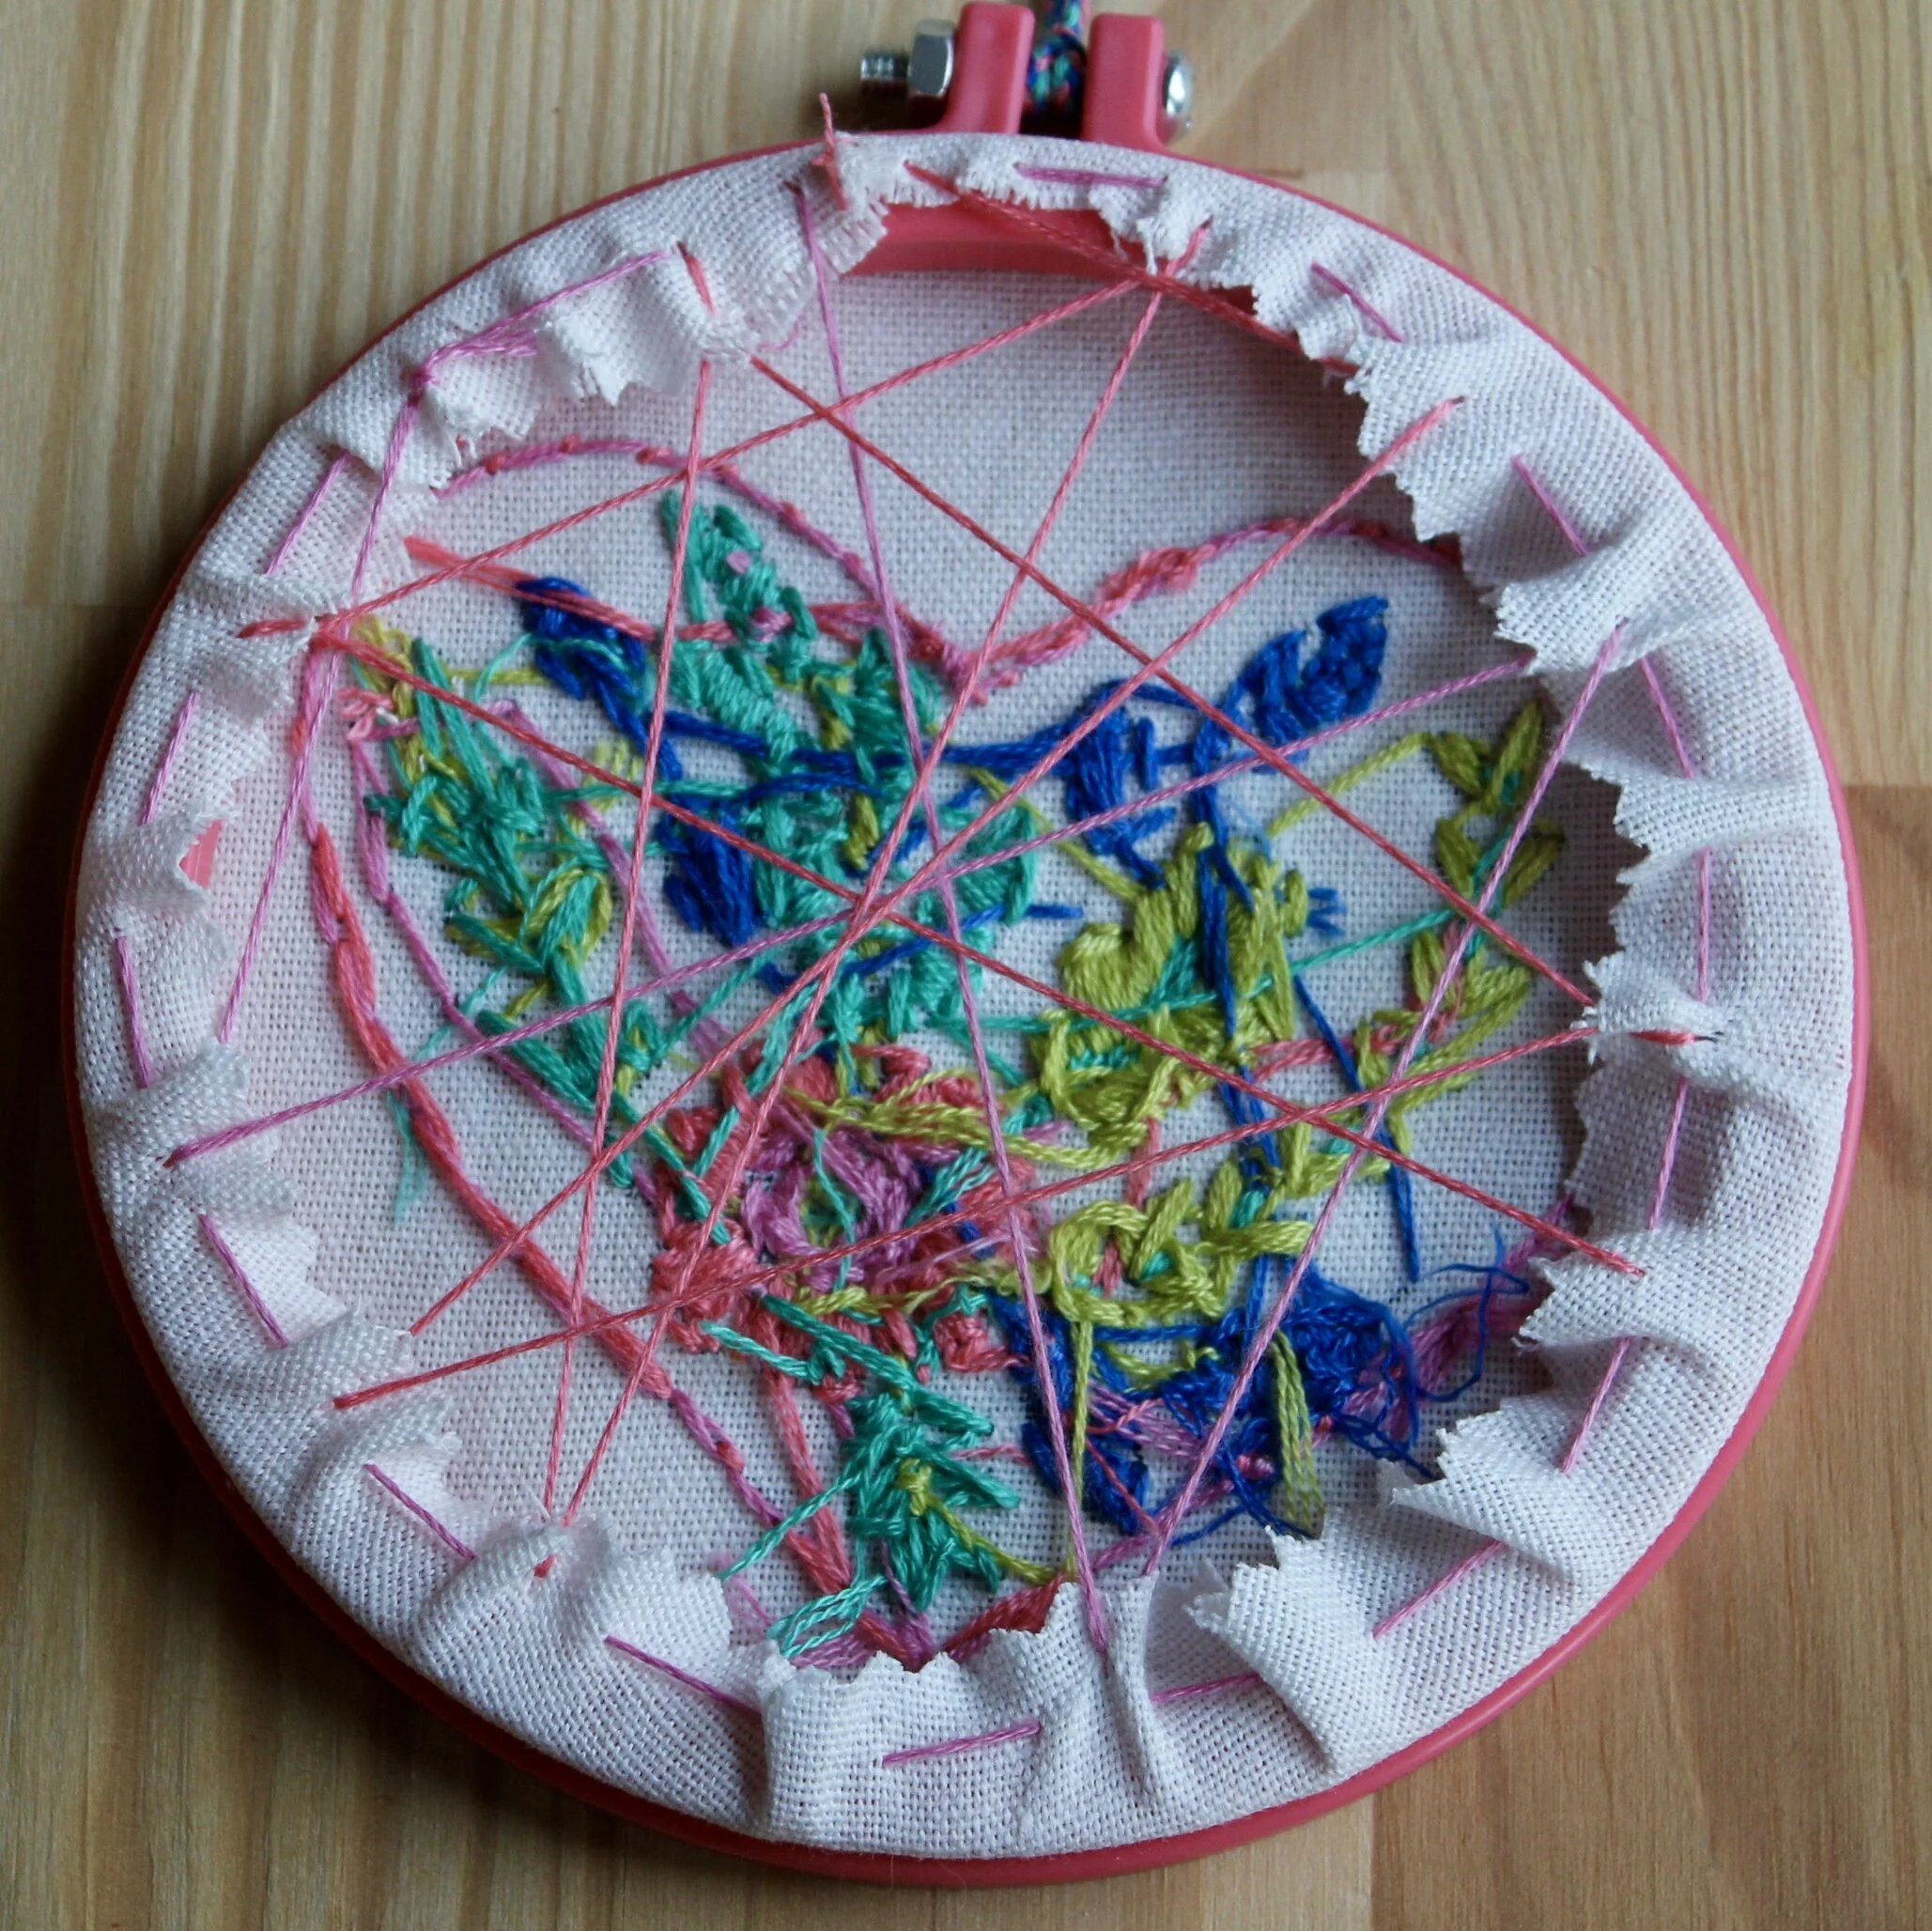
A picture of an embroidery hoop with fabric glued to the hoop to finish the back of the hoop

1. Glue

This is great if you know you don’t want to use the hoop for another purpose at a later date and perfect if you’ve not got enough fabric to gather. Just get your glue gun out and work round the hoop section by section

A picture showing an embroidery hoop by finished by gathering fabric using running stitches

2. Gathering

The easiest non-permanent way to finish a hoop by stitching around the edge of the fabric at the back of the hoop and gently pulling the threads to tighten the edges. Just use a large running stitch round the edge of the fabric and gently pul until the fabric has gathered. You can get an even flatter finish if you criss-cross the threads at tension across the back of the hoop as well.

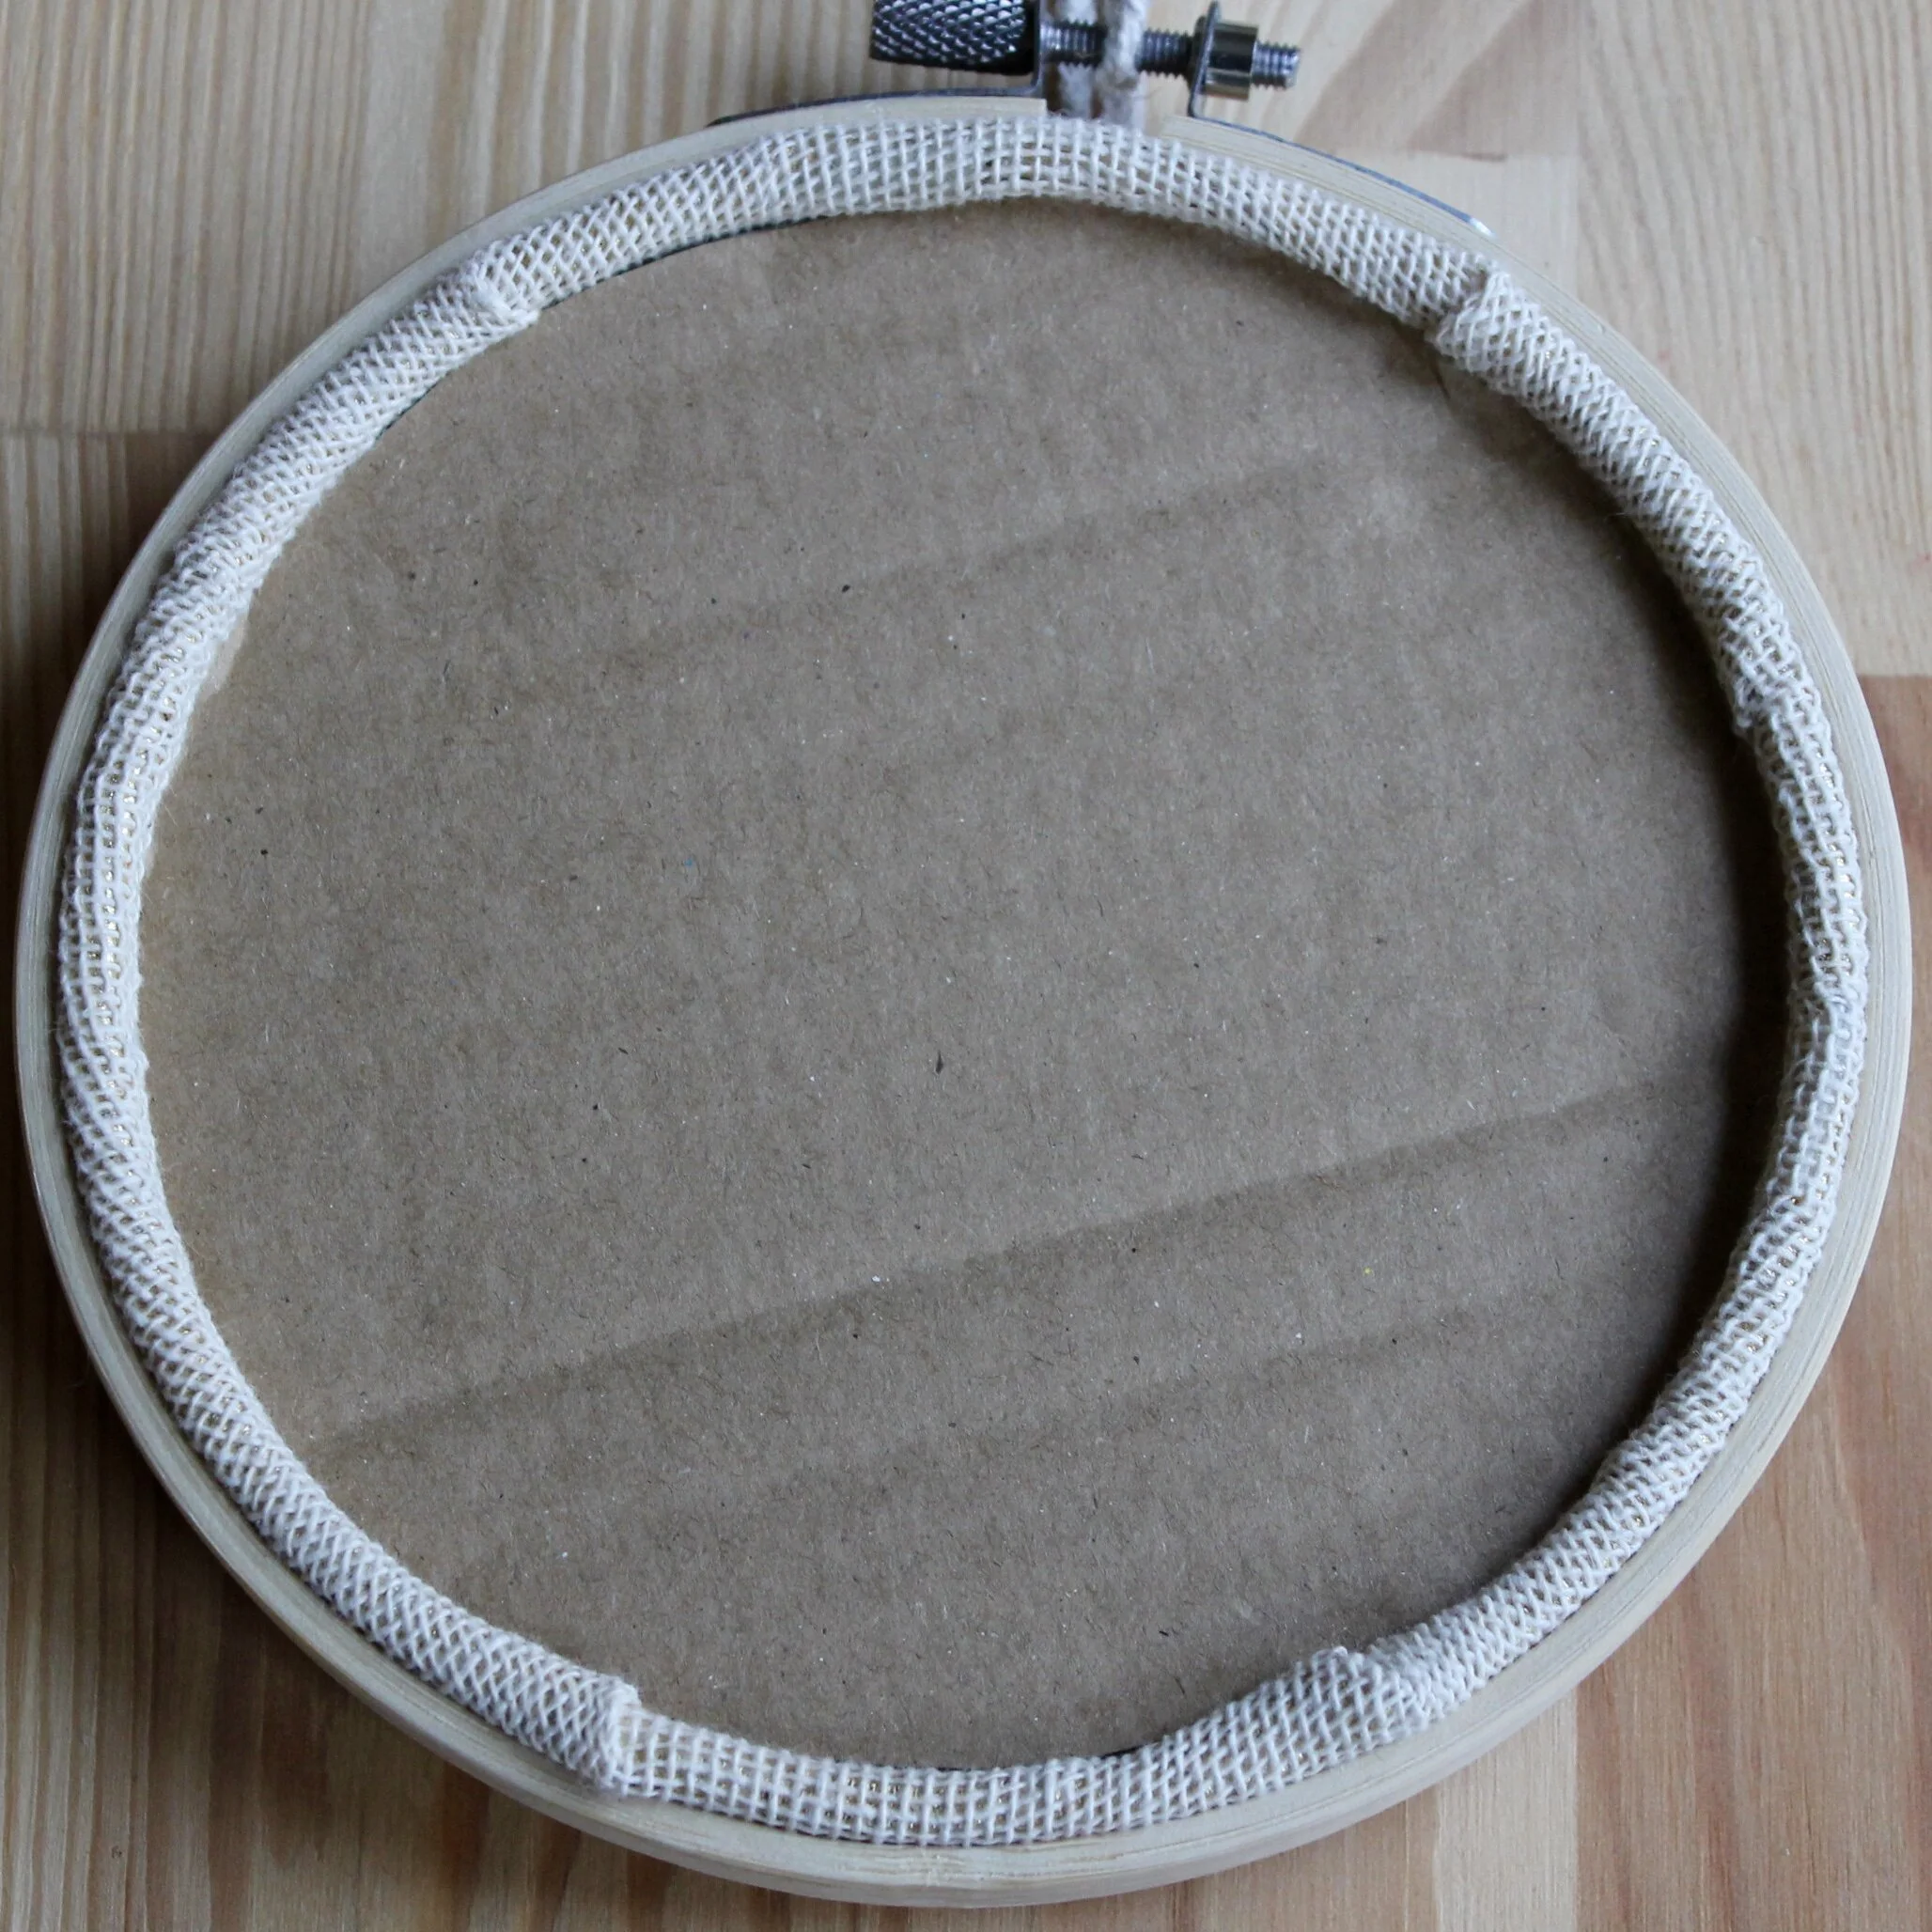
A picture of an embroidery hoop finished using a cardboard circle

3. Cardboard

This is my current favourite as it is so simple, works best if you’ve already gathered the lose fabric although you can sometimes get away with not having done this. Just draw round the inner hoop on a bit of cardboard and cut it out inside the line, trimming by a small amount if the card board still doesn’t fit

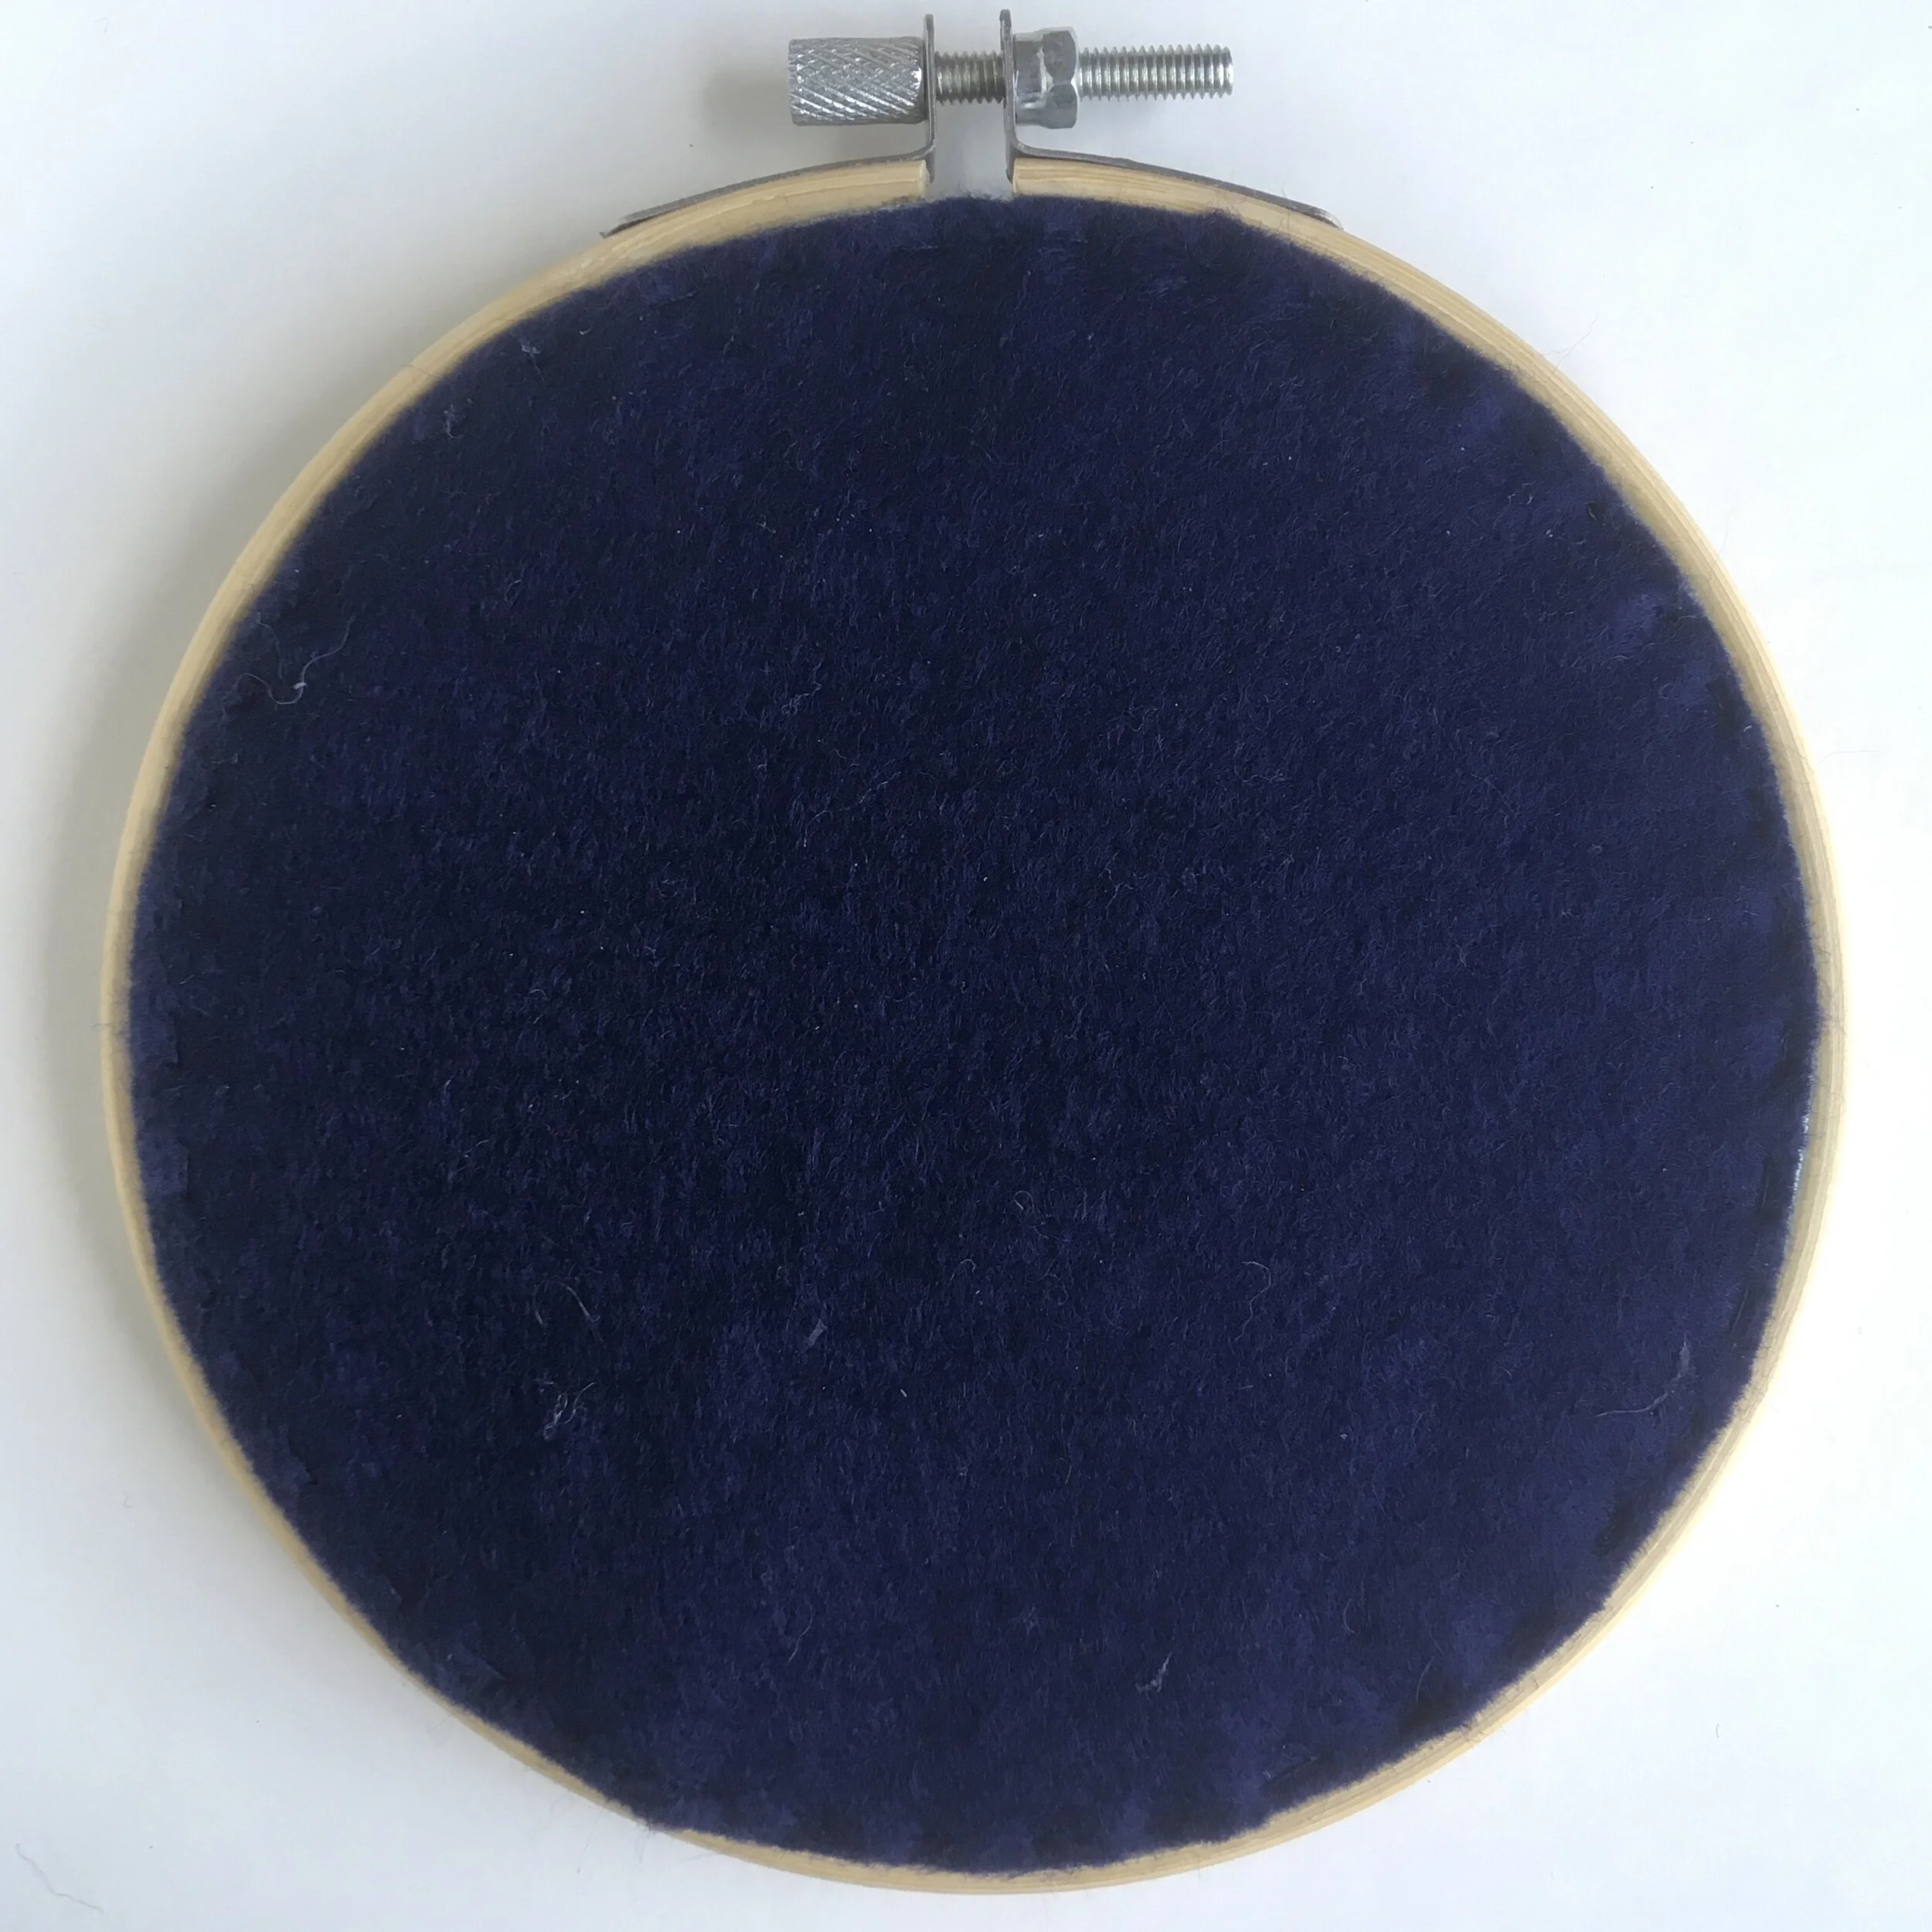
A picture of the back of an embroidery hoop finished off by stitching fabric over the back of the hoop

4. Felt

This gives the most professional finish again you need to gather the fabric first before carefully stitching the felt on to the fabric. Draw round the inner hoop on the felt and then attach with either running stitch or blanket stitch

Enjoyed this blog post? I share embroidery tips and a free embroidery pattern in my monthly newsletter. Sign up here to receive the newsletter on the 1st of each the month.
In tips 2 Tags Hoops, Finishing, Basics
Comment
A picture of brick stitch in three different blue threads. Overlaid is a blue square with white text saying - stitch showcase, brick stitch, www.embellishedelephant.co.uk

Stitch Showcase: Brick Stitch

December 9, 2020

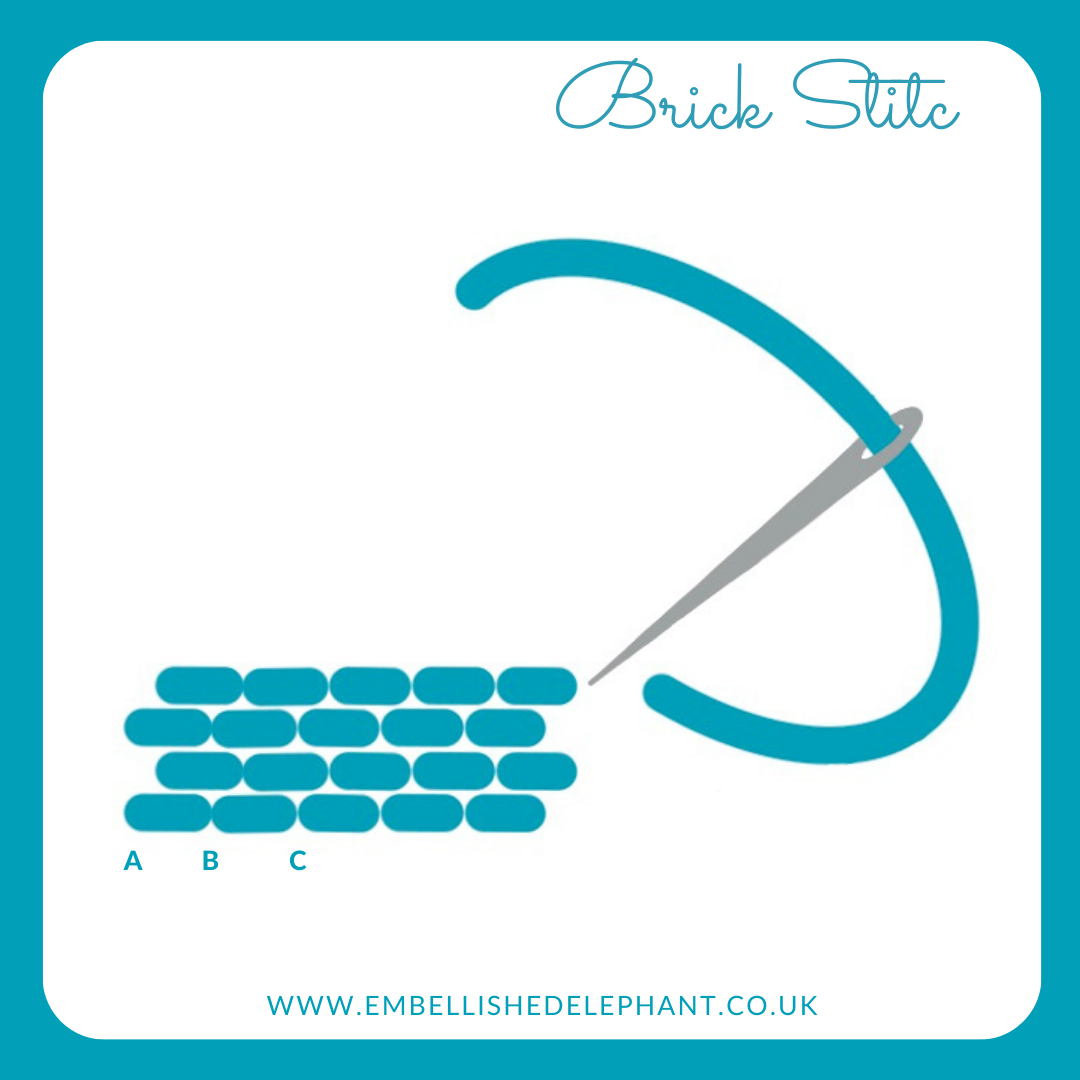
Brick stitch is simply rows of back stitch next to each other and staggered, like bricks in the wall.

  • Start by creating a row of backstitch (see here for a tutorial on backstitch)

  • To create the next row, start the stitch about half way along the first (B)

  • Complete the stitch, making sure the length of the stitch is consistent with the previous row (A)

  • Create the next stitch again about halfway along the row above (C) and complete the stitch (B)

An illustration showing how to create brick stitch. The illustration is in blue on a white background.

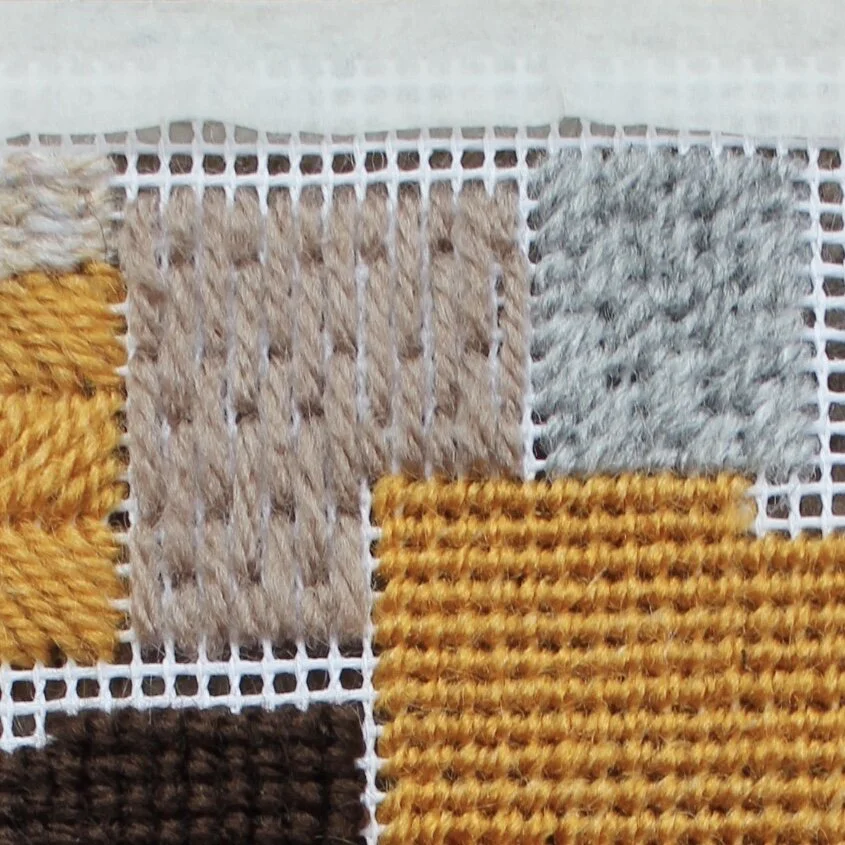
This canvas work sampler shows tow different examples of brick stitches, the light brown shows a block of bricks using longer stitches. Whilst the grey section the bricks are stitched in a diagonal direction.

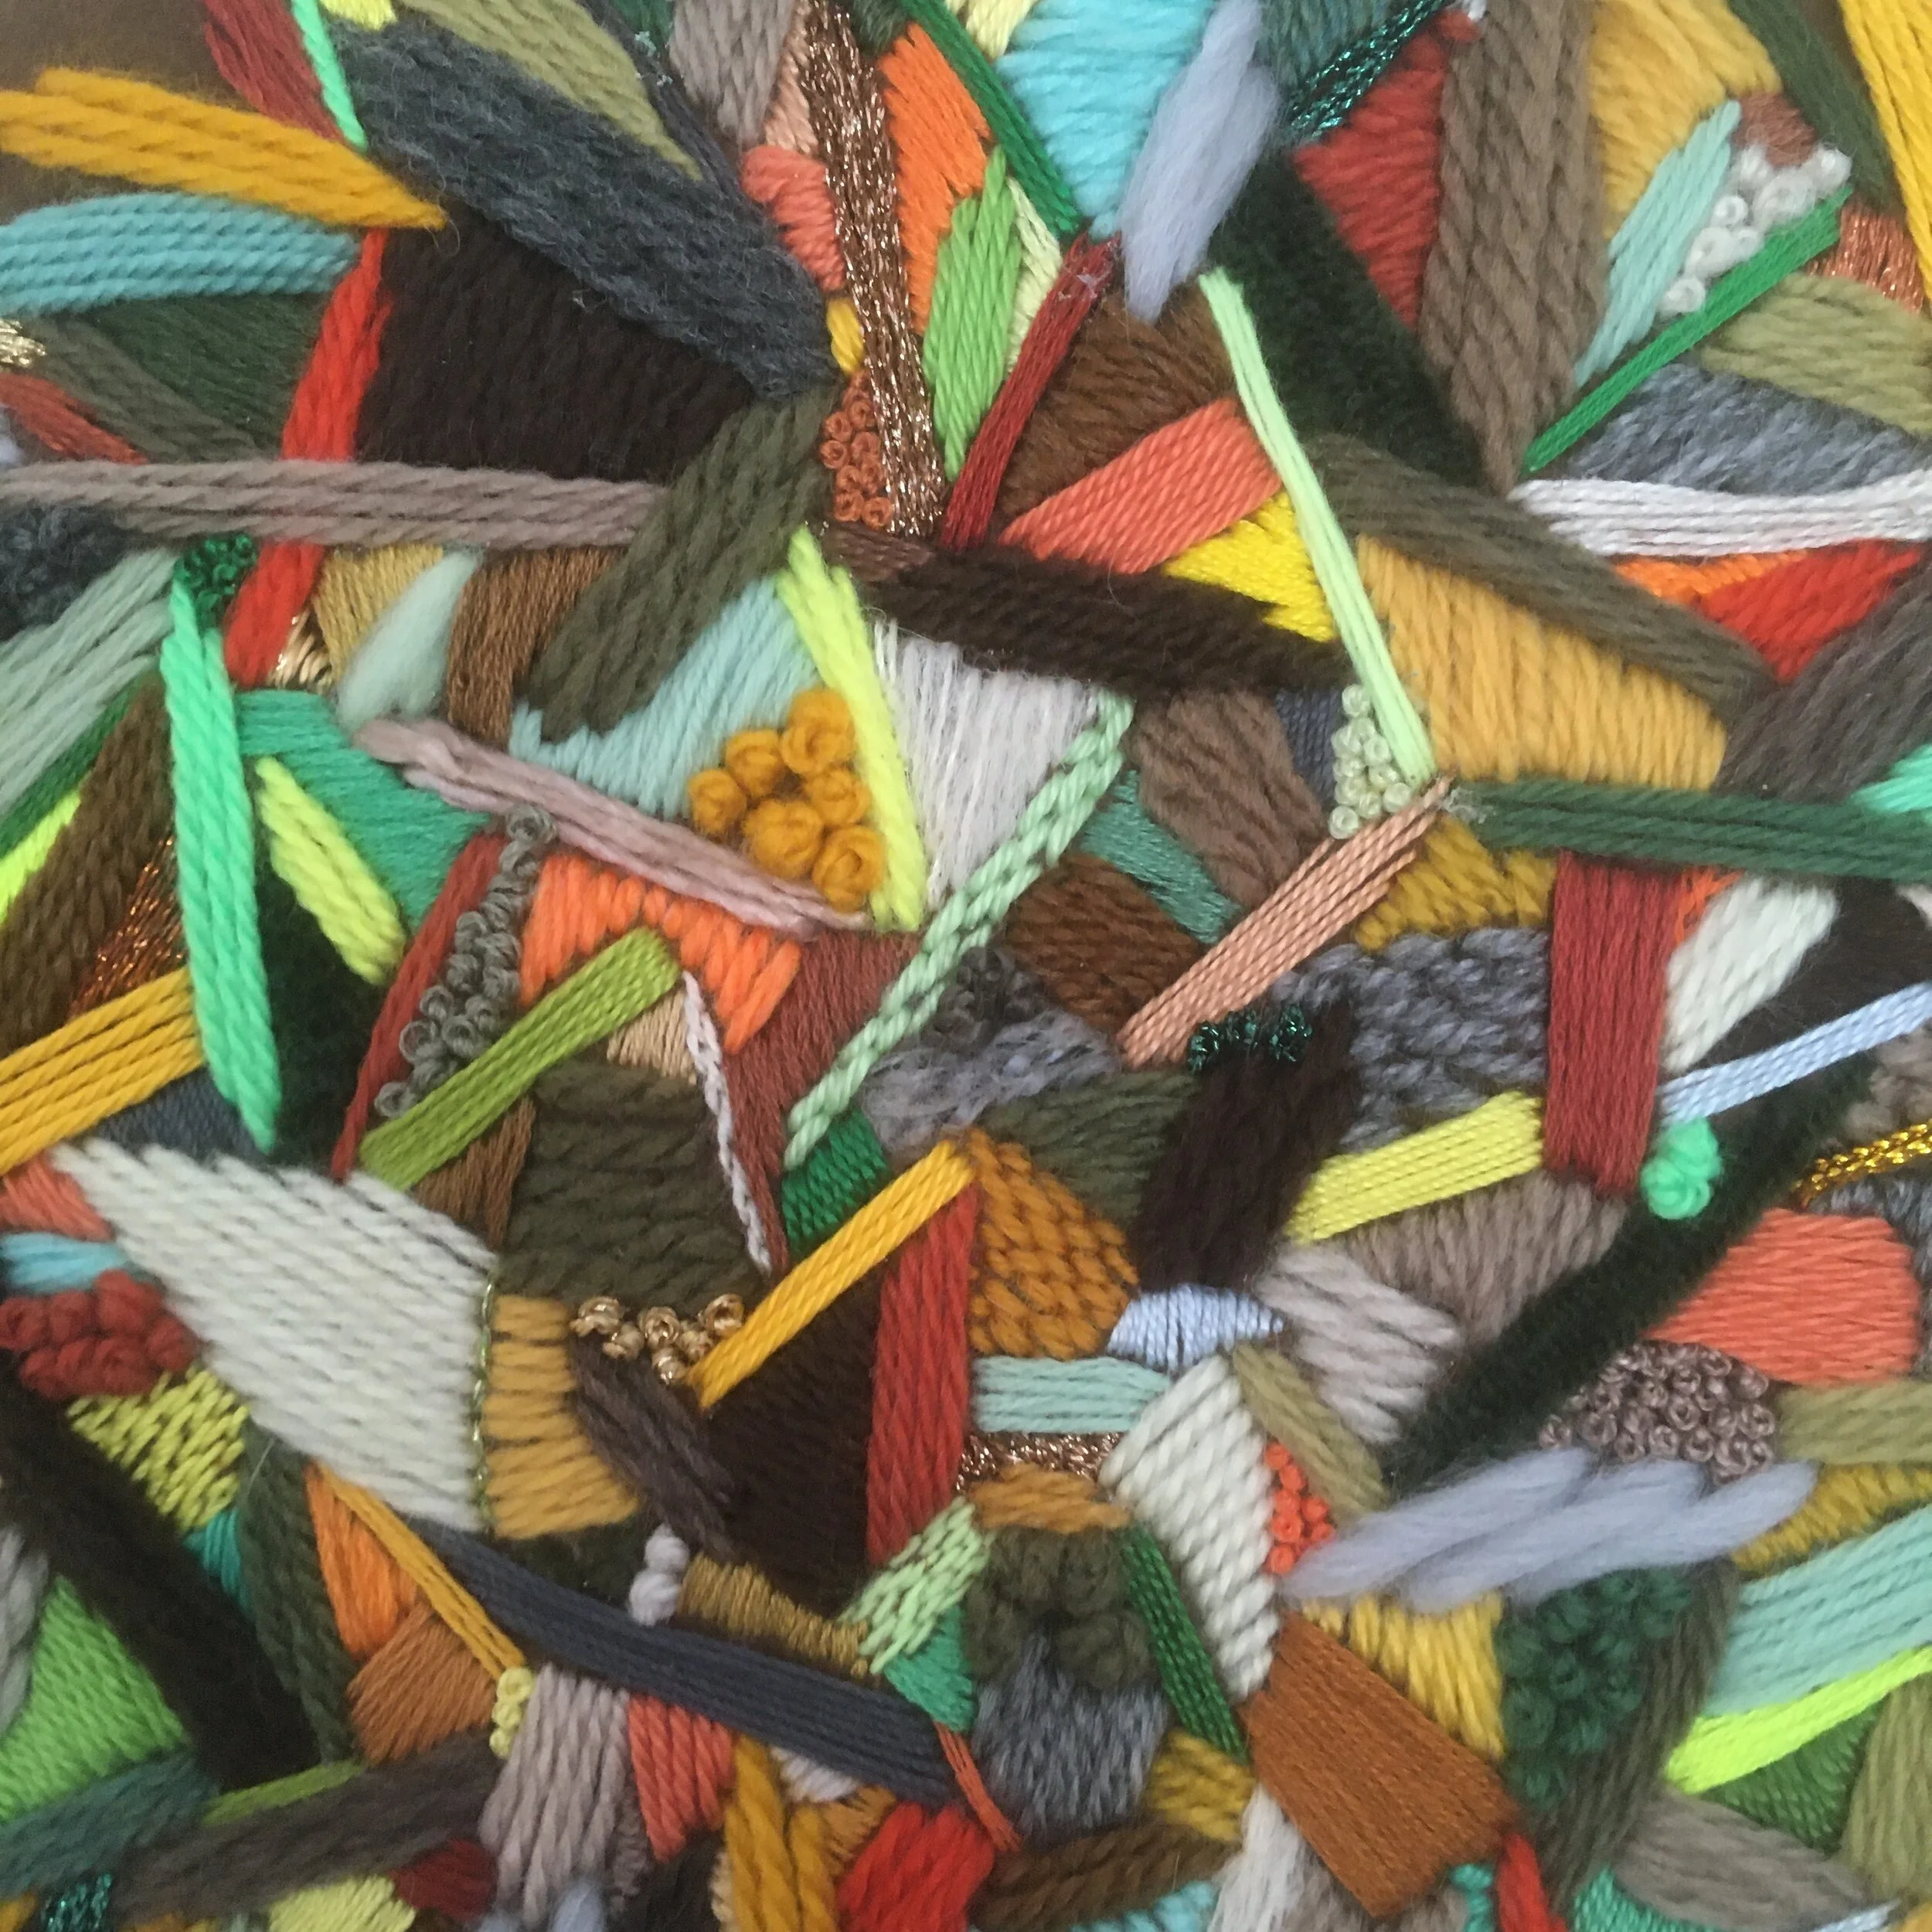
The close up of one of my intuitive embroidery pieces shows two further examples of brick stitch. Can you spot them? A light green section in the centre of the photo shows three long, thin rows, whilst just below this there is a mustard coloured triangular section where brick stitch is used more as a filling stitch.

Want to try this stitch? It’s one I suggest as part of my monstera kit.

A picture of a canvas work stitch sampler showing different canvas work stitches in shades of brown and yellow yarn
A close up image of a modern embroidery in autumnal tones using a range of embroidery stitches

Enjoyed this blog post? I share embroidery tips and a free embroidery pattern in my monthly newsletter. Sign up here to receive the newsletter on the 1st of each the month.

In stitch showcase 1 Tags Stitch Showcase, Line Stitch, Filling Stitch
Comment
An image of green felt monstera leaves on a calico background. Each leaf is embroidered in light green thread with stem stitch. Overlaid is a blue square with white text saying - stitch showcase, stem stitch, www.embellishedelephant.co.uk

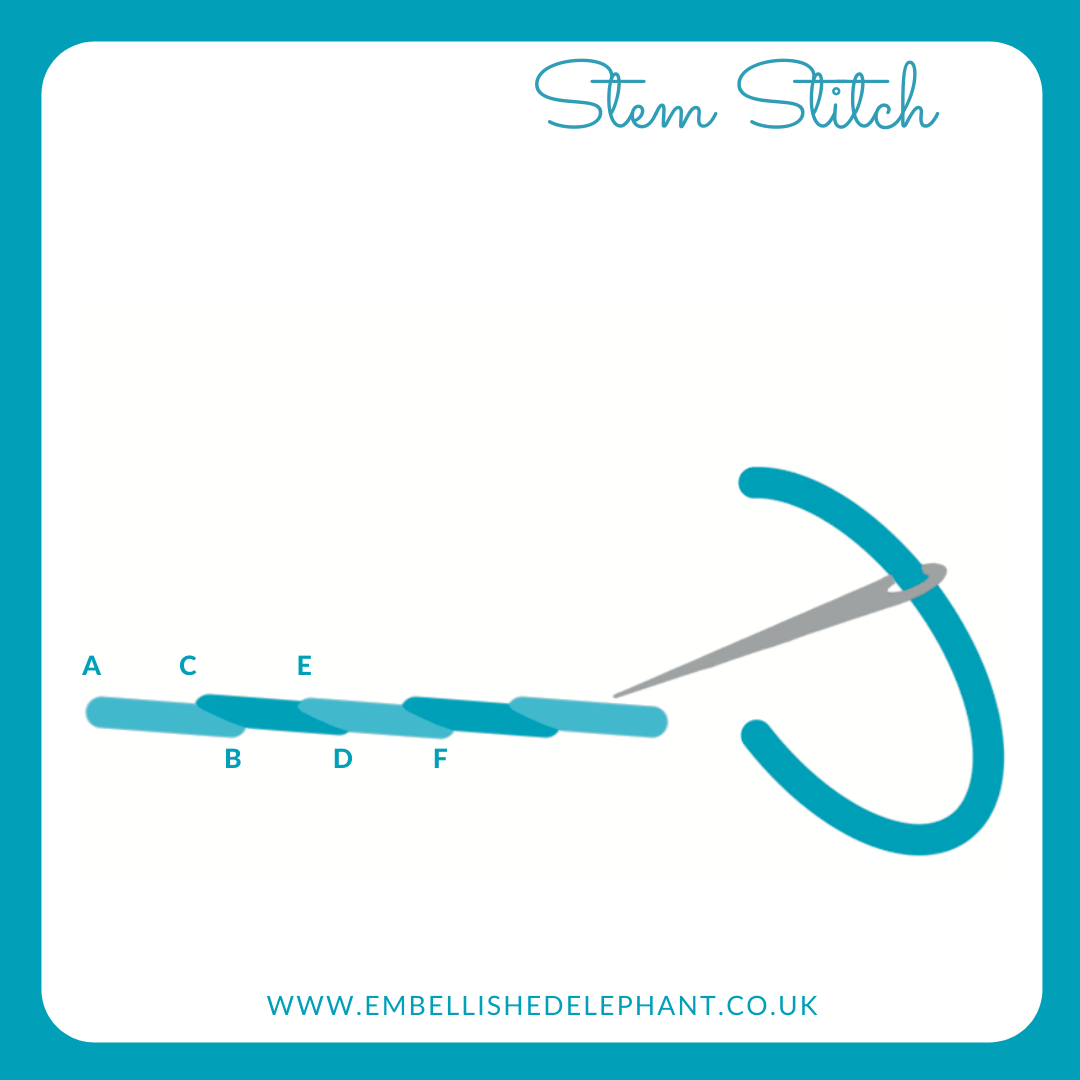
Stitch Showcase: Stem Stitch

December 2, 2020

For a long time I didn’t really bother with stem stitch, I preferred using plain old backstitch or occasionally split stitch but I gave it another go recently and it’s grown on me, but I have to admit I only really use it when stitching plants! This is basically a back stitch but with the point at which we start the next stitch in the sequence altered.

  • Bring the needle up through the fabric

  • Take the needle down through fabric about 5mm along, but don't pull the thread completely through - leave a small loop.

  • Bring the needle back up equal distance from each end of the stitch and in line with each hole. Gently pull through the loop until the stitch lies flat on the felt.

  • Create another stitch a few millimetres along so that the total stitch length from start to finish is the same as your first stitch. Again create a loop and push the needle back through in between and in line with the previous holes

  • It is important that each time you bring the needle back up you keep the loop of thread on the same side of the needle to create the wrapped effect of stem stitch.

An illustration of how to create stem stitch in embroidery. The illustration is in shades of blue and grey on a white background.

The leaves in the header picture show that varying the number of threads for different parts of leaf stems gives strong centre vein but the rest of the leaf has a more delicate look.

Want to try this stitch? It’s a stitch I suggest using in my monstera kit, flamingo flower kit, floral sampler and sunflower sampler.

Enjoyed this blog post? I share embroidery tips and a free embroidery pattern in my monthly newsletter. Sign up here to receive the newsletter on the 1st of each the month.
In stitch showcase 1 Tags Stitch Showcase, Line Stitch
Comment
← Newer Posts Older Posts →
No results found

Tags

  • Artists/Designers
  • Basics
  • Christmas
  • colour
  • Couching Stitch
  • Fabric
  • Filling Stitch
  • Finishing
  • Hoops
  • Isolated Stitch
  • Line Stitch
  • London
  • My Makes
  • Needles
  • Raised Stitch
  • Stitch Showcase
  • Texture Stitch
  • Thread
  • Transfer
  • Travel

Latest Posts

Featured
June 1, 2026
Focus on knots
June 1, 2026
June 1, 2026
May 1, 2026
Focus on stranded floss
May 1, 2026
May 1, 2026
April 1, 2026
Focus on raised stitches
April 1, 2026
April 1, 2026
February 15, 2026
Tips for unpicking thread tangles
February 15, 2026
February 15, 2026
February 1, 2026
How to add elements to a basic embroidery pattern
February 1, 2026
February 1, 2026
December 1, 2025
Using yarn in embroidery
December 1, 2025
December 1, 2025
November 1, 2025
What can you learn from vintage embroidery books
November 1, 2025
November 1, 2025
September 1, 2025
What is the difference between cross stitch and embroidery?
September 1, 2025
September 1, 2025
July 1, 2025
How to make time for embroidery
July 1, 2025
July 1, 2025
June 1, 2025
What is stranded embroidery thread?
June 1, 2025
June 1, 2025

Home — Shop — Stockists — Wholesale — Portfolio — Contact — Reviews — Policies — FAQs